Crochet skull caps can range from close-fitting open mesh to dense winter ribbing, so choosing one is about much more than picking a color. Some designs build outward from the crown, others begin as ribbed rectangles, and several use motifs, post stitches, cables, or open spaces to completely change the finished fabric.

These 18 crochet skull cap ideas focus on those meaningful differences. You’ll find streamlined fitted hats, airy warm-weather options, chunky winter caps, granny construction, slouchier silhouettes, and decorative textures. Along the way, the fit, crown shape, stretch, fabric density, and construction notes can help you decide which direction makes sense before committing yarn to a project.
Quick List
- Crochet Open-Mesh Skull Cap
- Crochet Granny Square Skull Cap
- Crochet No-Bunch Ribbed Skull Cap
- Crochet Cat-Ear Skull Cap
- Crochet Spiral-Crown Skull Cap
- Crochet Netted Summer Skull Cap
- Crochet Classic Close-Fit Skull Cap
- Crochet Crunch-Texture Skull Cap
- Crochet Multi-Size Ribbed Skull Cap
- Crochet Slip-Stitch Knit-Look Skull Cap
- Crochet V-Stitch Slouch Skull Cap
- Crochet Top-Down Everyday Skull Cap
- Crochet Straightforward Everyday Skull Cap
- Crochet Bobble-and-Cable Skull Cap
- Crochet Classic Winter Skull Cap
- Crochet Zigzag-Line Skull Cap
- Crochet Camel-Stitch Spiral Skull Cap
- Crochet Chunky Knit-Look Skull Cap
Decide How Close You Want the Skull Cap to Fit
A skull cap usually looks most intentional when its circumference, depth, and stretch work together. A dense fabric with little give may need different fit planning from deep ribbing or open mesh, so head circumference alone does not tell the whole story. Check how the selected tutorial handles sizing rather than applying one universal amount of negative ease.
Depth is just as important. A short crown creates a closer skull-cap profile, while extra vertical length can push the same construction toward a standard or slouchy beanie. Before finishing, compare the hat against the intended wearer and notice where the lower edge sits around the ears and forehead. For motif or side-to-side constructions, measure the fabric after it settles into its finished shape before assuming the initial dimensions will behave the same way.
Construction Changes the Crown More Than It Seems
Top-down hats let the crown establish the overall diameter before the sides extend downward. Side-to-side ribbed hats take a different route: a flat panel is joined and the top is closed afterward. That can create a strong vertical ribbed effect, but crown bulk depends on how the shaping and closure are handled.
Motif-built, continuous-spiral, and brim-up hats bring other trade-offs. Granny construction turns seams and motif placement into visible design features. Continuous rounds can reduce obvious joining lines, while brim-up construction lets the lower edge establish the fit before the crown closes.
When comparing tutorials, look beyond the finished color. Decide whether you prefer a visibly shaped crown, gathered closure, uninterrupted spiral, motif seams, or a ribbed panel. Those construction choices influence the finished silhouette even when two hats appear similar from the front.
Match Fabric Density to When You Plan to Wear It
Open crochet and dense crochet behave very differently on the head. Mesh and netted fabrics allow more airflow and expose more of the hair underneath, making them visually lighter. Tight slip stitches, compact ribbing, cables, bobbles, and chunky yarn create more substantial fabric and can add noticeable thickness.
Yarn also affects the way a skull cap holds its shape. A very soft yarn may emphasize drape, while a firmer yarn can make textured stitches and crown shaping more defined. Substituting yarn successfully requires more than matching a color; compare yarn weight, elasticity, fiber behavior, and the tutorial’s gauge information when it is provided.
For a fitted cap, check the fabric after working enough of the design to judge its real stretch. A swatch or partially completed brim can reveal whether your yarn choice is producing a flexible cap or a much firmer one than expected.
Crochet Open Mesh Skull Cap
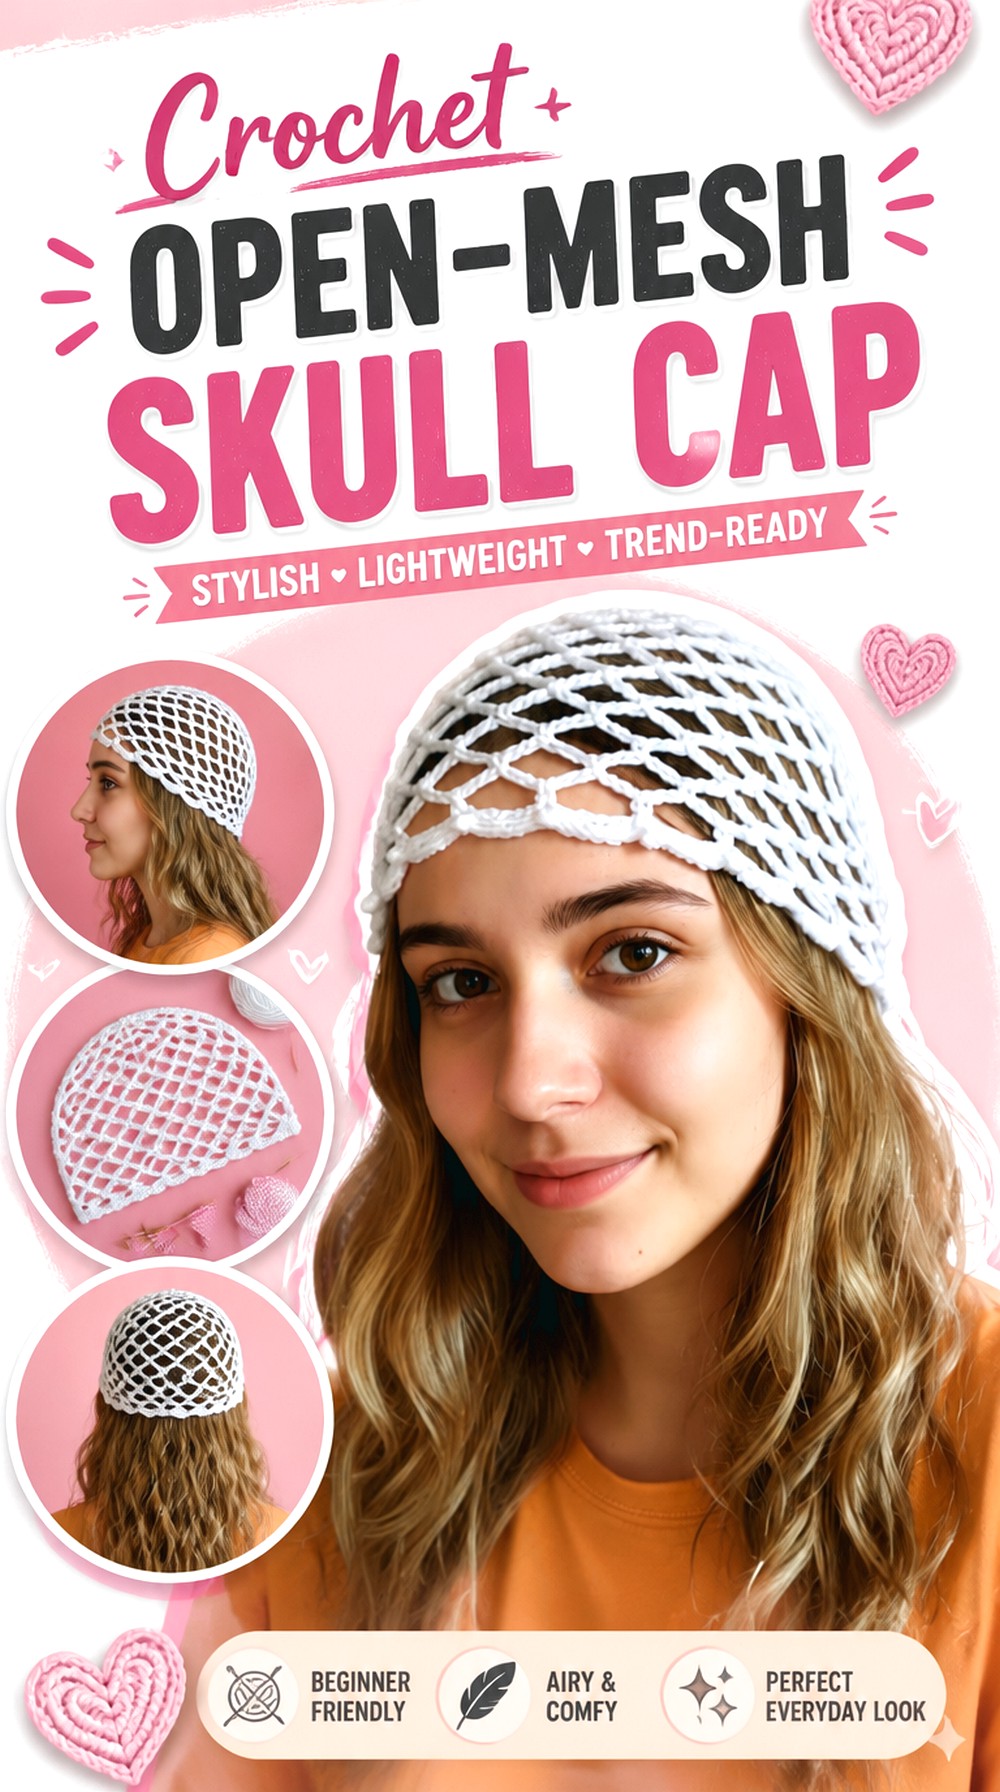
This open-mesh crochet skull cap creates one of the lightest-looking silhouettes in the collection. Instead of relying on dense ribbing or bulky texture, the fabric uses clearly visible open spaces that let the cap sit close while keeping the hairstyle and underlying color visible. It is a strong choice when you want the shape of a beanie without the visual weight of a conventional winter hat.
Because the openness becomes a major part of the finished design, pay attention to both fit and stitch consistency. Uneven tension is more noticeable in a regular mesh than it may be in dense fabric.
The Open Fabric Makes Fit More Visible
With large open spaces, the outline of the cap and the way it follows the head are easy to see. Check the circumference before completing the entire height, especially if you are substituting a yarn with a different amount of stretch. A cap that is too loose can lose the clean skull-cap profile, while one that is excessively tight may stretch the mesh farther than intended and change the appearance of the openings.
Hair and Underlayers Become Part of the Look
Unlike an opaque beanie, mesh allows what is underneath to contribute to the finished style. That makes it useful for layering over hair, braids, or a contrasting fabric head covering. If you want more coverage, this is not the most concealing option in the roundup. Compare the visible openness in the finished tutorial with the level of coverage you actually want before choosing it.
Crochet Granny Square Skull Cap
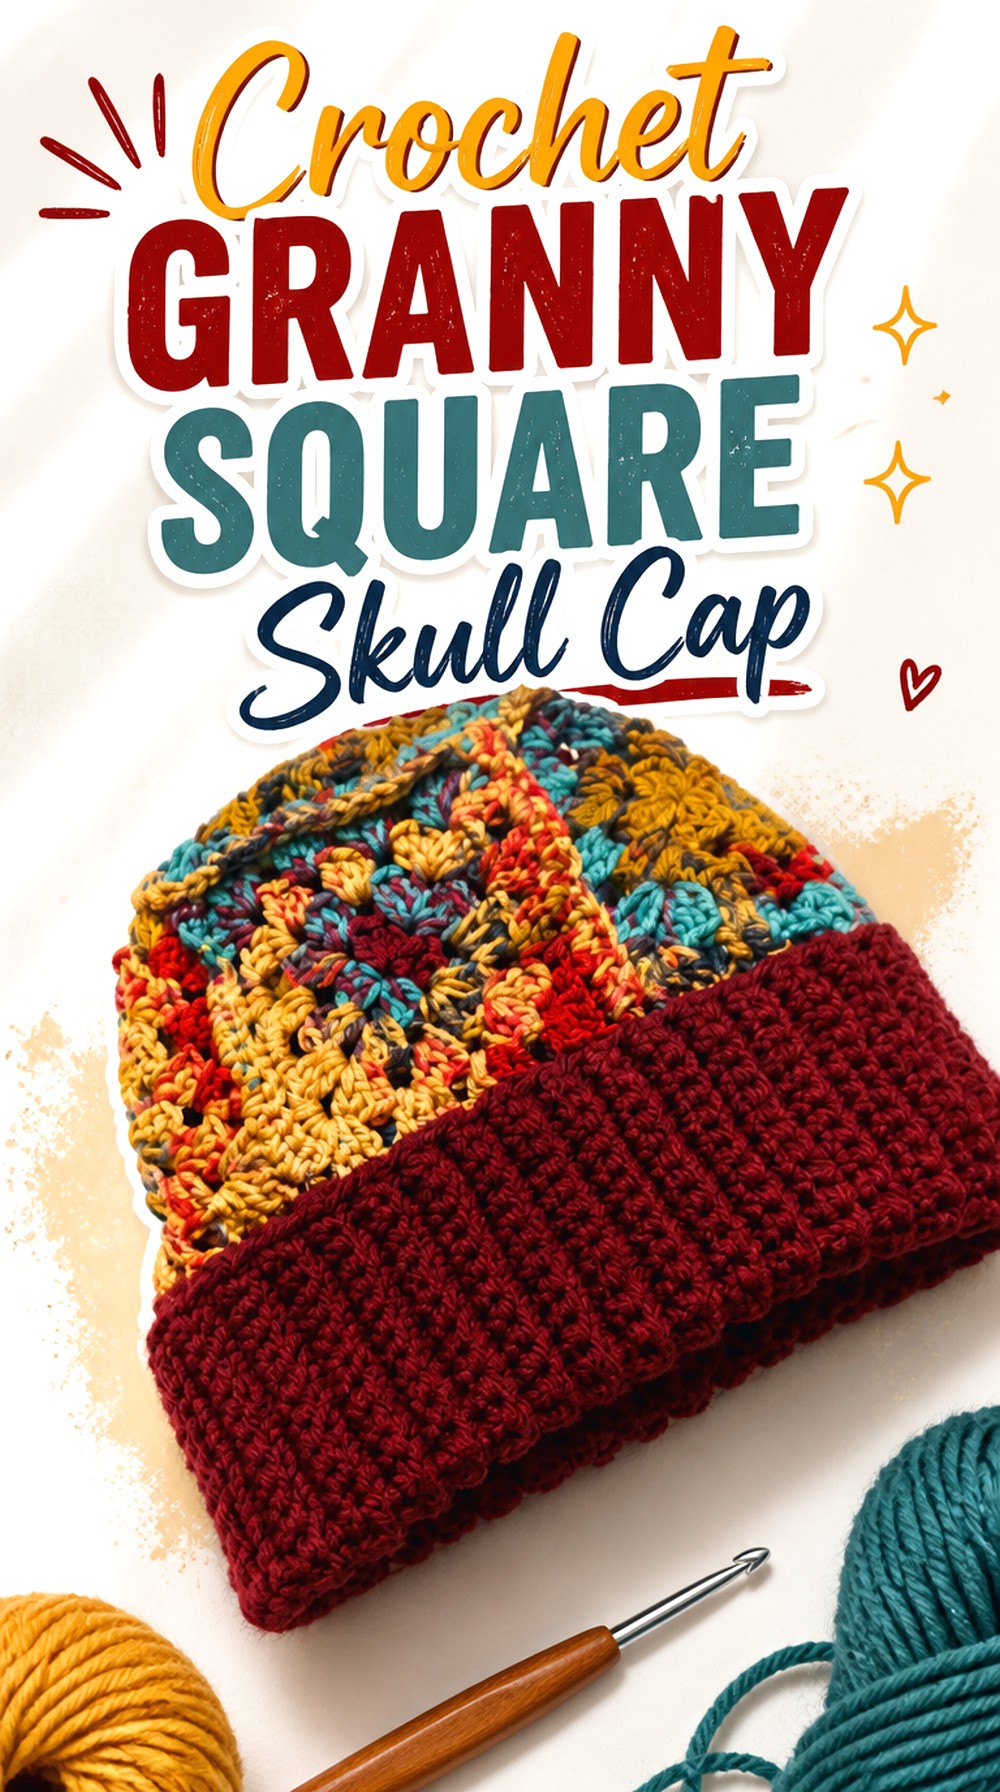
A granny-square skull cap makes the motif itself part of the hat architecture. Instead of reading as one continuous field of stitches, the finished cap has visible blocks and joins that create a more graphic, patchwork-style surface. This works particularly well when you want color placement or motif boundaries to be noticed rather than blended into the background.
The main planning issue is consistency between motifs. Small differences that seem harmless while individual squares are separate can become more obvious after joining. Blocking and comparing the squares before assembly can help reveal whether they are actually matching in size and shape.
Square Size Controls More Than Circumference
With motif-built headwear, square dimensions affect the overall span, seam placement, and crown behavior at the same time. Do not assume that a granny square from another project will automatically substitute into the hat. If you want to change the motif, first compare its blocked dimensions with the square used in the tutorial and consider whether its outer edge will join in a compatible way.
Plan Color Placement Before the Squares Are Joined
A granny cap can look intentionally balanced or unexpectedly busy depending on where contrasting motifs meet. Lay the finished squares beside one another before assembly and decide where the strongest colors should appear around the face, sides, and crown. This simple preview is especially helpful when using scraps because it prevents several dominant colors from accidentally clustering in one section of the hat.
Original Tutorial and Creator Credit
Creator: Dress it up Debra
Crochet No Bunch Ribbed Skull Cap
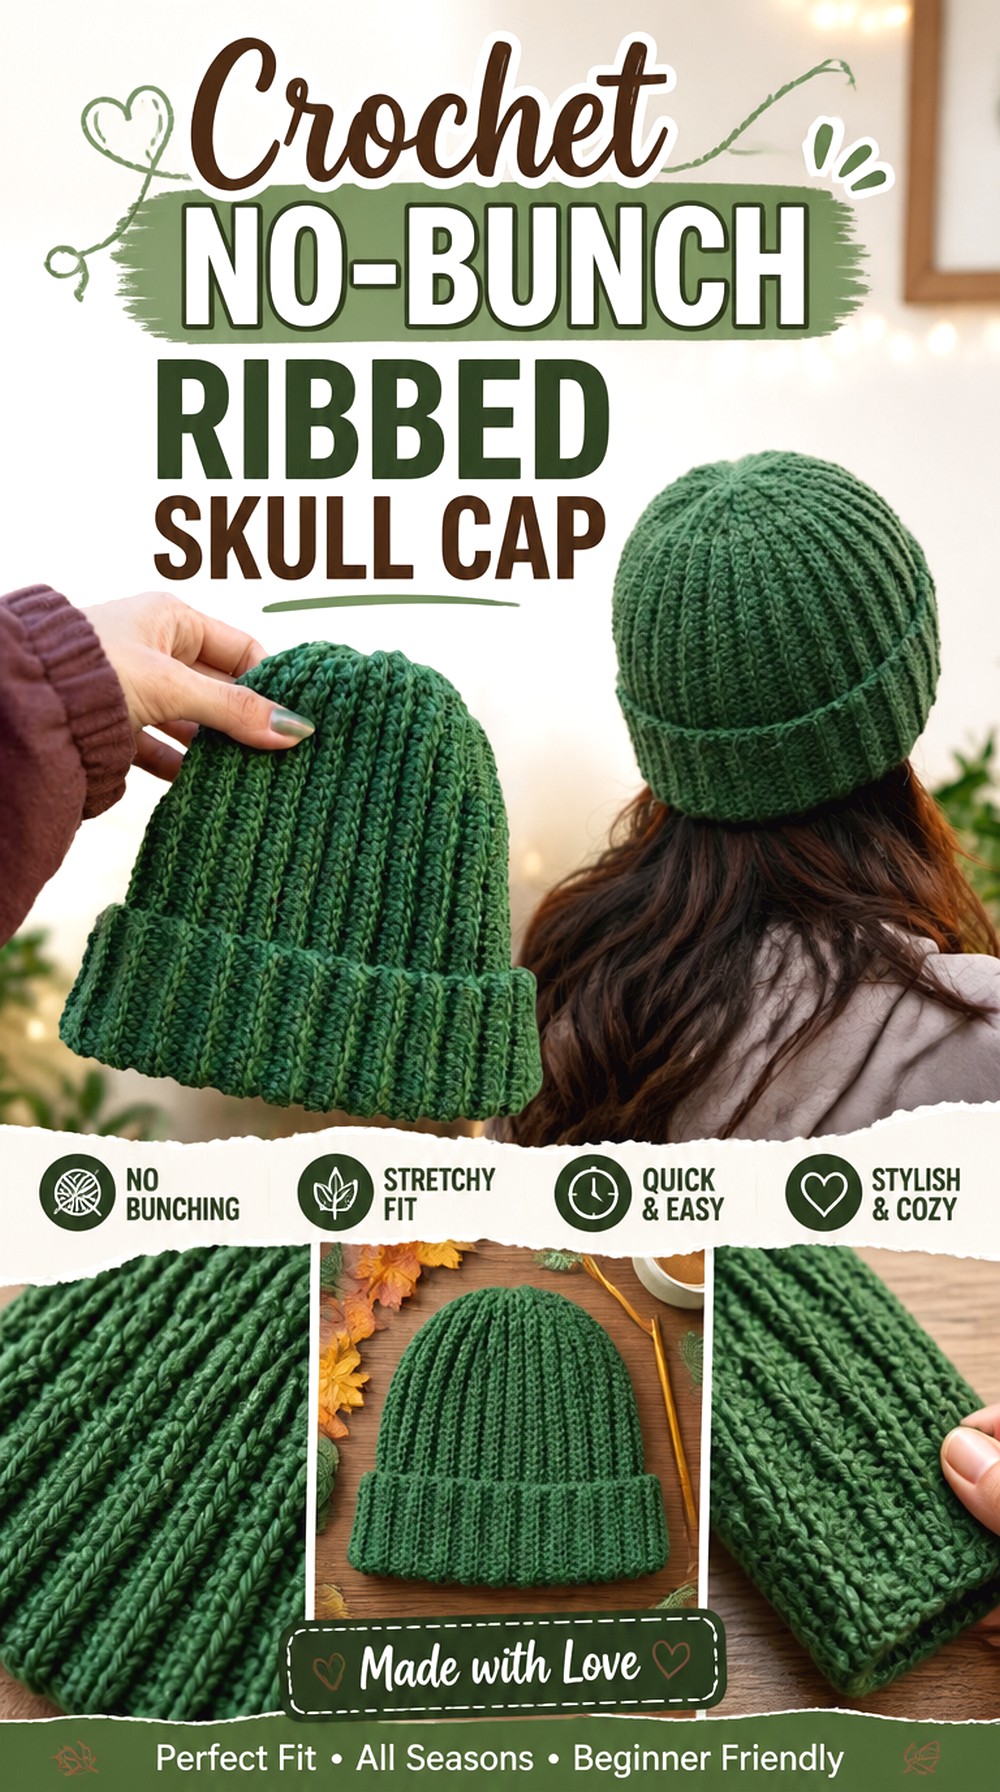
This ribbed crochet skull cap aims for a streamlined knit-like appearance without a heavily gathered-looking crown. The vertical texture makes the hat visually simple, so it can work well when you want an understated cap that puts fit and rib definition ahead of decorative motifs.
Ribbing also introduces useful elasticity, but that means measurements should be considered in relation to stretch. A flat panel may look narrower than the head it will eventually fit because the fabric is intended to expand. Follow the creator’s sizing guidance rather than making the panel equal to a head measurement automatically.
Crown Shaping Keeps the Top Cleaner
Side-to-side ribbed beanies can become bulky where the upper edge is gathered. This tutorial specifically addresses that issue, making the crown treatment a meaningful reason to choose it over a basic rectangular hat. If a smooth top matters to you, watch the crown portion carefully and compare the fabric thickness of any substituted yarn before assuming it will gather in the same way.
Deep Ribs Create a Strong Vertical Line
The ribbed surface visually runs from the lower edge toward the crown, which can make a simple solid-color hat look more structured. A highly variegated yarn may compete with those lines, while a solid or subtle tonal yarn leaves the rib definition easier to see. Neither approach is wrong; decide whether you want the yarn color changes or the texture itself to be the main feature.
Original Tutorial and Creator Credit
Creator: VivCrochets
Crochet Cat Ear Skull Cap
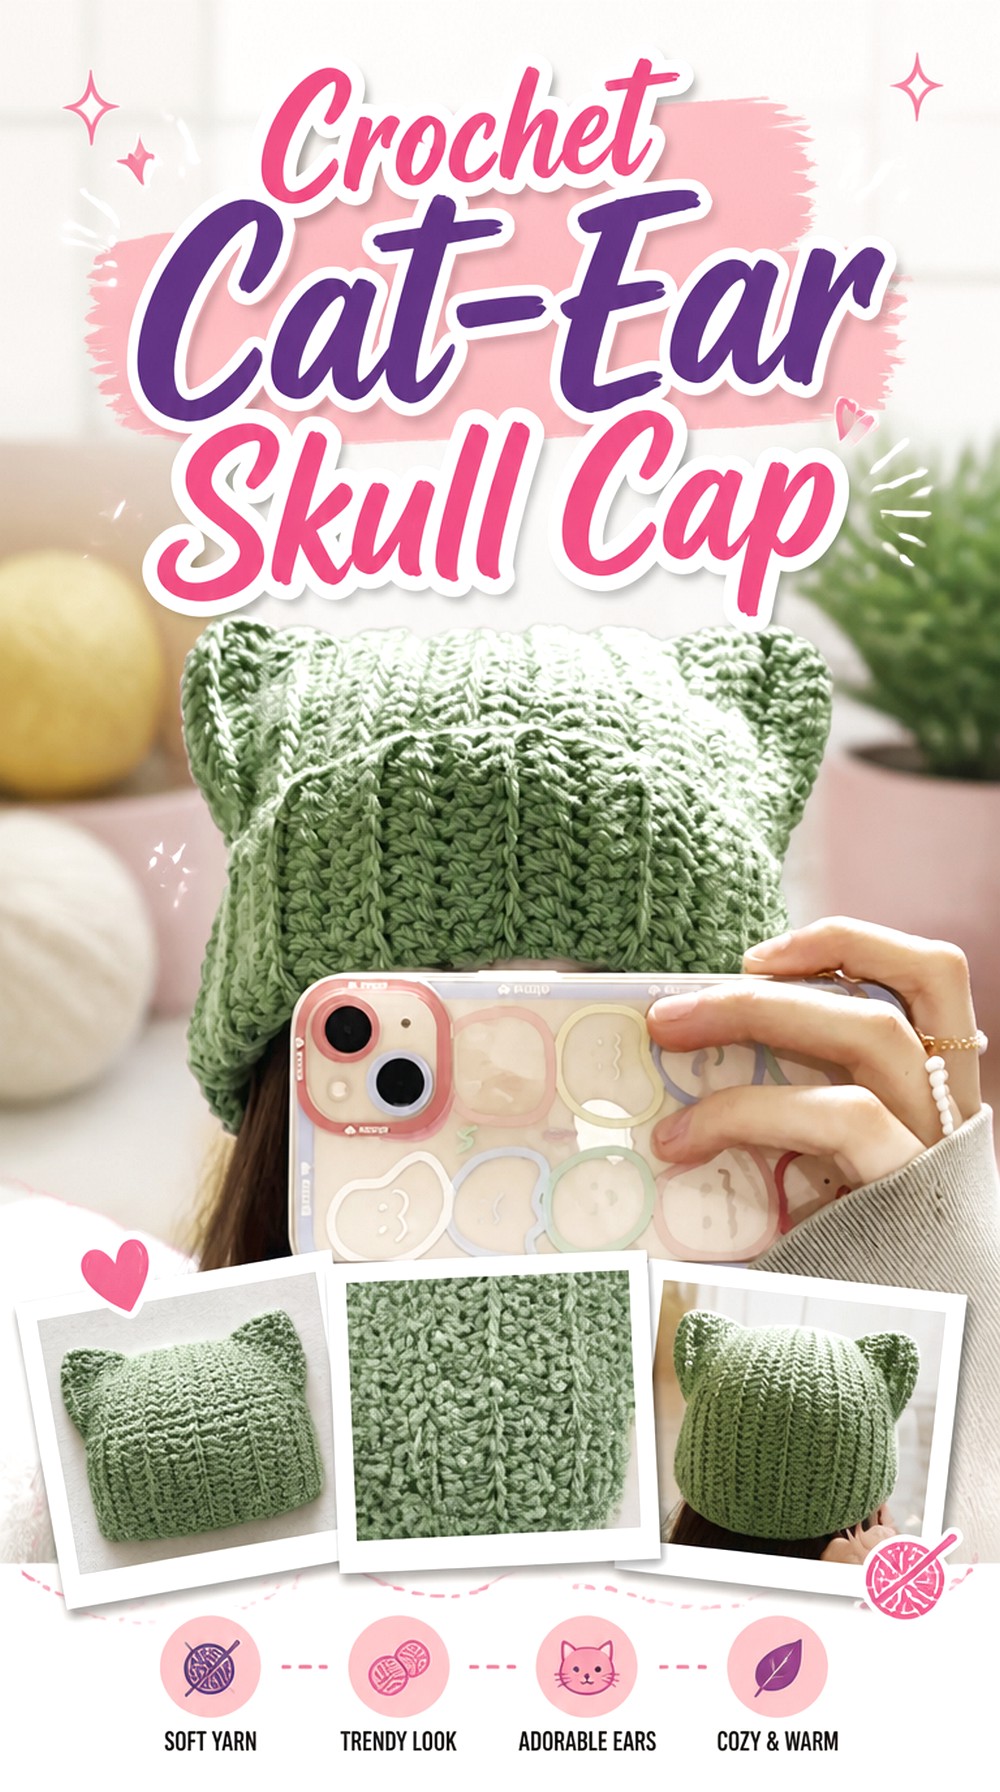
This cat-ear skull cap turns a simple close-fitting hat into a playful geometric accessory. The pointed corners come from the overall shape rather than a conventional rounded crown, so the finished profile is immediately different from the other fitted beanies in this collection. It works especially well when the ears themselves are the design focus and you do not want separate dimensional embellishments dominating the hat.
The cap is constructed from a straightforward fabric shape, making width and height especially important. Small proportional changes can alter how sharply the top corners stand once the hat is worn.
The Corners Need Enough Room to Form
A cat-ear beanie should not be evaluated only while it lies flat. Once placed on the head, the upper corners shift into the ear-like silhouette. If the hat is made too shallow, the top can be pulled downward instead of leaving enough fabric for the points. Compare the flat height with the intended head depth before joining and finishing.
A Folded Edge Can Change the Whole Proportion
If you decide to add or deepen a turned-up lower edge, remember that it uses some of the hat’s vertical length. A deeper fold can make the ear points look more pronounced or leave the body too short, depending on the starting dimensions. Plan the lower treatment and total height together instead of treating the brim as an afterthought.
Original Tutorial and Creator Credit
Creator: Solarxdreams
Crochet Spiral Crown Skull Cap
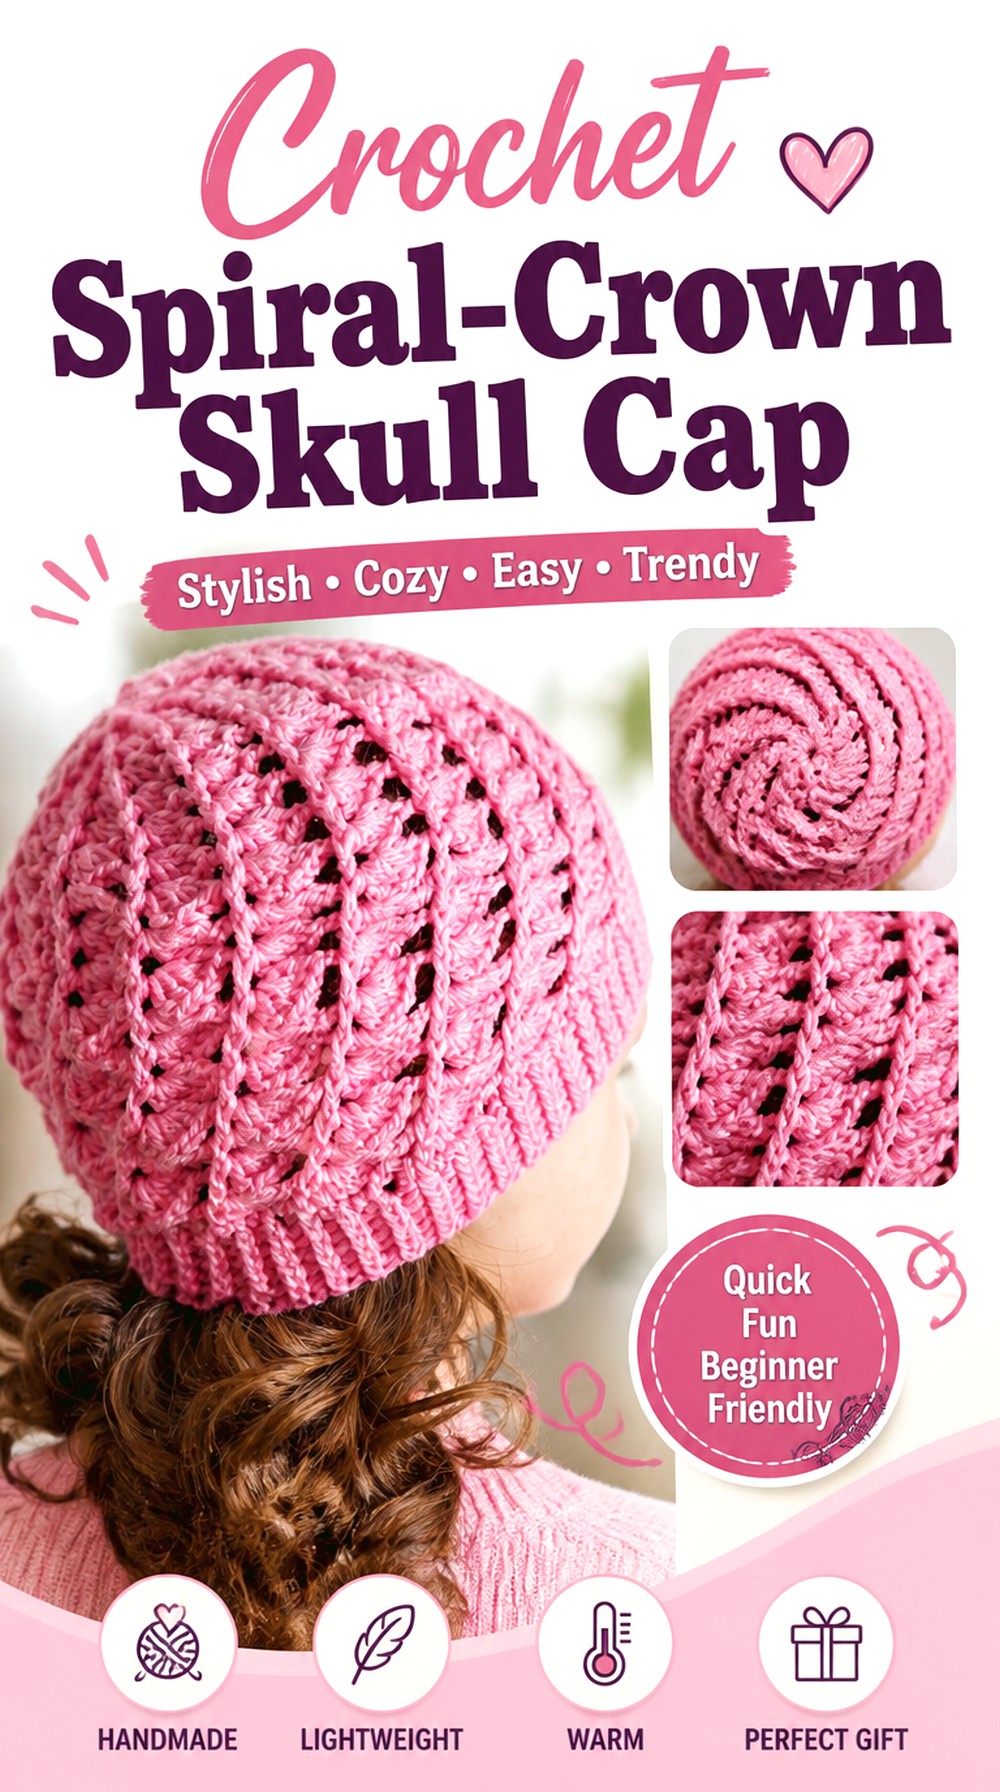
A spiral-crown crochet skull cap draws attention upward with visible movement through the crown. That makes it a useful alternative to ribbing when you want texture to follow a circular direction instead of running vertically. The spiral effect gives even a single-color hat more visual motion without requiring contrasting motifs.
Because the crown is the focal point, clean increases and consistent tension matter. Any irregularity near the center can remain visible in the finished cap, particularly when using a smooth yarn that shows stitch definition clearly.
The Crown Is the Main Design Feature
For this style, inspect the spiral from above as well as from the front. A cap can fit correctly while the crown still looks uneven if tension changes significantly between rounds. Lay the work flat periodically during the crown stage. Unexpected rippling or cupping can indicate that your personal gauge is behaving differently from the tutorial before the problem becomes harder to correct.
Smooth Yarn Helps the Spiral Read Clearly
A heavily fuzzy yarn can soften the outlines between stitches and make the spiral less obvious. If the directional crown is the reason you chose the project, consider a yarn that provides visible stitch definition. On the other hand, a haloed fiber will create a softer, less graphic result. Choose according to whether you want crisp geometry or a more blended surface.
Original Tutorial and Creator Credit
Creator: Crochet Square & Tutorials
Crochet Netted Summer Skull Cap
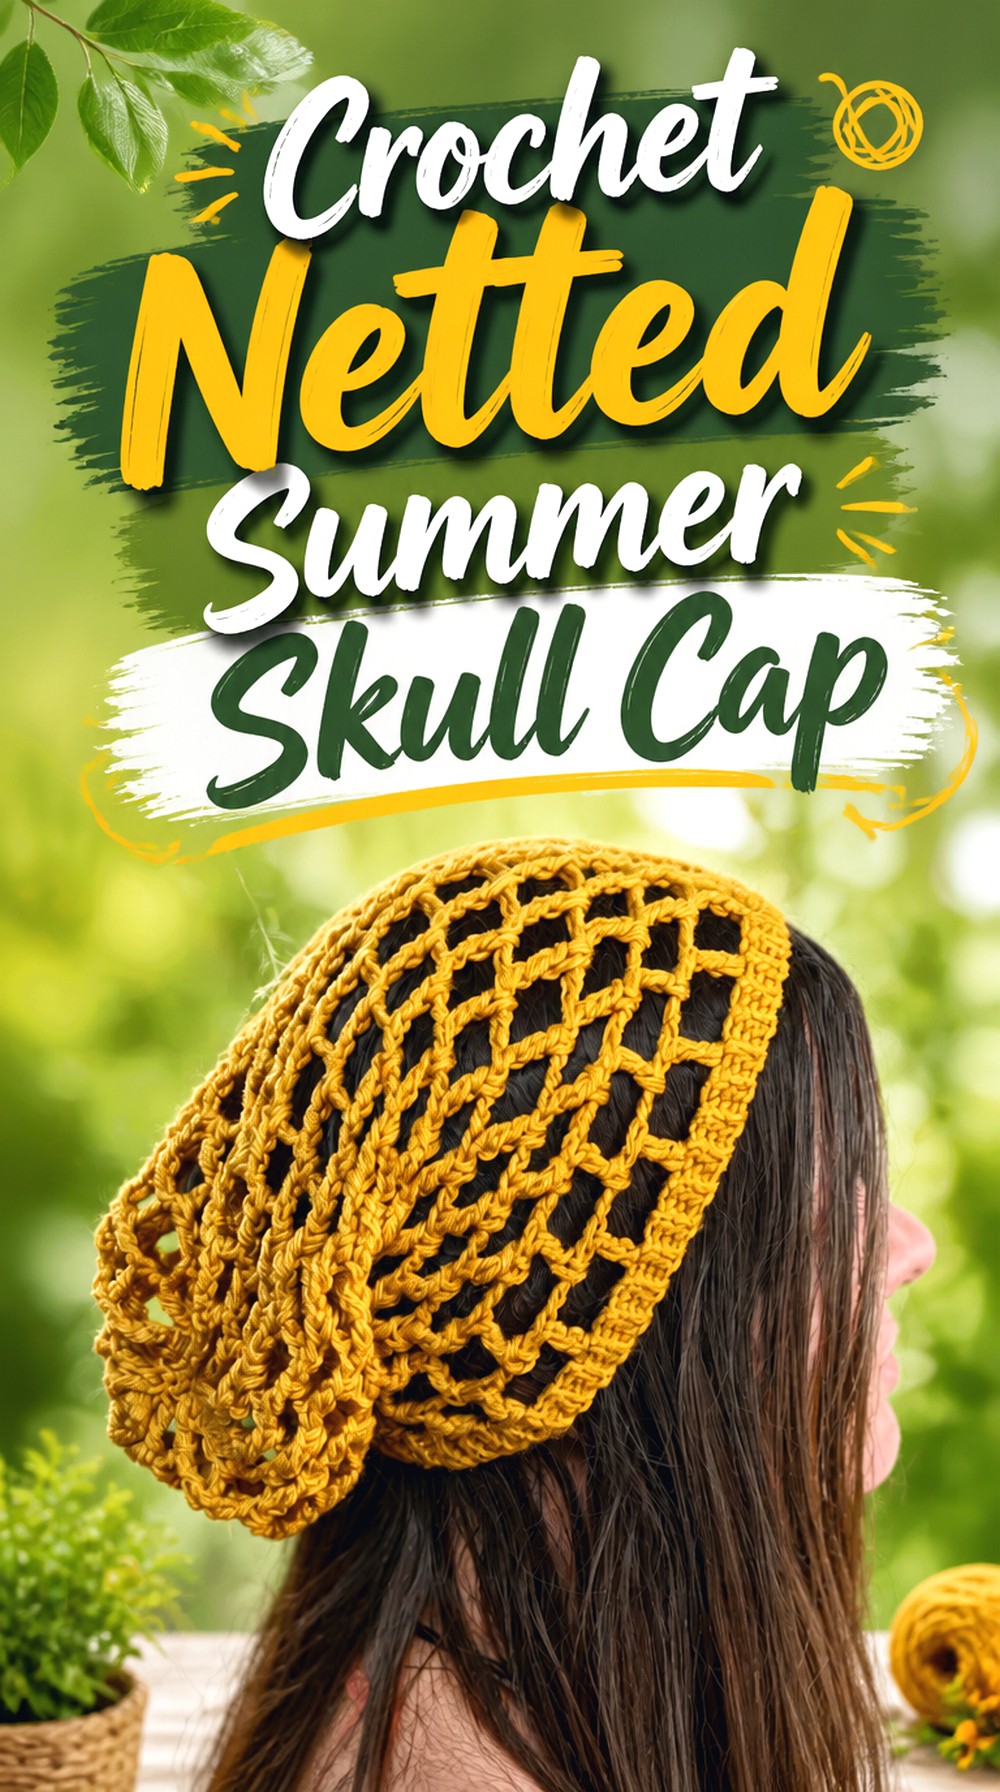
This netted summer skull cap emphasizes ventilation and drape instead of insulation. The larger open sections create a relaxed surface that feels visually lighter than dense winter crochet, and the ribbed lower section gives the open body a more defined anchor around the head.
It is a good direction when you like the look of a beanie but want substantial openness through the upper portion. Because the design intentionally includes airy spaces, it should be chosen for that effect rather than expected to offer the same coverage as a compact ribbed or slip-stitch cap.
The Brim and Body Behave Differently
A stretchy lower band and an open upper body can respond very differently to tension. The brim needs to establish a dependable fit, while the netted section can have considerably more visual and physical movement. If you substitute yarn, compare how it behaves in both fabric types. A yarn that works nicely in ribbing may create a noticeably heavier or droopier mesh than expected.
Extra Length Quickly Creates More Slouch
Open netted fabric can emphasize added height because there is little dense structure to hold it upright. If you prefer a closer skull-cap shape, monitor vertical length before completing the full body. If you deliberately want a more relaxed profile, additional depth can create it, but judge the hat while worn because open fabric often hangs differently from how it looks flat.
Original Tutorial and Creator Credit
Creator: Crochet With Julie
Crochet Classic Close Fit Skull Cap
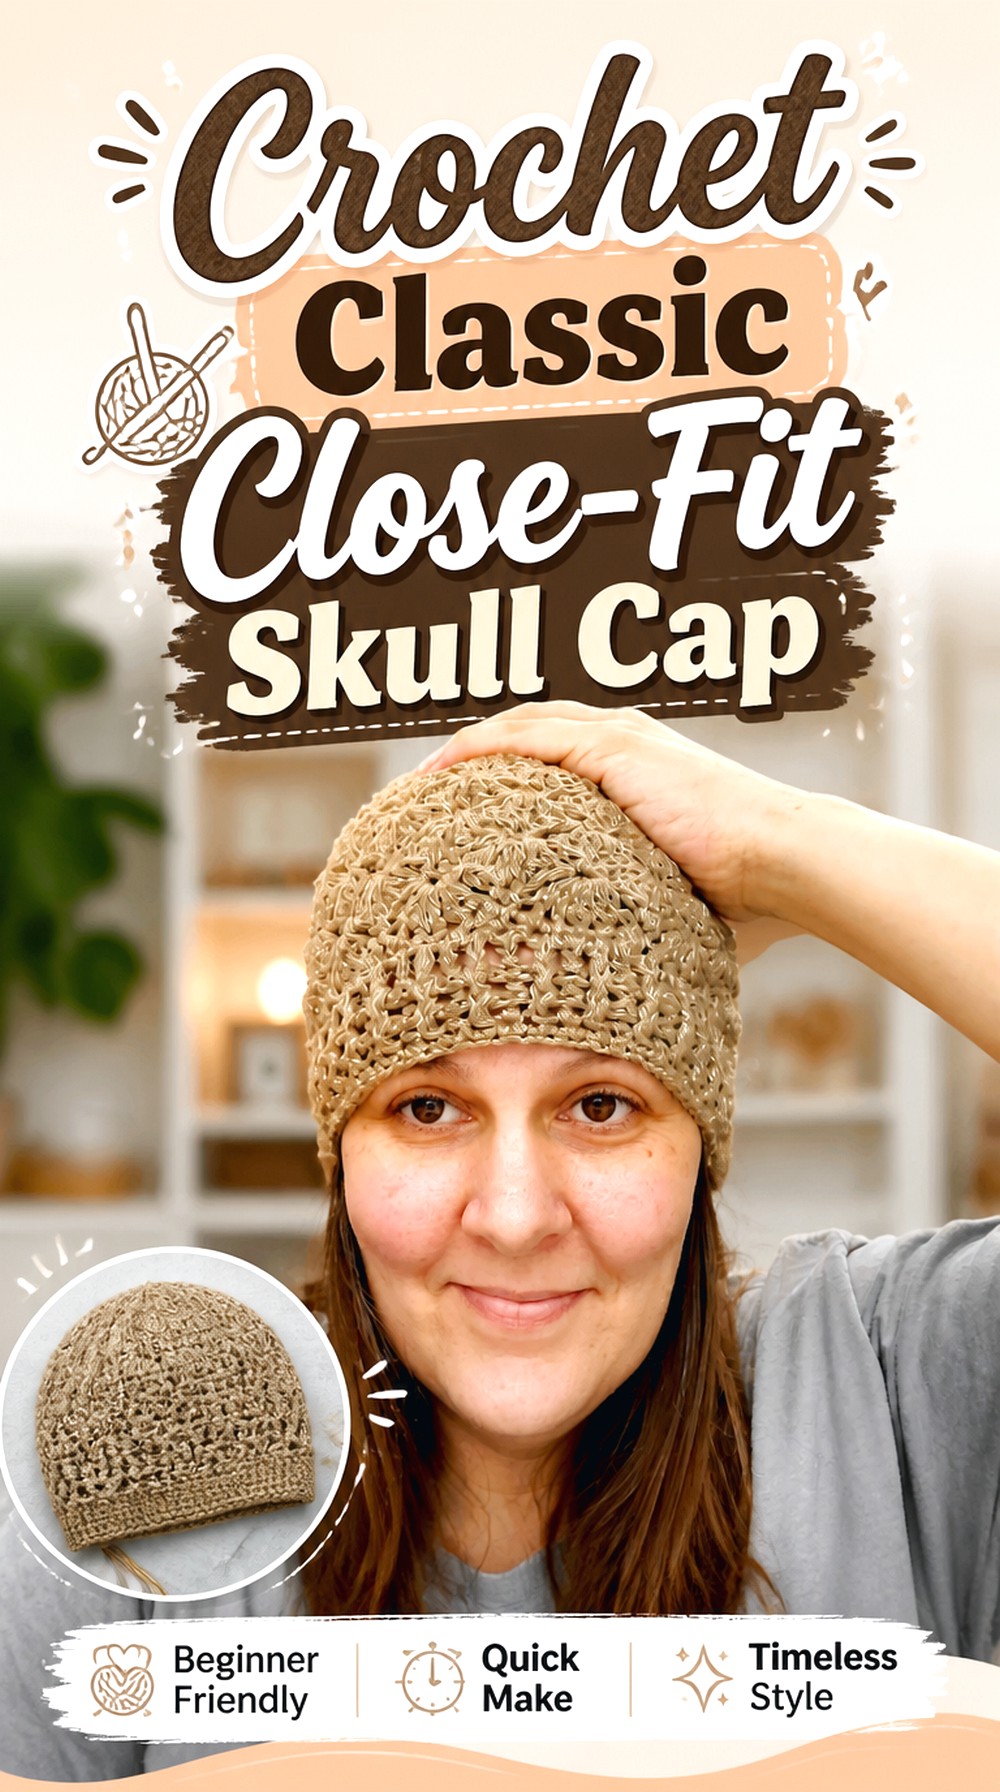
For a straightforward crochet beanie without an oversized decorative concept, this classic close-fit option keeps the emphasis on a practical hat silhouette. It is useful in a collection like this because not every skull cap needs a strong novelty feature. A simple body can make yarn color, subtle texture, and the wearer’s preferred depth more important.
Before starting, look closely at the creator’s completed cap and decide whether its overall crown and lower-edge profile match how closely you want yours to sit. Small fit changes can make a conventional beanie appear noticeably more fitted or relaxed.
Simplicity Makes Proportion More Important
When a cap does not rely on granny motifs, mesh, or exaggerated texture, fit becomes the detail the eye notices first. Check how far the finished hat reaches over the ears and whether the crown appears close or slightly relaxed. If you plan to shorten the cap into a stronger skull-cap silhouette, do so with reference to the complete crown shape rather than removing length arbitrarily.
Use Yarn Color as the Main Visual Variable
A simpler structure gives you room to use solids, marls, stripes, or controlled color changes without competing with an elaborate stitch pattern. If your yarn already contains strong color variation, a restrained hat construction can let those changes remain readable. If you prefer a minimalist result, a solid shade will keep attention on the shape and stitch texture instead.
Original Tutorial and Creator Credit
Creator: Bag-O-Day Crochet
Crochet Crunch Texture Skull Cap
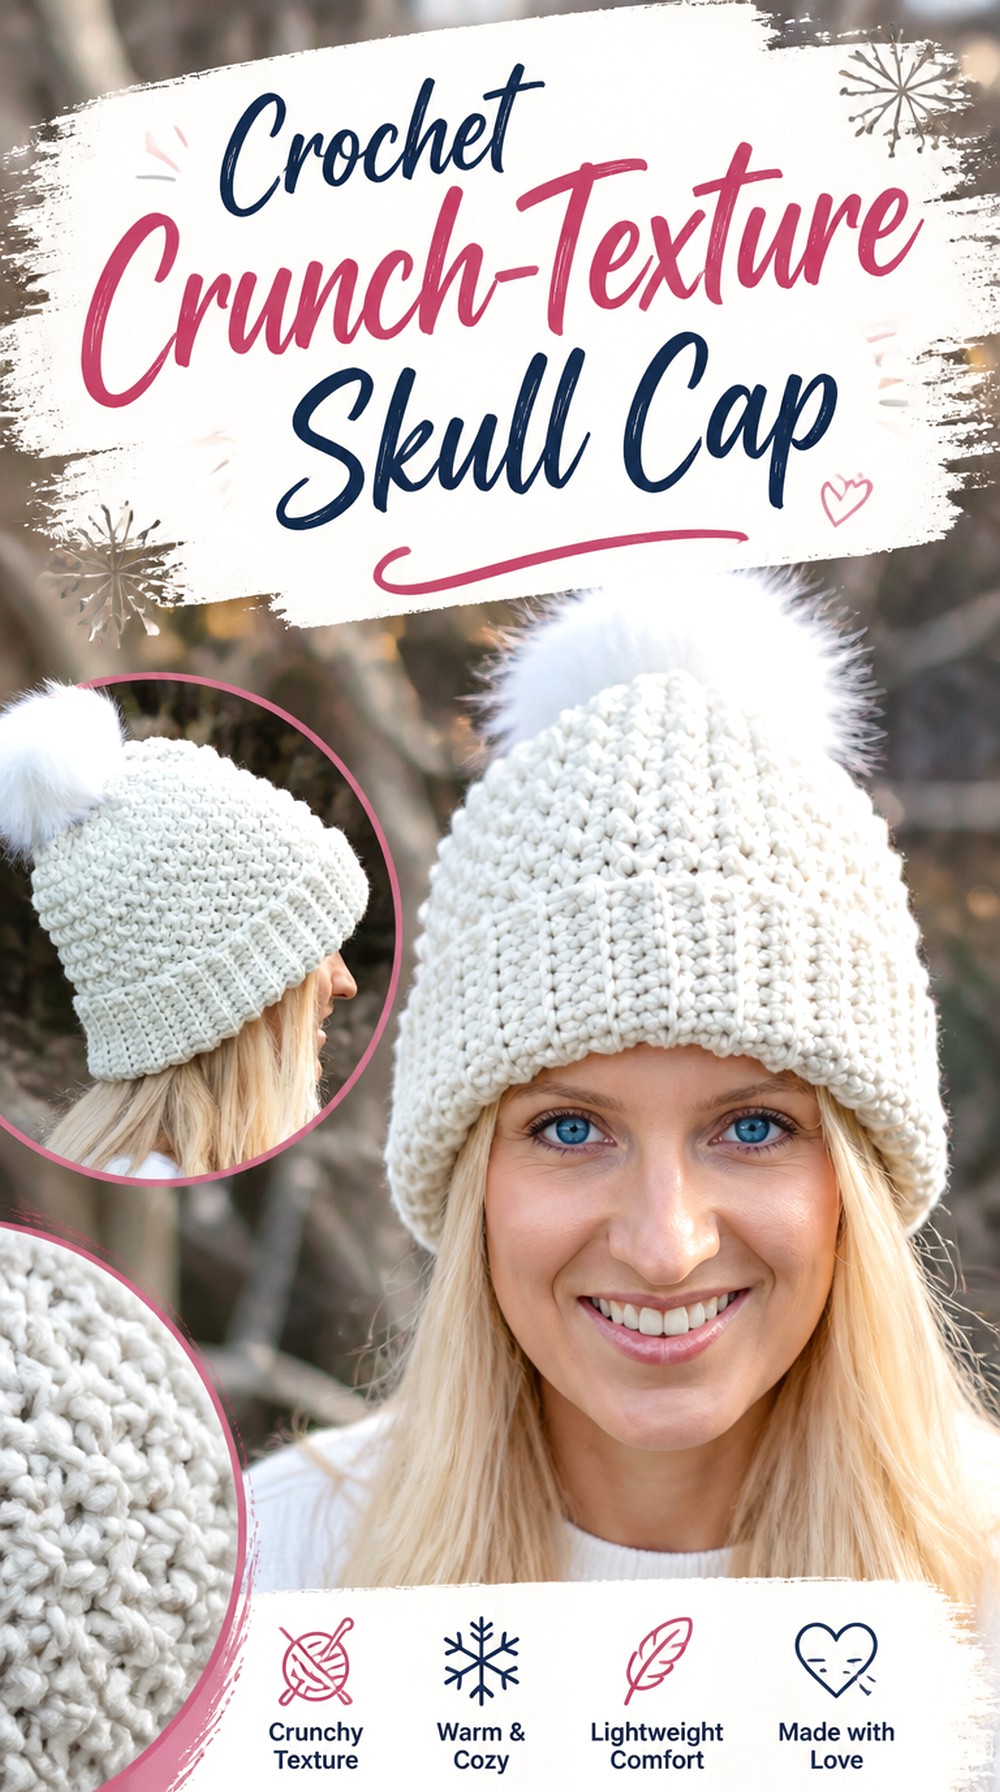
This textured winter skull cap combines a stretchy-looking ribbed lower section with a more pebbled upper surface. The contrast gives the cap definition without requiring multiple colors or separate motifs. It is a useful middle ground between a plain basic beanie and the heavier visual effect of cables or bobbles.
Naztazia identifies the upper texture as crunch stitch and pairs it with single-crochet ribbing. That combination makes the transition between brim and crown part of the design, so yarn choice should allow both areas to remain distinct.
Two Textures Need to Look Intentional Together
When a hat changes stitch texture above the brim, the transition line should look deliberate rather than accidental. Keep an eye on tension as you move from stretchy ribbing into the denser-looking body. If one section pulls in much more than the other, the lower edge may flare or the body may feel unexpectedly tight. Evaluating the transition early gives you a chance to correct the mismatch.
Defined Stitches Make the Surface More Noticeable
This design gets much of its character from the upper texture, so a very fuzzy yarn can soften that effect. Smooth yarn makes the small stitch variations clearer, while a more haloed fiber produces a gentler surface. If you are selecting between two yarns of similar weight, consider which one displays stitch relief more clearly before committing to the full hat.
Original Tutorial and Creator Credit
Creator: naztazia
Crochet Multi Size Ribbed Skull Cap
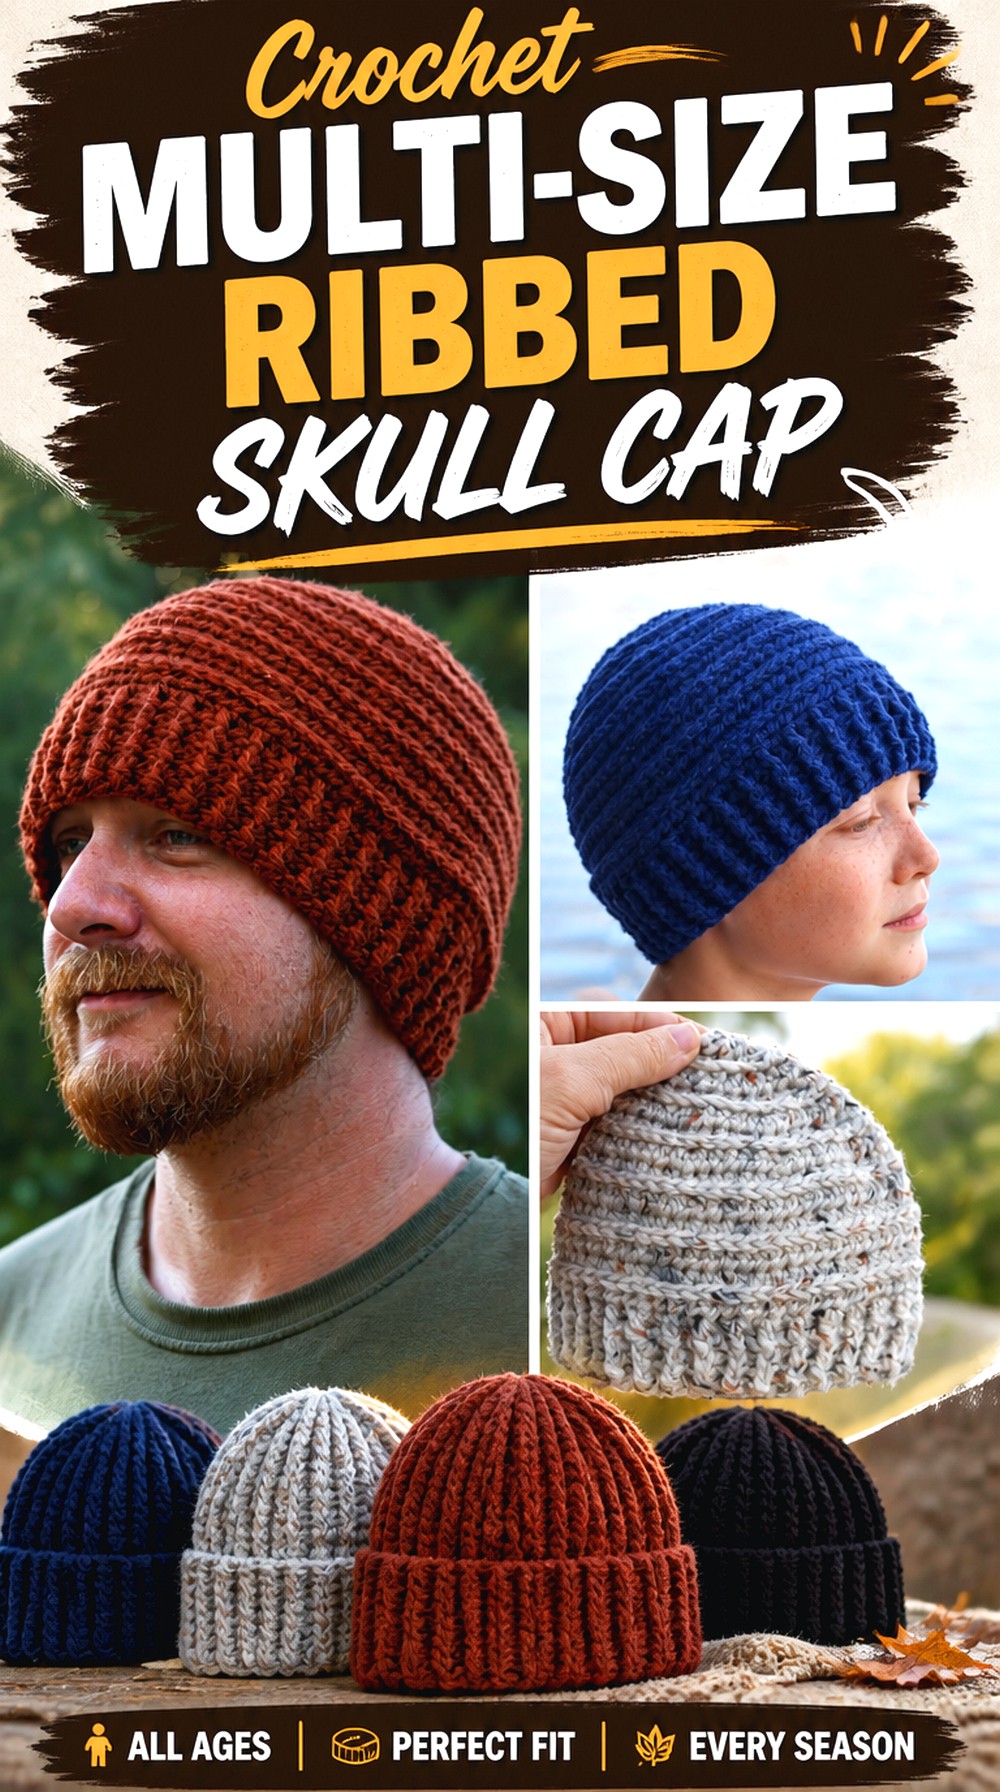
This ribbed skull cap is especially useful when sizing flexibility matters because the source tutorial covers multiple hat sizes rather than presenting only one finished adult example. The appearance is classic and vertically textured, so it can translate easily across different ages without relying on a design element that only suits one scale.
The important distinction is that size changes should come from the tutorial’s sizing system rather than simple guesswork. A child-size cap is not just an adult hat made shorter; circumference, depth, and crown proportion need to work together.
Use the Intended Size Before Adjusting Style
Start with the tutorial size closest to the wearer before deciding whether you want a deeper fold, shorter body, or more fitted profile. That keeps personal style changes separate from basic fit corrections. If you alter several dimensions at once, it becomes harder to identify whether a poor result came from the size selection or from the customization itself.
Ribbing Rewards a Stretch Check
Ribbed crochet can look narrow when relaxed and expand significantly when worn. Before joining or finishing the cap, gently stretch the work to see how it behaves rather than relying only on an unstretched measurement. The goal is not to force it to its maximum width but to understand whether the fabric has enough comfortable elasticity for the selected size.
Original Tutorial and Creator Credit
Creator: Winding Road Crochet
Crochet Slip Stitch Knit Look Skull Cap
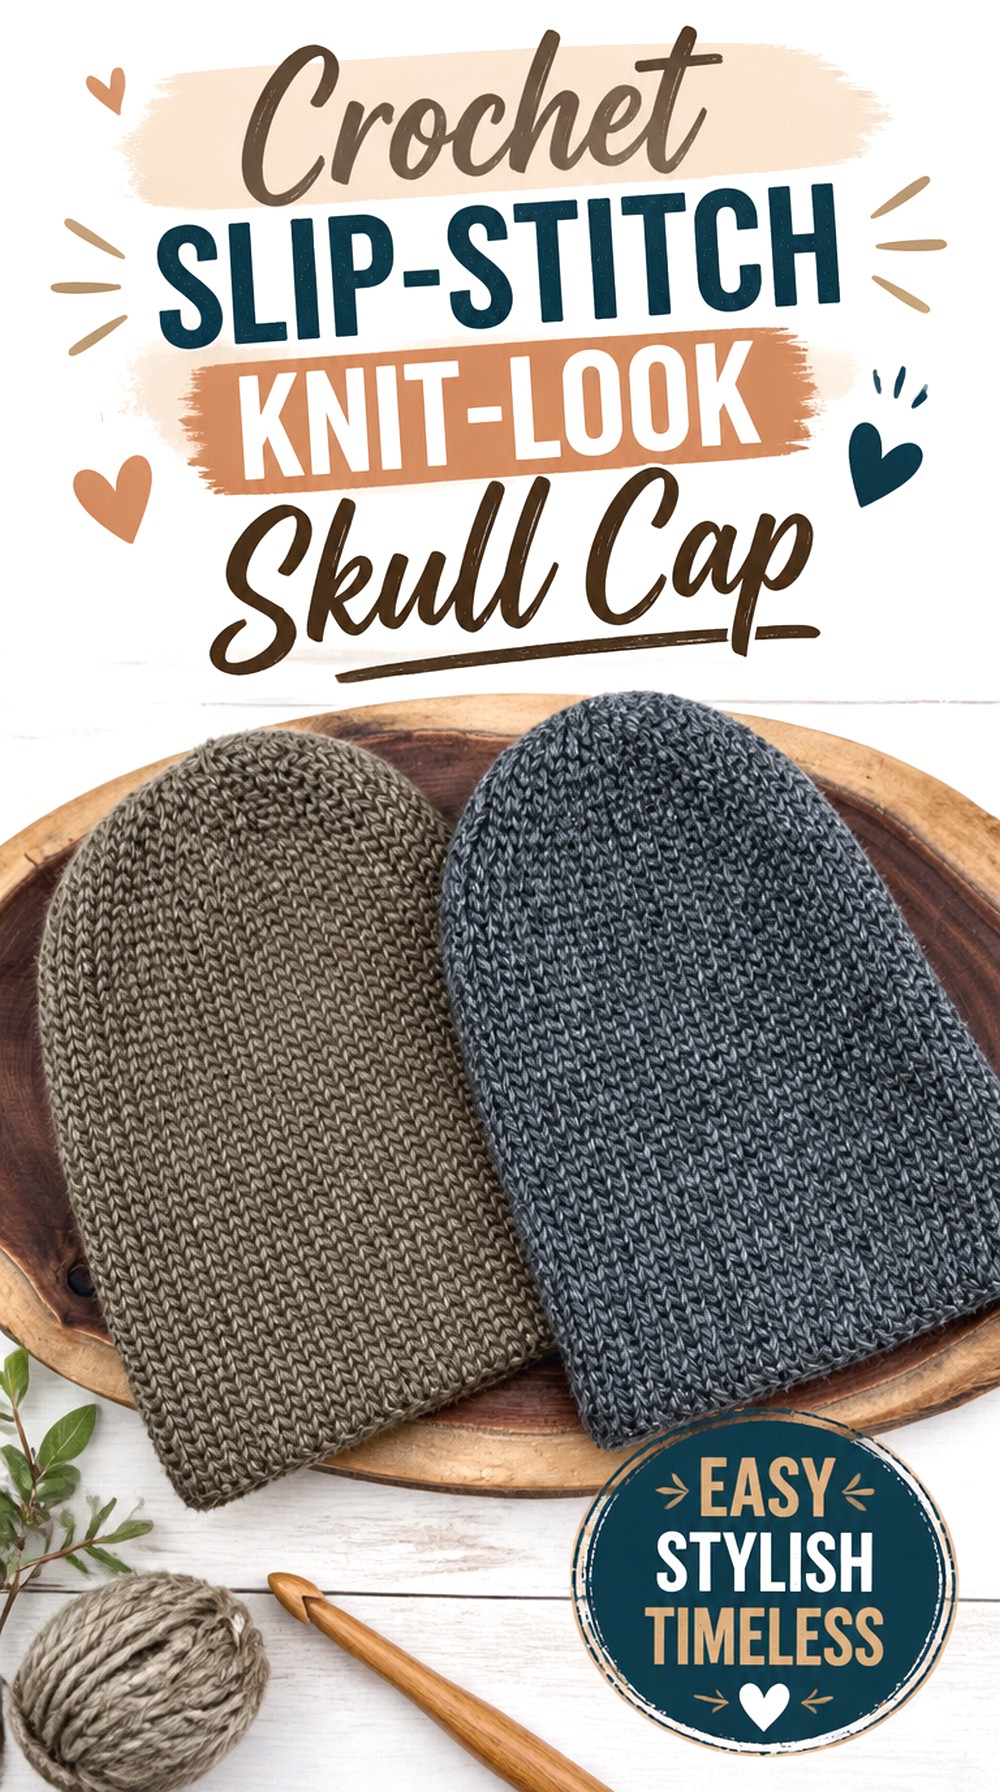
This knit-look skull cap uses crochet slip stitches to create narrow, compact ribs that visually resemble knitted fabric. The result is more refined and closely textured than many thicker ribbed crochet hats, making it a good choice for someone who likes crochet construction but wants a restrained, knit-inspired surface.
Rich Textures Crochet also highlights a bulk-free crown in the tutorial description. That detail matters for a fitted skull cap because excess material at the top can quickly change the silhouette from sleek to gathered.
Slip-Stitch Fabric Can Feel Denser Than Expected
Slip stitches create a compact fabric, and personal tension has a major effect on how flexible that fabric feels. If your stitches naturally run tight, avoid assuming that the same hook and yarn will automatically produce identical stretch. Work enough of the ribbing to test its flexibility before committing to the full width of the cap.
The Knit-Like Effect Benefits From Consistency
The narrow ribs are most convincing when the rows remain even. Uneven tension or accidentally changing which loop you work into can interrupt the clean vertical lines. This is a style where a small irregularity may show more clearly than it would in bobbles or open mesh, so periodically inspect the rib pattern from a short distance as the panel grows.
Original Tutorial and Creator Credit
Creator: Rich Textures Crochet
Crochet V Stitch Slouch Skull Cap
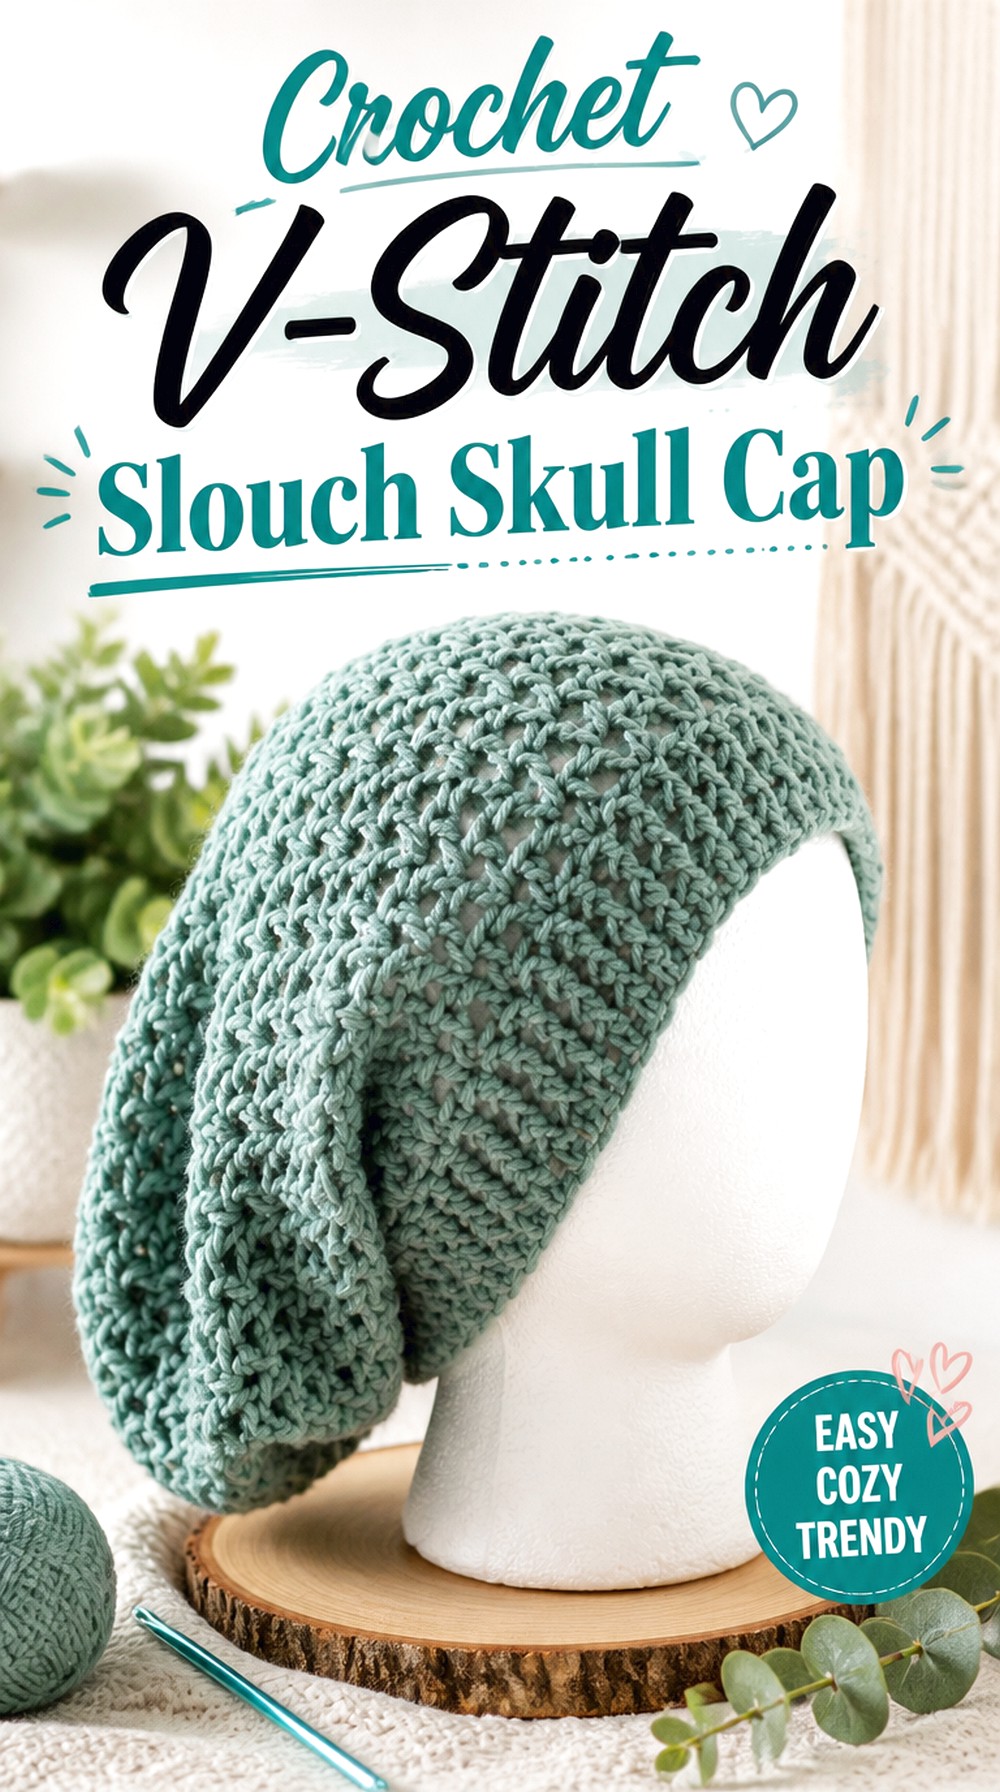
This V-stitch cap is the relaxed option in the collection. It pairs a defined lower band with a more open upper body and deliberately carries extra depth behind the crown. If you like skull-cap styling around the forehead but do not want the entire hat to hug the back of the head, this offers a useful compromise.
The open V-stitch texture also keeps the body from looking as visually heavy as a dense slouch hat. That balance between a stable lower edge and a softer upper section is the main reason to choose it over a fully fitted ribbed cap.
Slouch Comes From Depth, Not Just Width
A relaxed hat should not simply be made wider. Extra width can cause the brim to lose its grip, while additional crown depth creates the hanging profile associated with a slouch cap. Keep the lower circumference aligned with the intended fit and judge the relaxation primarily through the body length and how the fabric falls behind the head.
Open Texture Softens the Extra Volume
Dense fabric can make a long slouch cap feel visually substantial. The V-stitch body introduces open spaces that reduce that effect and allow the fabric to drape more freely. If you substitute a stiffer or heavier yarn, the finished slouch may hang differently. Compare the drape of your developing fabric rather than assuming the same length will produce the same silhouette.
Original Tutorial and Creator Credit
Creator: Fiber Flux
Crochet Top Down Everyday Skull Cap
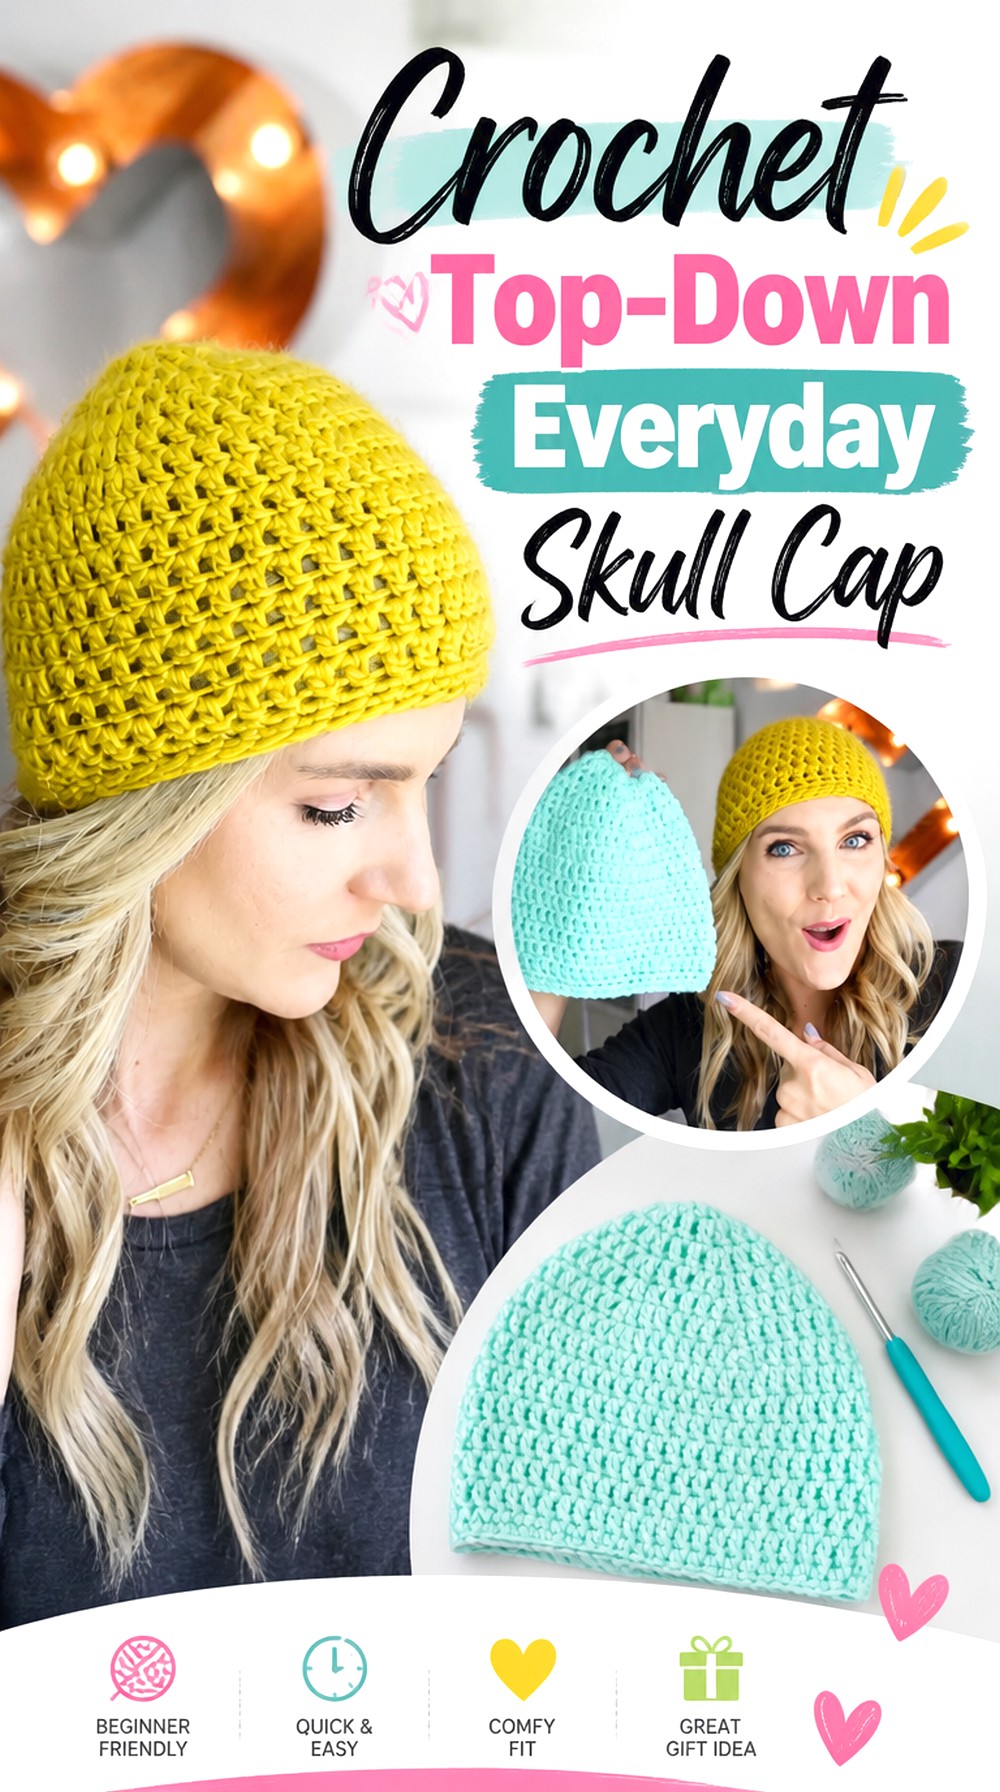
A top-down everyday skull cap is useful when you want the crown established first and the lower portion built afterward. This construction makes it easier to watch the circular shape develop from the center instead of creating a flat panel and closing the top later.
The finished design is intentionally straightforward, which makes it a practical reference for learning how a conventional crochet beanie sits on the head. It can also serve as a neutral base if you prefer color changes or a simple edge rather than highly dimensional texture.
Watch the Crown Before Adding More Length
Top-down construction gives you a clear checkpoint once the crown reaches its intended width. If the work is already cupping sharply or lying excessively wavy before the straight body begins, continuing downward will not necessarily correct the underlying proportion. Compare your developing crown with the tutorial at similar stages and address tension or gauge differences early.
A Simple Body Makes Length Easy to Judge
Once the crown shaping is complete, the visual character of the cap depends heavily on how far the body extends. Try the developing hat on, when practical, before the final lower edge. A few extra rounds can move the design toward fuller ear coverage, while stopping earlier creates a stronger skull-cap profile. Keep the creator’s intended size as the baseline.
Original Tutorial and Creator Credit
Creator: Melanie Ham
Crochet Straightforward Everyday Skull Cap
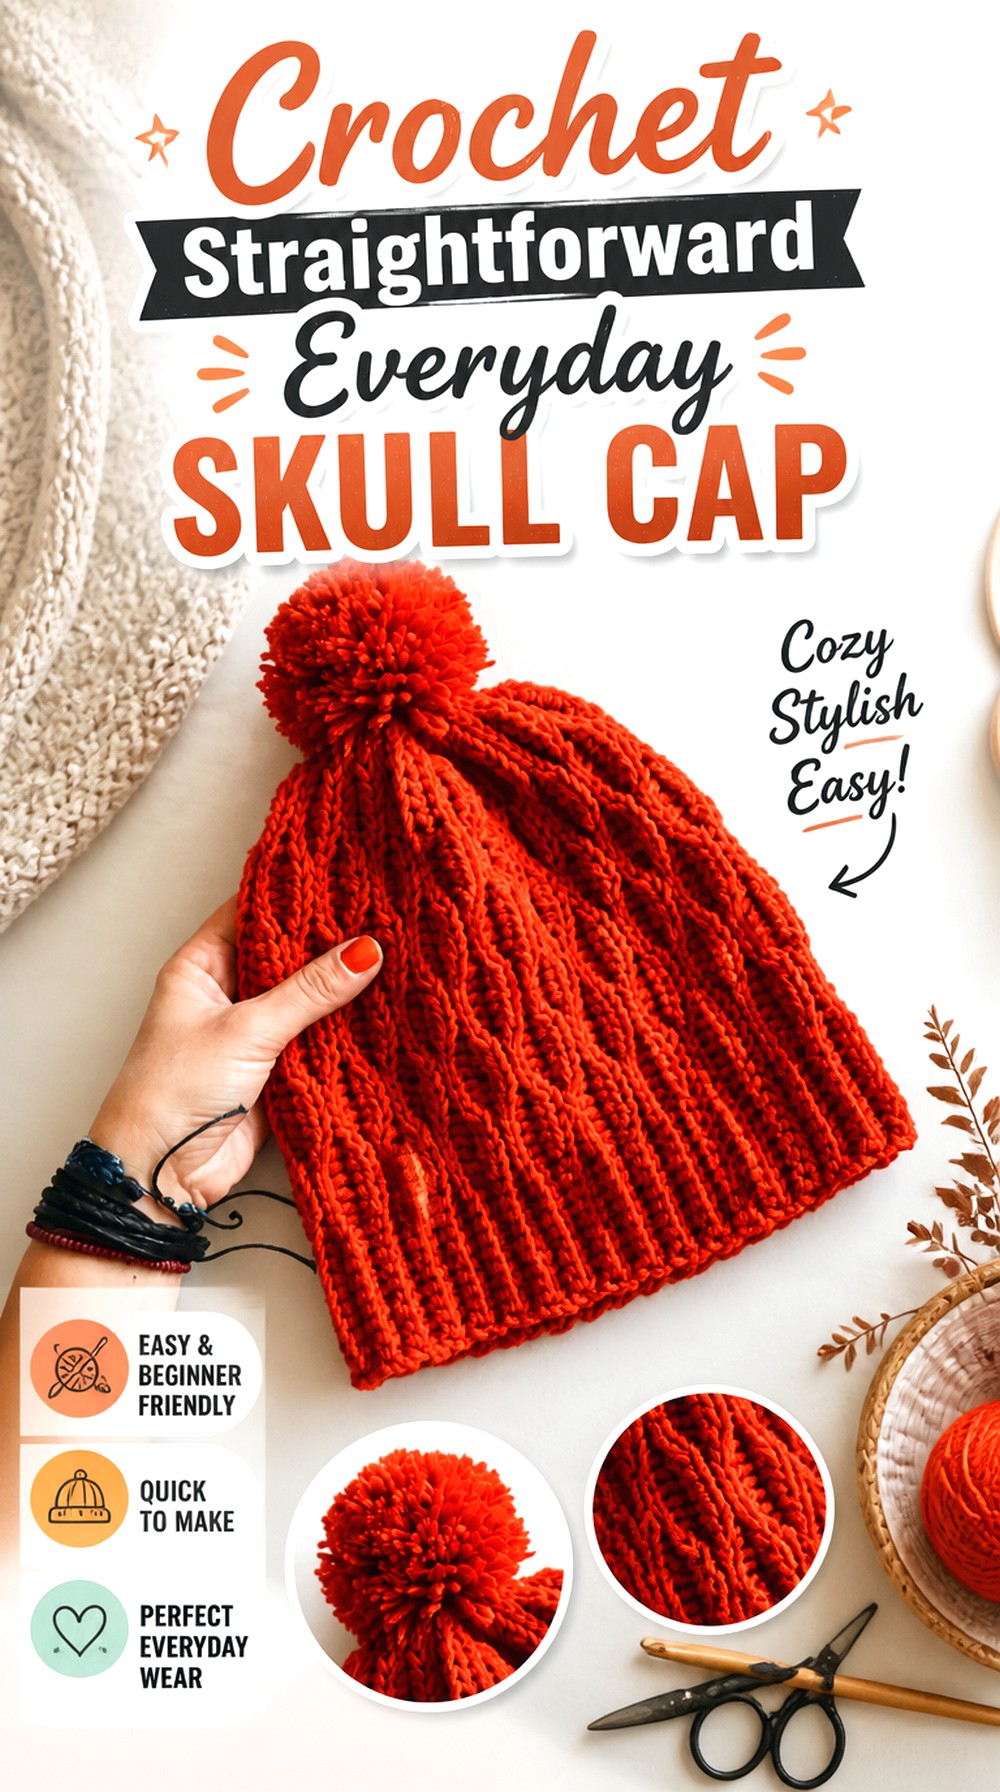
This everyday beanie from Sirin’s Crochet offers another classic route for readers who want a recognizable crochet hat without mesh, granny squares, or oversized decorative details. Its value in this collection is comparison: once you remove strong novelty features, fit, yarn, and the overall crown profile become the decisions that matter most.
A simple skull cap is also easier to pair with strongly colored or self-striping yarn because the stitch pattern is less likely to compete with the color changes. Before substituting materials, however, confirm that your yarn produces a compatible fabric and gauge.
Let the Finished Silhouette Guide Customization
If you want to adapt a basic beanie into a shorter skull cap, first study where the original finished edge sits and how the crown curves. Removing too much height can make the cap ride upward rather than simply sit higher. Make small proportional changes and evaluate them on the head instead of relying only on a flat measurement.
This Style Can Carry Bolder Yarn Choices
A plain structural design can act as a quiet background for marled, gradient, or contrasting yarn. That gives you more freedom to make color the focal point. If you use a strongly variegated yarn, consider whether frequent color changes hide the stitch texture you liked in the original. A solid shade provides the clearest reading of the crochet surface.
Original Tutorial and Creator Credit
Creator: Sirin’s Crochet
Crochet Bobble and Cable Skull Cap
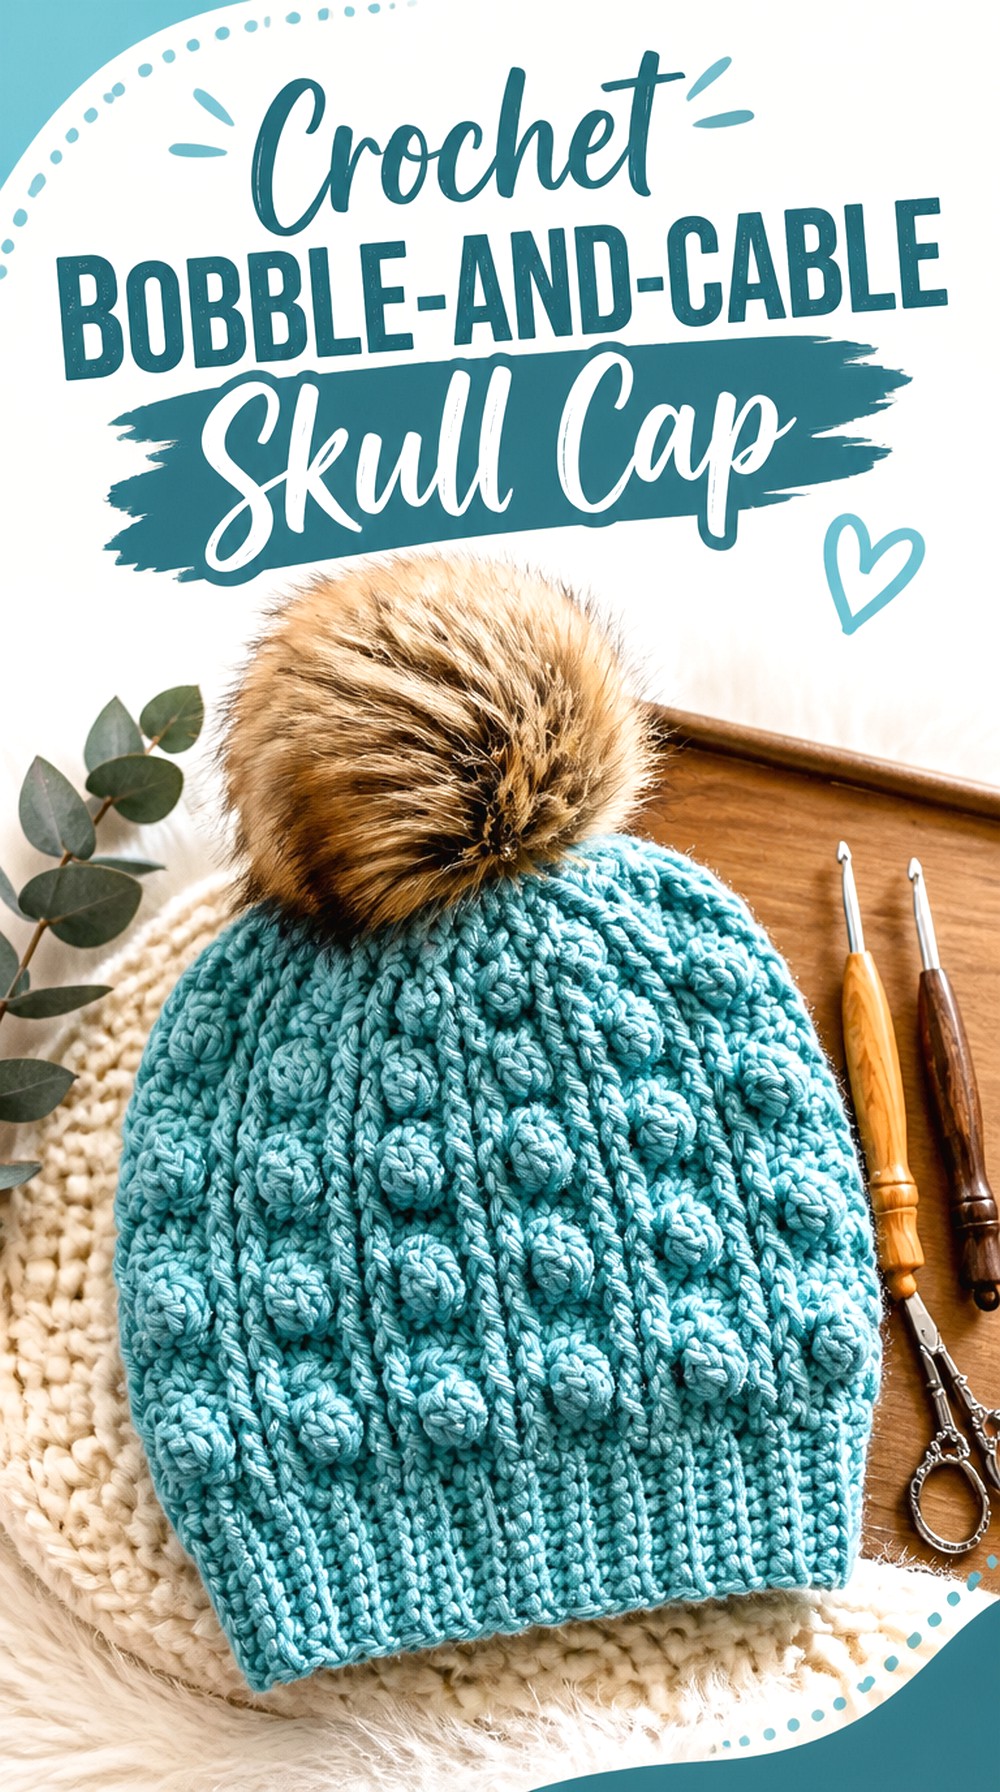
This bobble-and-cable skull cap is the most dimensional option in the roundup. Raised texture gives the surface a sculpted look, making the hat interesting even in one color. It suits readers who want stitch texture to be the obvious focal point rather than relying on stripes, mesh, or motif joins.
Dimensional stitches can also create a thicker fabric than flatter crochet, so this is a project where substituting yarn deserves extra thought. A heavier or fuzzier yarn may magnify the bulk and make the cable definition less distinct.
Raised Texture Changes the Visual Scale
Bobbles and cables occupy more visual space than flat stitches. On a fitted cap, that can make the hat appear fuller even when the actual circumference is similar to another design. If you prefer a sleek skull-cap look, compare this deliberately dimensional surface with the slip-stitch or mesh options before choosing. The appeal here is texture, not minimalism.
Solid Colors Keep the Cables Easier to Read
Strong stitch relief often shows most clearly when color changes are restrained. A busy variegated yarn can visually break up the cable lines and bobbles, while a solid or gently tonal yarn keeps the shadows around the raised stitches more visible. If your main goal is to showcase the stitch pattern, test a small section with your intended yarn first.
Original Tutorial and Creator Credit
Creator: TL Yarn Crafts
Crochet Classic Winter Skull Cap
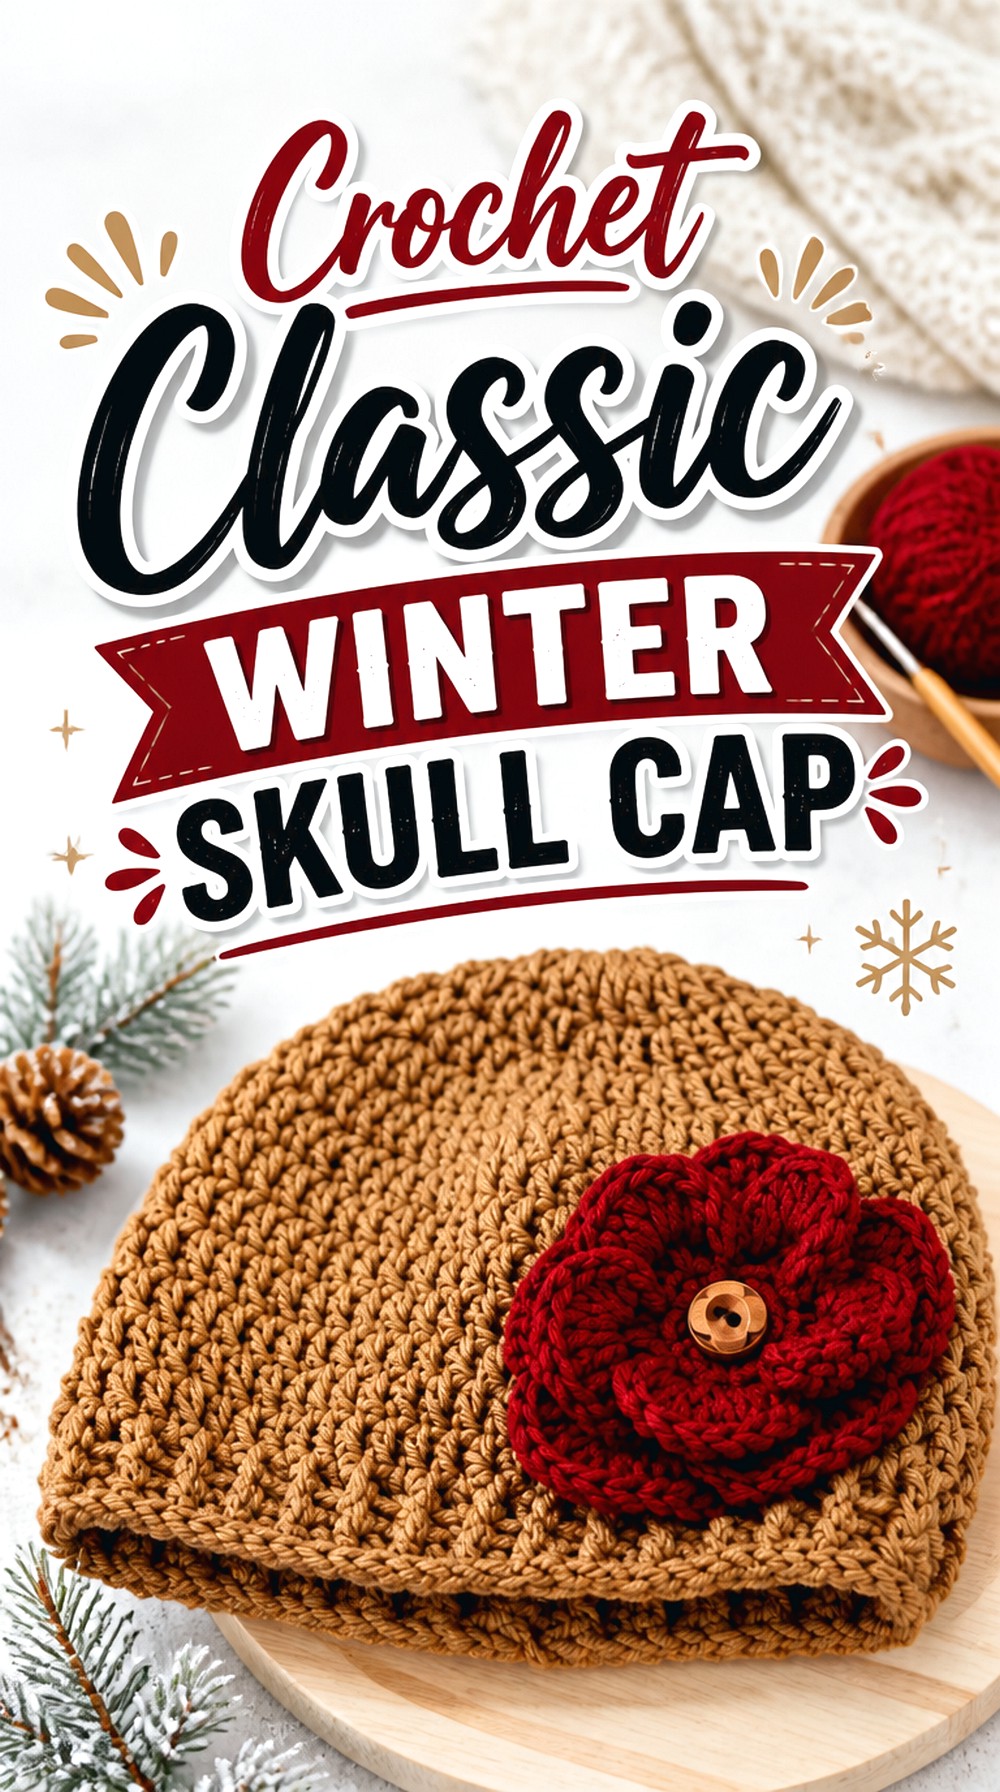
This classic winter skull cap keeps the focus on a wearable, conventional hat shape. It is a useful choice if you want something that reads clearly as a crochet beanie but does not depend on exaggerated openwork or chunky texture. That makes it adaptable to different wardrobes and yarn colors.
Jonna Martinez’s tutorial presents a full beanie project, so the finished example is useful for judging overall proportion before you begin. Rather than copying the size blindly, compare the intended wearer’s measurements with the tutorial information and adjust only where the source provides a reliable sizing route.
A Neutral Shape Leaves Room for Personal Finishing
Because the base hat is not dominated by one dramatic surface treatment, finishing choices can change its character significantly. A clean lower edge keeps the result simple, while a compatible embellishment or contrasting edge would make it more decorative. Decide on any extra detail before finishing so the overall color and proportion still feel balanced.
Check Ear Coverage Before Fastening Off
Winter beanies are often expected to provide more coverage than fashion skull caps. If that is your goal, try the developing hat on or compare its depth against a well-fitting hat before completing the lower edge. If you prefer a shorter streetwear-style skull cap, reduce depth cautiously; the crown still needs enough room to follow the head without pulling upward.
Original Tutorial and Creator Credit
Creator: Jonna Martinez
Crochet Zigzag Line Skull Cap
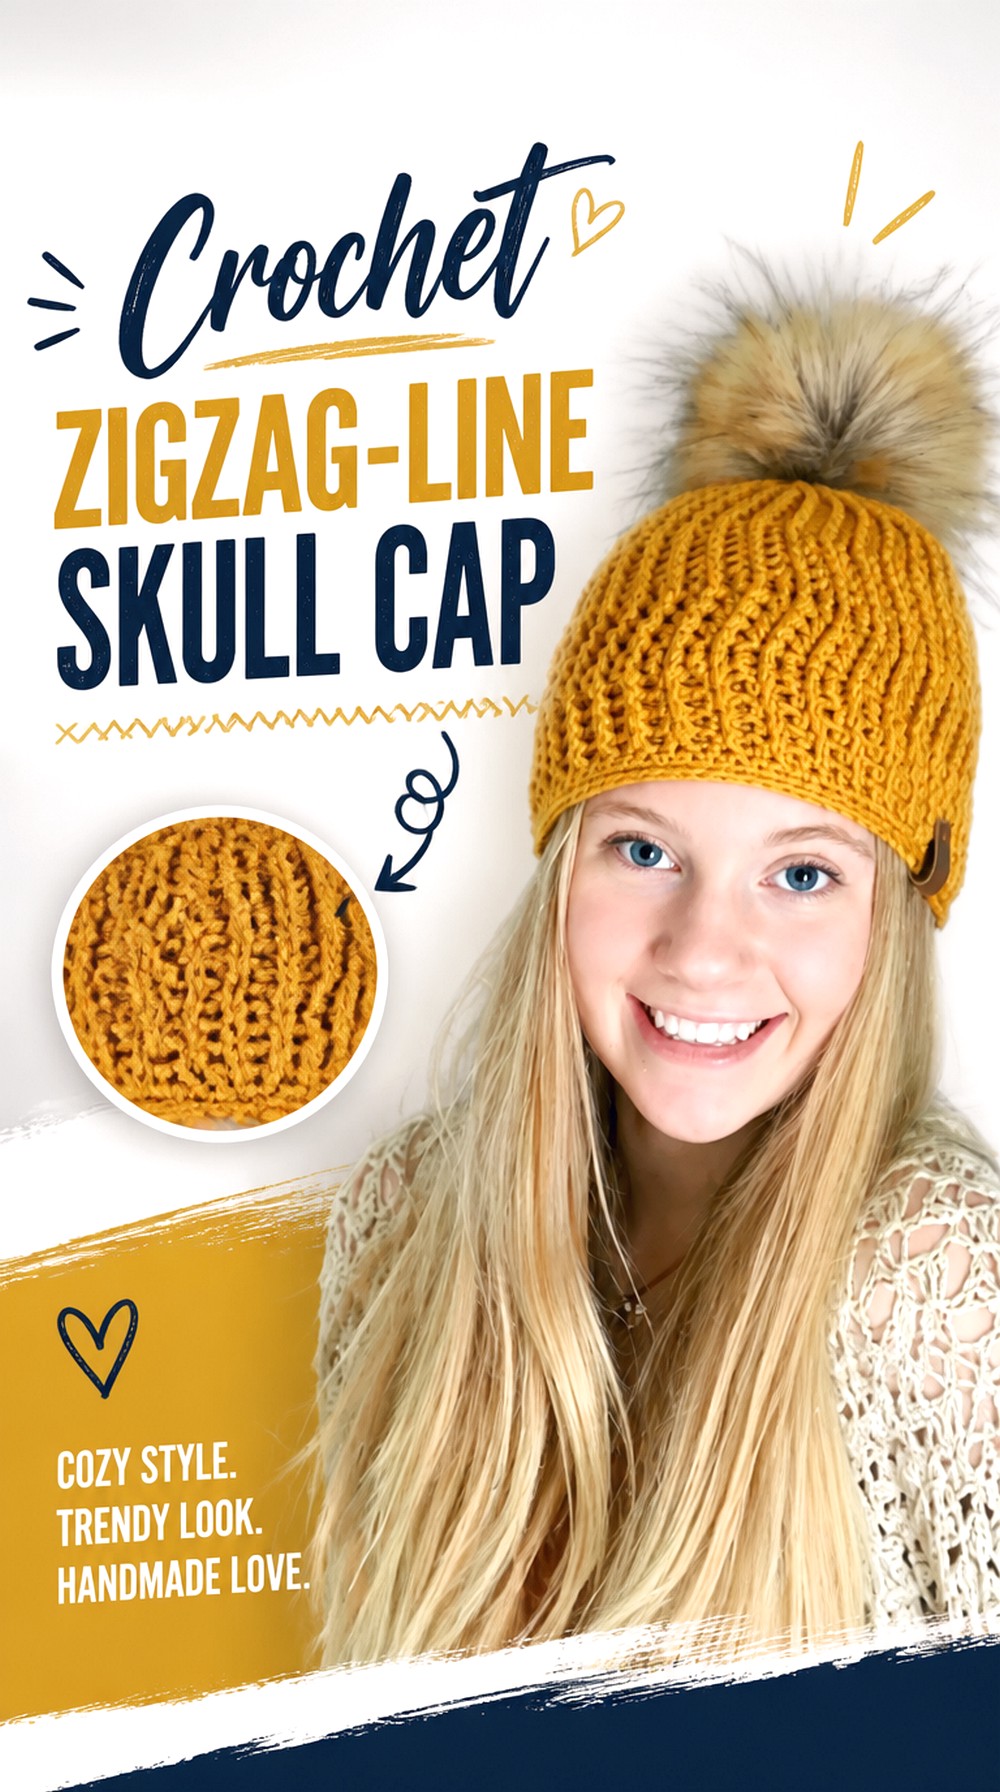
The Modern Lines design creates subtle zigzag movement with raised post-stitch texture rather than using separate color blocks. This gives the skull cap a directional pattern that is more structured than plain crochet but less bulky-looking than large bobbles or cables.
MJ’s Off The Hook Designs describes the hat as a top-down project worked in the round, so the crown and line pattern develop together instead of being assembled from a separate rectangular panel. The result is a good option when you want visible surface geometry within a conventional beanie silhouette.
Follow the Line Pattern Around the Whole Hat
Directional texture needs to look continuous from more than one viewing angle. As the design develops, rotate the work and check whether the raised lines remain visually consistent around the circumference. An accidental stitch-placement shift can be less noticeable while working one small area but more obvious after the zigzag repeats across the full hat.
Crown Shaping and Texture Must Stay Balanced
Top-down increases already affect the spacing of stitches, and a raised pattern adds another visual layer. If you change yarn or hook size, make sure the crown still lies and curves as intended rather than focusing only on whether the zigzag looks attractive. A well-defined pattern will not compensate for a crown that has become too flat, rippled, or tight.
Original Tutorial and Creator Credit
Creator: MJ’s Off The Hook Designs
Crochet Camel Stitch Spiral Skull Cap

This camel-stitch skull cap combines a defined lower band with continuous spiral construction through the hat. The Crochet Crowd notes that the design avoids a conventional joined seam and uses a continuous spiral, which is an important visual distinction if you dislike an obvious round transition.
The stitch pattern also includes elongated accent details, so the finished surface has more movement than a basic solid-color cap. It fits best in this roundup as an option for readers who want texture and color flow without switching to motif assembly or heavy cables.
Continuous Rounds Need a Reliable Marker
When there is no obvious joined-round boundary, it becomes easier to lose track of where one round ends and the next begins. A stitch marker becomes more than a convenience because it provides a stable reference point while the spiral progresses. Move it consistently rather than relying on visual memory, especially once the textured pattern begins to repeat around the hat.
Color-Changing Yarn Can Emphasize the Spiral
A yarn with gradual color movement can reinforce the continuous construction because the shades travel around the cap without being interrupted by a strong seam. If you use a solid color, the stitch relief becomes more dominant instead. Decide whether you want the eye to notice the spiral color progression first or the textured stitch pattern first.
Original Tutorial and Creator Credit
Creator: The Crochet Crowd
Crochet Chunky Knit Look Skull Cap
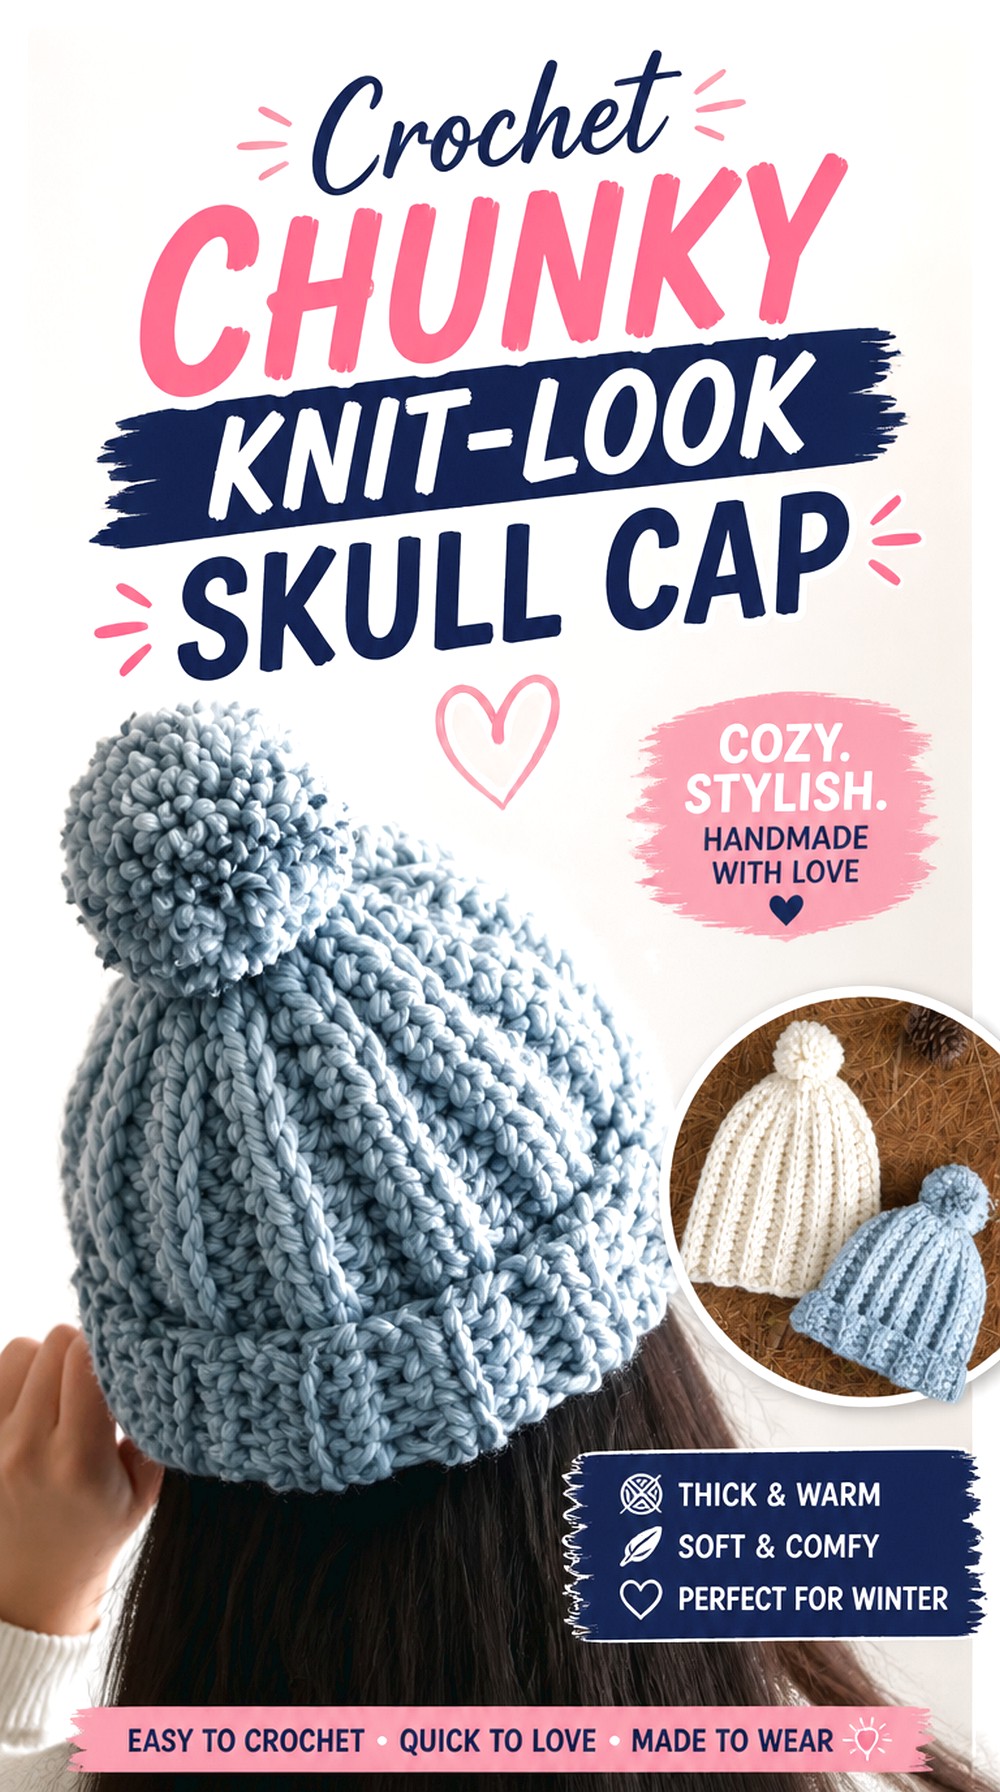
This chunky knit-look skull cap uses thick yarn and pronounced ribbing to create the most substantial silhouette in the collection. The rows form a knitted-looking surface, while the heavy yarn gives the ribs a bold scale that is noticeably different from the finer slip-stitch knit-look option earlier in the list.
Because the fabric is thick, every dimension carries more visual weight. Crown closure, folded edges, and overall depth can all look larger than they would in medium-weight yarn, so this project is better suited to an intentionally chunky winter aesthetic than a barely-there skull cap.
Thick Yarn Magnifies Crown Bulk
A crown that gathers neatly in a lighter fabric may look much fuller when the yarn is very thick. Pay close attention to the creator’s shaping and finishing rather than treating the top like a generic rectangular beanie closure. If you substitute an even bulkier yarn, expect the thickness itself to influence the final crown profile.
Choose Between a Folded and Cleaner Lower Edge
A chunky cap can become substantially thicker when the lower edge is doubled. If you like a strong cuff, that extra volume may be exactly what you want. For a closer skull-cap appearance, a less bulky lower treatment may feel more balanced. Compare the finished depth with the wearer’s head before deciding how much fabric to turn upward.
Original Tutorial and Creator Credit
Creator: forthefrills
Comparing the 18 Crochet Skull Cap Styles
For the closest, lightest visual fit, the Open-Mesh Skull Cap is the clearest starting point, while the Netted Summer Skull Cap adds more openness and relaxation through the upper body. The No-Bunch Ribbed, Multi-Size Ribbed, and Slip-Stitch Knit-Look caps suit readers who prefer strong vertical texture and a more traditional fitted beanie appearance.
For surface detail, the Crunch-Texture, Bobble-and-Cable, Zigzag-Line, and Camel-Stitch Spiral options make the stitches themselves the focal point. The Granny Square and Cat-Ear caps change the construction and outline more dramatically, while the Spiral-Crown design concentrates its visual interest at the top.
If you prefer extra depth rather than a true close fit, the V-Stitch Slouch Cap is the most deliberately relaxed choice. The Chunky Knit-Look cap moves in the opposite direction, emphasizing thickness and winter weight.
Conclusion
The right crochet skull cap depends first on the silhouette you want. Choose mesh or netted fabric for an airy, visibly open result; ribbing or slip stitches for a closer knit-inspired look; granny construction or cat ears for a more distinctive shape; and cables, post stitches, or chunky yarn when surface texture should carry the design.
Fit should be checked alongside fabric stretch and crown depth, especially when changing yarn. A small material substitution can affect how closely the cap sits or how much the crown gathers. Once you choose the shape that suits your goal, use the original tutorials linked above for the creator’s exact construction details and sizing information.
Frequently Asked Questions
How do I make a crochet beanie look more like a true skull cap?
Focus on crown depth and how closely the lower edge sits rather than simply making the entire hat smaller. A skull-cap profile generally has less extra fabric behind or above the head than a slouchy beanie. Start from a tutorial size that fits the intended circumference, then use the source’s guidance to judge length. Randomly removing width can make the hat tight without making the silhouette more fitted.
Which crochet skull cap style gives the most stretch?
Ribbed constructions are useful when stretch is a priority, but the amount of elasticity still depends on the stitch, yarn, hook, and personal tension. The No-Bunch Ribbed, Multi-Size Ribbed, and knit-look options are good designs to compare. Do not assume every ribbed fabric stretches equally; work enough of the chosen stitch pattern to test how it expands and recovers before finishing the cap.
Can I use cotton yarn for a crochet skull cap?
Cotton can work for some skull-cap designs, particularly when you want less fuzzy stitch definition or a warm-weather fabric, but it may behave differently from the yarn shown in a tutorial. Some cottons have less elastic recovery than wool or acrylic yarns. Check the specific yarn’s weight and stretch, then make sure your fabric still matches the fit and gauge requirements of the chosen design.
What is the main difference between a mesh skull cap and a ribbed one?
Mesh creates intentional open spaces, so it usually looks lighter and shows more of the hair or layer beneath the hat. Ribbing creates a more opaque, vertically textured fabric and often contributes noticeable stretch. Choose mesh when ventilation and an open look are priorities. Choose ribbing when you prefer stronger coverage, a knit-inspired surface, or a lower edge that visibly hugs the head.
Should I block a crochet skull cap before wearing it?
That depends on the yarn, stitch pattern, and construction. Motif-built hats can benefit from having individual pieces brought to compatible dimensions before joining, while heavily elastic ribbing should not be stretched into a permanently larger shape just to force a measurement. Follow the care instructions for the yarn and the tutorial’s finishing guidance. When blocking, preserve the intended fit rather than automatically flattening or enlarging the fabric.
How can I stop a crochet skull cap from becoming bulky at the crown?
Start with a construction designed to manage crown volume rather than trying to correct a bulky top after finishing. Top-down shaping, planned decreases, and shaped ribbed panels can all produce different crown results. Yarn thickness also matters: a closure that looks tidy in medium yarn may become prominent in chunky yarn. Compare the crown method and finished top in the tutorial before choosing your project.
Can I substitute another granny square in the granny skull cap?
Possibly, but only after comparing the replacement square with the original motif. Check its blocked width, edge structure, density, and how its corners align for joining. Two squares that use different stitch patterns can finish at different dimensions even when they contain a similar number of rounds. Adjusting a motif without checking those differences can change the hat circumference, crown shape, and seam placement.