Wilderkind is one of Pinterest’s 2026 predicted fashion and beauty trends, built around delicate animal references such as butterflies, fawn-like details, fox-inspired styling, and a softer sense of “forest magic” rather than loud animal print. Crochet is especially well suited to that mood because texture can carry the nature theme without requiring a literal print.

The 14 ideas below keep those animal and insect references in view while expanding naturally into fungi, leaves, acorns, and small flowers. Some projects are conspicuous statement pieces, while others work as a single quiet woodland detail. The useful differences are in scale, fit, opening style, motif relief, and how much of the accessory becomes part of the outfit.
Each entry points to a separate public tutorial from a different creator. Where a tutorial provides a broader animal-inspired base rather than a specifically Wilderkind design, that distinction is made clear before the creator credit.
Quick List
- Crochet Acorn Crossbody Satchel
- Crochet Mushroom Crossbody Bag
- Crochet Flower Motif Shoulder Bag
- Crochet Leaf Bandana
- Crochet 3D Butterfly Bandana
- Crochet Leaf Chain Headband
- Crochet Ruffled Mushroom Hat
- Crochet Pointed Pixie Bonnet
- Crochet Cheshire Cat Woodland Hood
- Crochet Butterfly Scarf
- Crochet Flower Bracelet
- Crochet Daisy-Chain Flower Choker
- Crochet Butterfly Choker
- Crochet Mushroom Earrings
Choose One Strong Nature Motif Before Layering Accessories
Wilderkind works particularly well when the nature reference is recognizable without every part of the outfit repeating it. An acorn satchel, mushroom hat, or animal hood already supplies a large visual cue, so those pieces can sit against relatively quiet clothing. A leaf headband, flower bracelet, or mushroom earrings leave much more room for another woodland detail elsewhere.
Also consider relief. Flat leaf patterning reads differently from raised butterflies, dimensional mushrooms, or pronounced hat ruffles. Combining several highly dimensional pieces can make the crochet compete for attention. If you plan to wear more than one handmade accessory at once, mixing scales usually produces a clearer result: one substantial piece with one smaller motif rather than several equally dominant forms.
Let Function Decide How Literal the Forest Theme Becomes
A necklace or pair of earrings can become quite literal because the object is small. A butterfly, mushroom, or line of flowers stays contained within a limited area. Bags and hats require more restraint because the themed surface is much larger.
For practical accessories, inspect the underlying shape before choosing primarily for motif. A crossbody bag still needs an opening that suits what you carry, a bandana still needs the amount of hair coverage you want, and a bonnet still needs the intended fit around the head. Decorative adaptations should support those basics rather than obscure them. Changing color is relatively straightforward; enlarging motifs, altering straps, or adding heavy three-dimensional pieces can affect how an accessory sits and should be planned more carefully.
1. Crochet Acorn Crossbody Satchel
1. Crochet Acorn Crossbody Satchel

The acorn satchel takes the forest reference beyond surface decoration: the bag itself becomes the woodland object. Last Minute Laura’s tutorial is explicitly for an acorn-inspired crossbody satchel, so this is a useful direction when you want the silhouette—not merely a stitched motif—to carry the Wilderkind theme.
That makes it quite different from a conventional tote with an acorn appliqué. The rounded form occupies noticeable space against the body, while the crossbody format turns the exaggerated shape into something wearable. Earthy colors are an obvious option, but they are not mandatory; retaining a clear visual division between the main acorn form and its upper area can preserve the reference even if you move away from literal browns.
Let the Acorn Shape Remain the Focal Point
Because the whole bag already has a recognizable botanical silhouette, extra mushrooms, flowers, leaves, tassels, and charms are not automatically improvements. Lay any proposed additions beside the completed body before attaching them. If the acorn becomes harder to recognize, the decoration is competing with the feature that made this particular bag worth choosing.
A quieter strap can also help the body remain dominant. If you change the strap treatment, consider its visual width as well as its length.
Check Where the Rounded Body Sits
A sculptural crossbody bag interacts with the wearer differently from a flat rectangular pouch. Before making substantial changes to strap length, consider where the widest part of the satchel will land.
A lower position may allow more swing, while a higher one changes how the rounded form sits against the torso. This is a good project to compare against a crossbody bag you already wear comfortably rather than choosing strap proportions only from an isolated measurement.
Creator: Last Minute Laura
2. Crochet Mushroom Crossbody Bag
2. Crochet Mushroom Crossbody Bag

This mushroom bag concentrates several recognizable fungi details in one accessory. Teenie Crochets’ tutorial covers the bag body, mushroom cap, spots, assembly, and a long strap, with the finished piece presented as a shoulder or crossbody-style mushroom purse.
Its appeal within a Wilderkind wardrobe is the immediate silhouette. You do not need additional mushroom prints elsewhere for the idea to register. The cap and spots already establish the theme, while the hanging bag body gives the design more volume than a flat mushroom appliqué. That makes it a stronger statement than the mushroom earrings later in this collection. If you prefer a less literal interpretation, changing the palette can soften the toadstool association without removing the distinctive cap construction.
Preserve the Relationship Between Cap and Body
The mushroom identity depends on two forms being read together. If you dramatically enlarge one section or add a very heavy trim to the other, the proportions may stop feeling intentional.
Color can help reinforce the division. The cap does not need to be classic red, but enough contrast between major sections can make the shape easier to understand from a distance. This matters more on a shaped bag than on an accessory where the mushroom is simply a small attached motif.
Inspect the Opening Before Planning a Lining
If you intend to carry small loose objects, look closely at the finished fabric and the way the bag opens before deciding whether you want to add lining. A lining would be an adaptation rather than something to assume from the tutorial.
It also creates extra finishing work around the top of an unusually shaped bag. Complete enough of the crochet shell to understand the real opening and internal shape before cutting fabric or deciding how any added lining would be attached.
Creator: Teenie Crochets
3. Crochet Flower Motif Shoulder Bag
3. Crochet Flower Motif Shoulder Bag
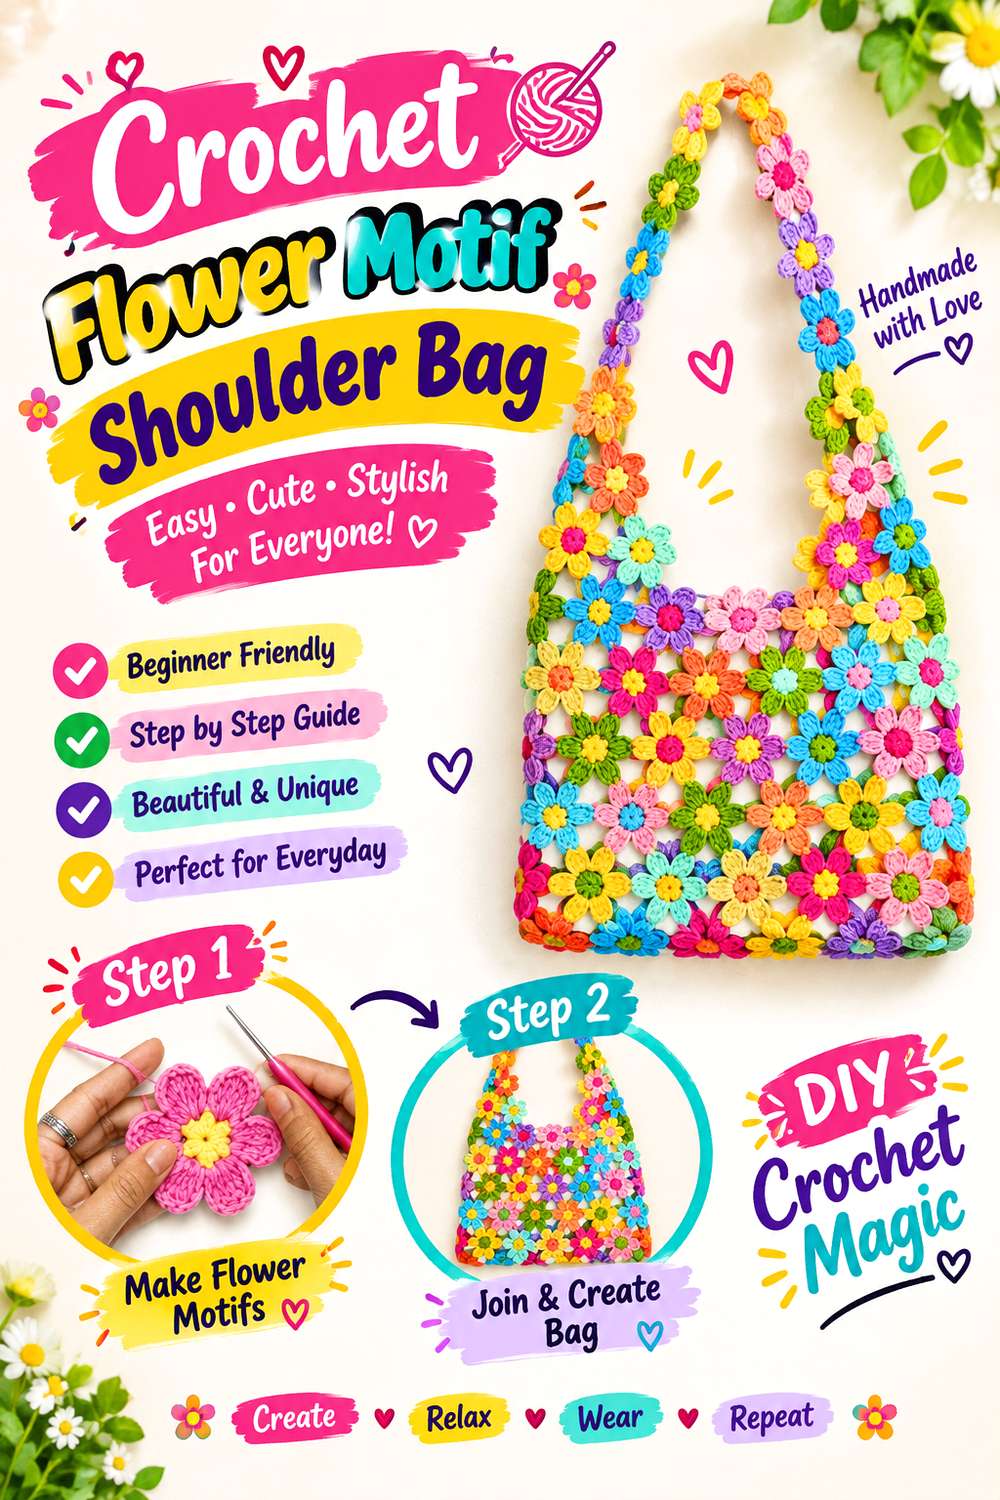
For a softer botanical interpretation, this bag is assembled around individual flowers rather than an animal or fungi silhouette. The Crochet Channel’s tutorial demonstrates five- and six-petal flowers, a join-as-you-go method, and the construction of the bag body, strap, and bottom.
That motif-built surface gives the accessory a very different character from the acorn and mushroom bags. Instead of one large woodland object, you get repeated small blooms whose joining lines become part of the design. This is particularly useful if you want the Wilderkind mood to feel gathered and organic rather than costume-like. A restrained moss, cream, bark, dusty floral, or mixed woodland palette could shift the flowers away from a bright garden look without changing the underlying project.
Judge the Gaps as Part of the Design
Joined flower motifs naturally create a surface different from dense continuous crochet. Before using the bag for small objects, inspect how open the finished fabric becomes, particularly where motifs meet.
If you consider adding a lining, treat it as a separate design decision. A contrasting lining can become visible through open areas, while a closely matched lining recedes. Either choice changes the final look, so decide after you can see the actual joined fabric rather than before making the flowers.
Keep the Strap Visually Connected to the Motifs
The flowers already produce a busy rhythm across the bag body. An elaborate replacement strap can compete with that pattern, especially if it introduces another strong texture.
If you alter the source design, first decide whether you want the floral field or the carrying arrangement to attract attention. A quieter strap emphasizes the flowers; a more decorative strap turns the whole accessory into a layered statement. Neither approach is inherently better, but combining both without a focal point can make the design harder to read.
Creator: The Crochet Channel
4. Crochet Leaf Bandana
4. Crochet Leaf Bandana
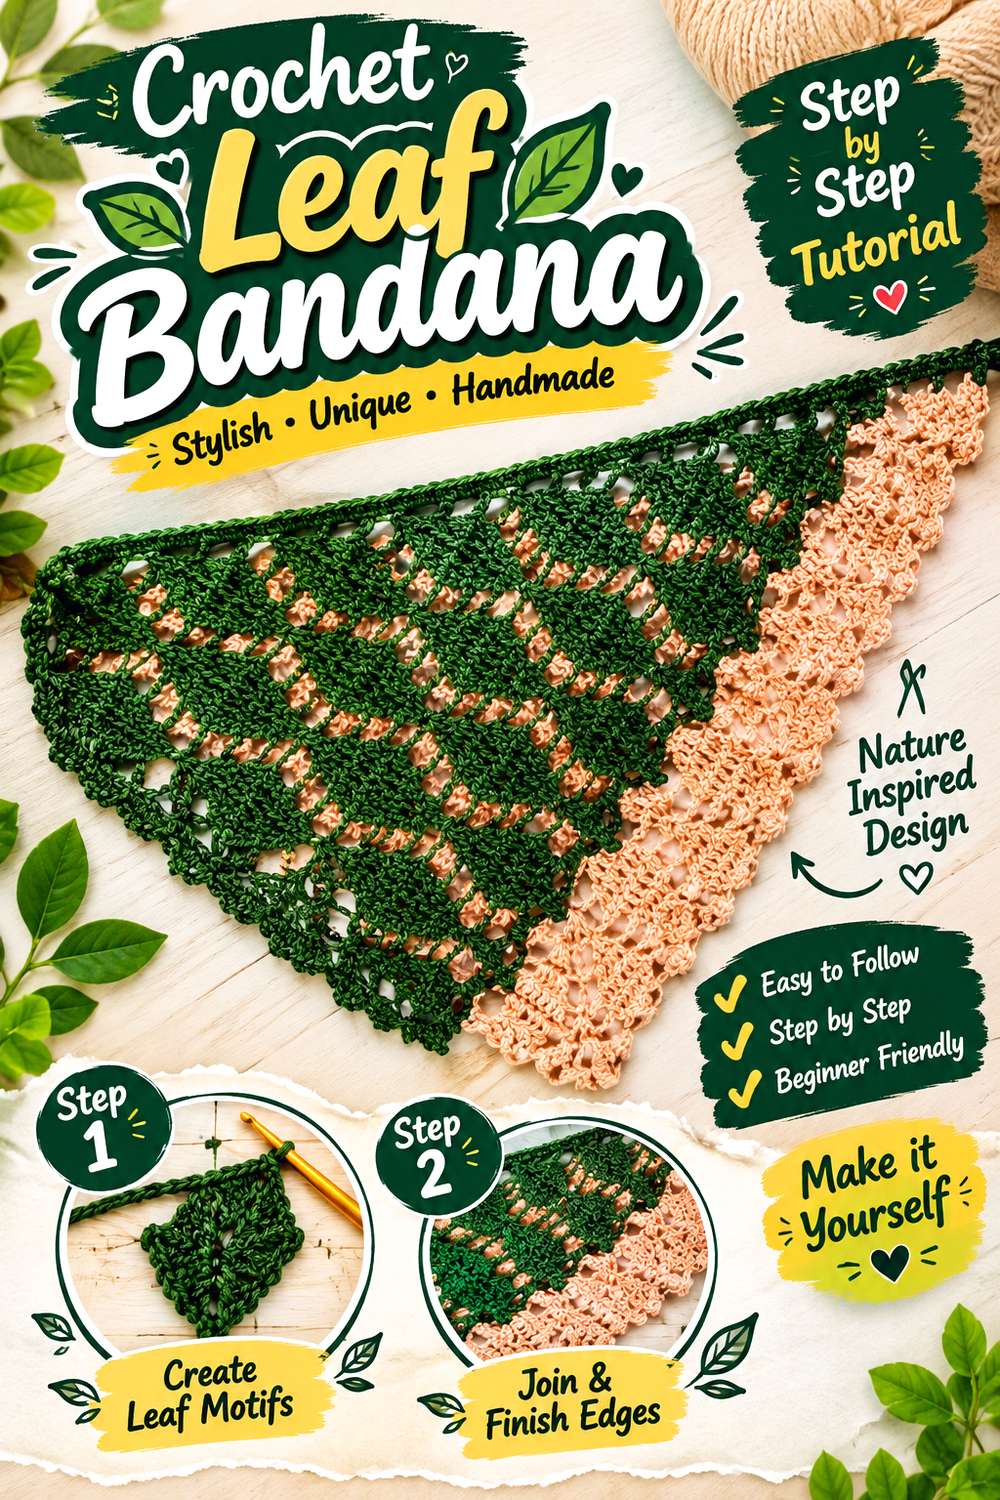
A leaf-pattern bandana brings the forest reference much closer to everyday hair styling. Nanda Pedreira Crochet’s tutorial specifically teaches a bandana with a repeated leaf design, making this an exact botanical project rather than an ordinary triangle scarf recolored in green.
The distinction is useful because the leaf structure creates interest across the fabric itself. From a distance, the accessory can still read as a simple head covering; up close, the botanical repeat becomes the identifying feature. This makes it easier to combine with plain clothing than a sculptural mushroom hat or animal hood. It also offers a way to use Wilderkind without relying on obvious woodland creatures. A single-color version would emphasize stitch shadow, while stronger contrast can make the leafy surface more noticeable.
Decide How Much Hair Coverage You Want
Bandanas can look similar when laid flat while feeling quite different once tied. Consider how far you want the point to extend and how much of the sides of the head you prefer covered.
If you alter the size, remember that width, depth, and tie position interact. Expanding every direction automatically may produce more fabric than expected around the ears or neck. Compare the tutorial’s finished shape with a bandana you already like before changing the proportions.
Let the Leaf Pattern Carry the Color Story
A detailed botanical repeat does not require a complicated palette. In fact, a single moss, fern, bark, cream, or muted rust tone can make stitch definition the main event.
If you do introduce multiple colors, consider where the changes fall inside the leaves. Abrupt high-contrast changes can visually break up the motif. A swatch is useful here because the question is not merely whether two skeins look good together, but whether the resulting leaves remain legible once crocheted.
Creator: Nanda Pedreira Crochet
5. Crochet 3D Butterfly Bandana
5. Crochet 3d Butterfly Bandana
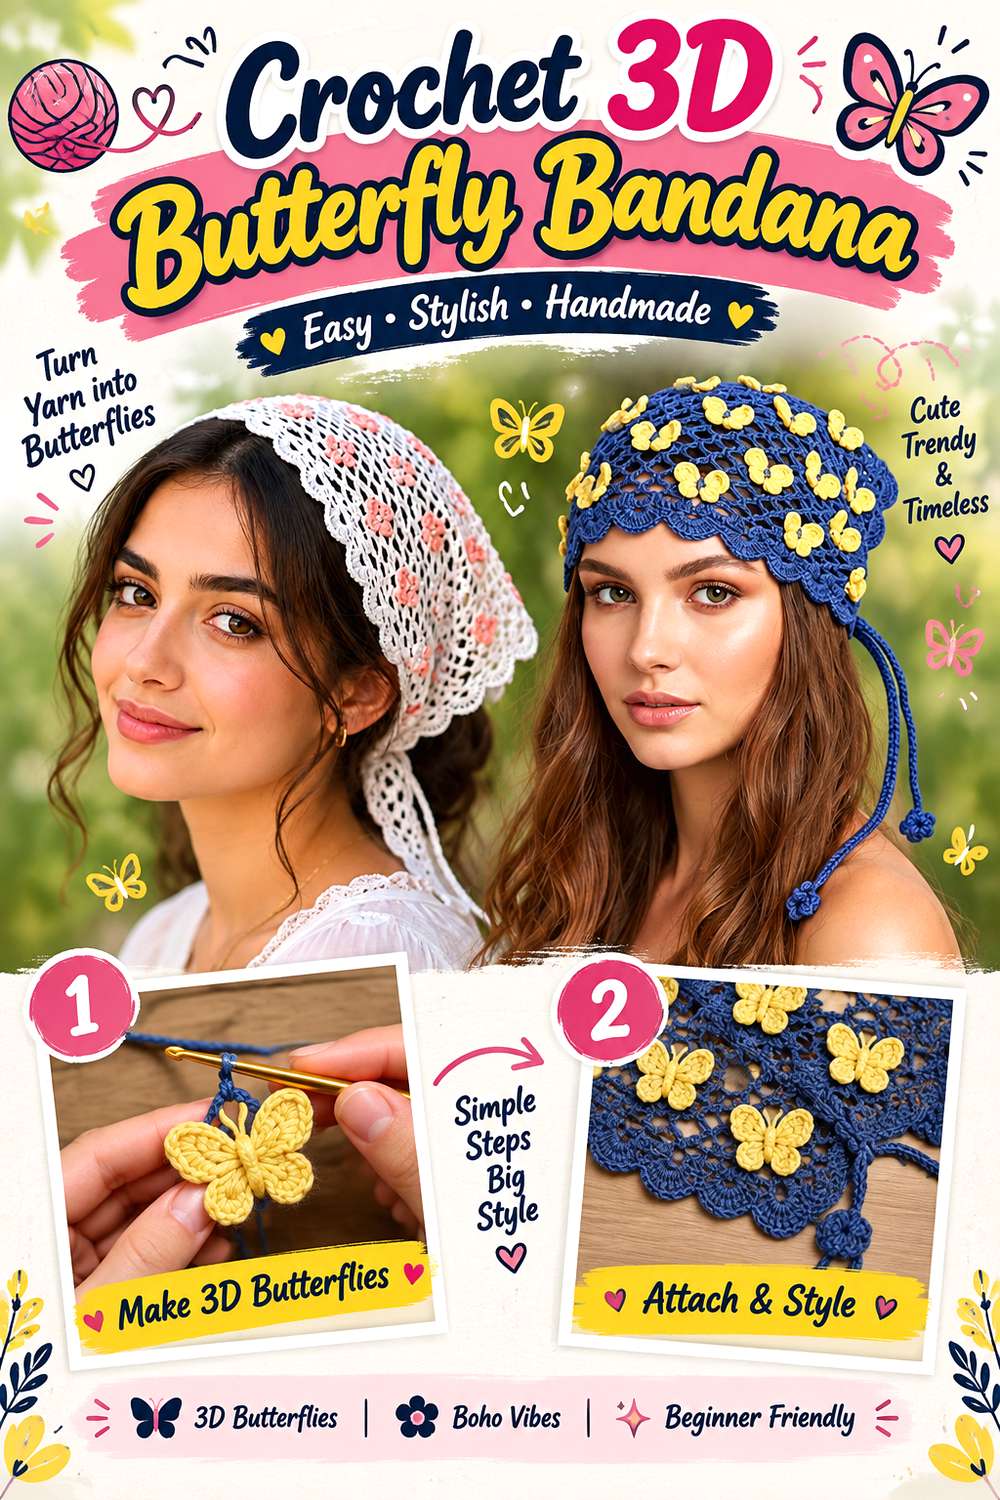
This bandana moves the insect motif off the printed or stitched surface and into three dimensions. The tutorial from baftanieziba teaches the bandana, its delicate open fabric, raised butterfly elements, and their attachment to the finished accessory. The source is presented in Persian, so that language difference is worth considering before choosing it as your primary instruction.
Visually, this is a more literal Wilderkind interpretation than the leaf bandana. The butterflies sit as distinct objects rather than disappearing into an allover stitch repeat. That creates small focal points around the head and makes placement important. A few clearly separated butterflies can feel airy and intentional, while crowding many dimensional motifs together would produce a very different, more decorative result.
Raised Butterflies Need Breathing Room
Three-dimensional motifs cast their own shadows and can overlap visually even when they are not physically touching. Before attaching additional butterflies, pin or lay them temporarily across the bandana and view the piece at wearing distance.
Spacing that appears sparse on a table can look balanced once the fabric curves over the head. Leaving some open crochet visible around each motif helps the butterfly shapes remain recognizable instead of merging into a general textured surface.
Keep the Tie Area Relatively Clear
The ends of a bandana undergo more handling because they are repeatedly tied, tightened, and released. Raised motifs placed directly in that area may twist into the knot or add unnecessary bulk.
If adapting the decoration, concentrate the butterflies where the fabric remains visible and comparatively flat when worn. This preserves their visual role while keeping the functional tying section easier to handle. It is a simple example of letting placement solve both a styling and a usability question.
Creator: baftanieziba
6. Crochet Leaf Chain Headband
6. Crochet Leaf Chain Headband
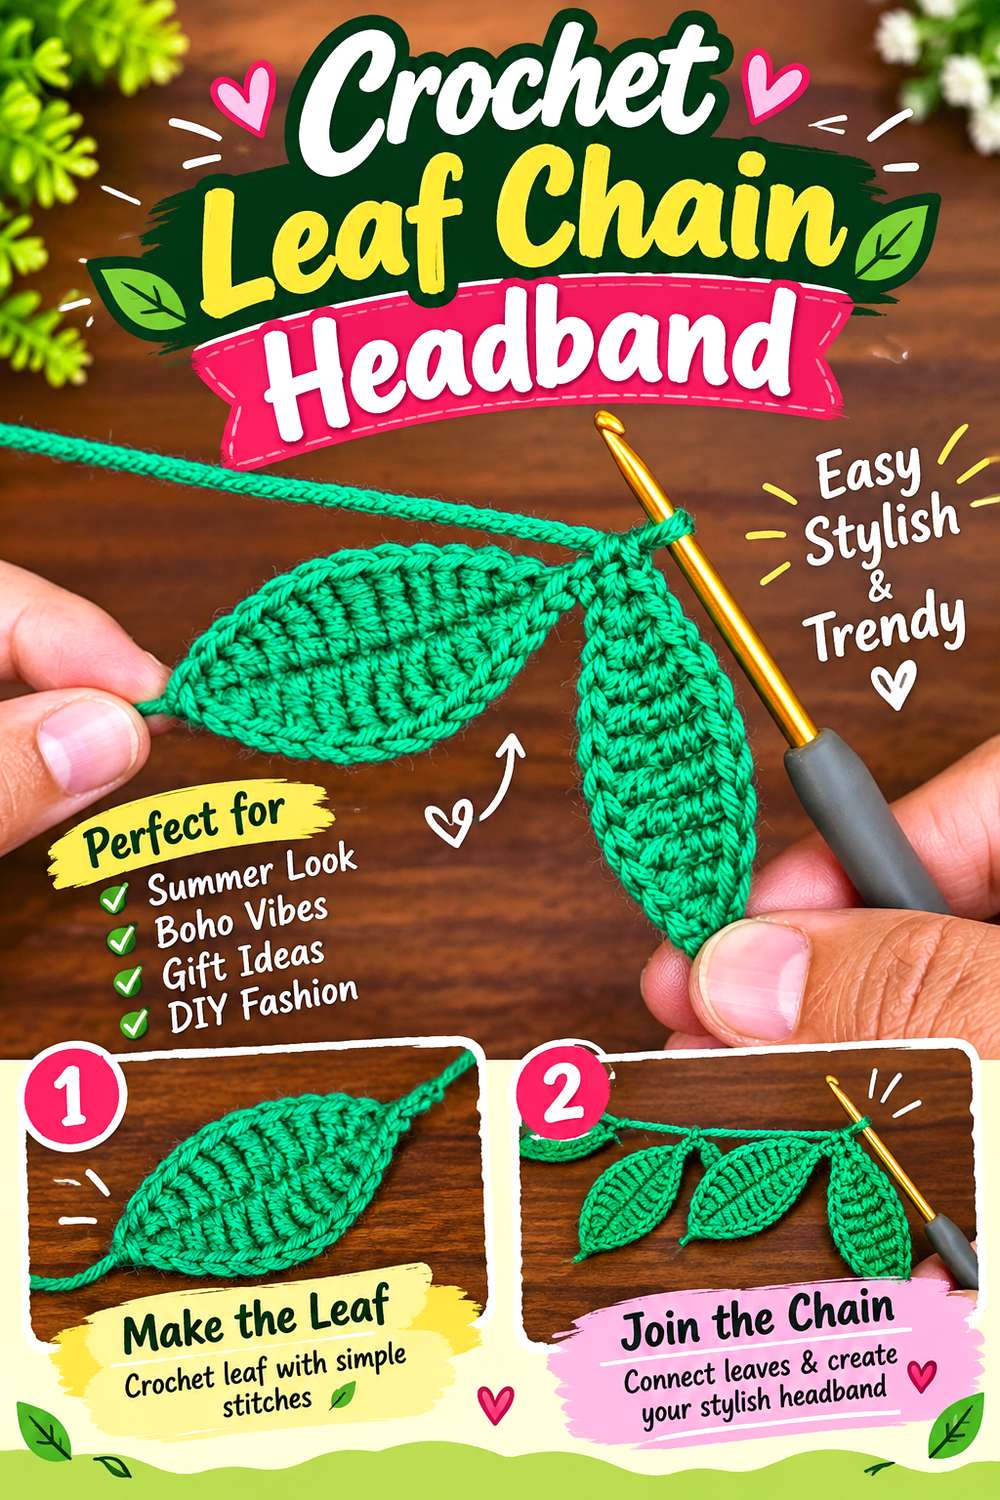
This headband reduces the botanical idea to a sequence of linked leaves. The tutorial from knitting workshop covers making a leaf motif, connecting the leaves into a headband, and adjusting the finished size.
Compared with the broader leaf bandana, this accessory leaves much more hair visible and turns the botanical form into a narrow line around the head. That difference makes it useful when you want a distinct nature cue without adding another large textile layer. It can also sit beside earrings or a small necklace more comfortably than an oversized hat. The leaf shapes themselves are the main feature, so color decisions can be restrained. A tonal green version feels botanical, while cream, rust, brown, or muted lilac can keep the form while loosening the literal forest association.
Watch the Rhythm Between Leaves
A linked motif accessory depends on repetition. Leaves that twist unpredictably or bunch together can make the headband appear uneven even when every individual motif is neatly made.
Before completing the final connection, lay the band out in the curve it will take around the head. Check whether the leaves face consistently or alternate in the way you want. This is easier to adjust before finishing than after the entire band has been secured.
Fit the Band, Not Just the Motif Count
Adding another leaf seems like a simple way to increase the headband size, but each additional motif also changes the spacing and visual rhythm.
Use the tutorial’s size-adjustment guidance as the construction reference, then test the developing band on its intended wearer when possible. You want enough security for the accessory to stay positioned without relying on an arbitrary number of leaves. Yarn behavior and tension can alter the finished length even when two versions contain the same motif count.
Creator: knitting workshop
7. Crochet Ruffled Mushroom Hat
7. Crochet Ruffled Mushroom Hat

This mushroom hat goes well beyond a red cap with white spots. Mainmade Crochet’s tutorial includes a broad mushroom form, added spots, and pronounced ruffles designed to act as the gills beneath the cap.
Those ruffles change the character of the accessory substantially. From above, the cap provides the fungi reference; from lower angles, the layered underside gives the hat movement and depth. It is consequently one of the more theatrical pieces in this collection. That can be ideal for festival, fantasy, or strongly themed styling, but it also means the hat does not need many other woodland accessories competing near the face. If you want a softer Wilderkind interpretation, an earthy or muted palette can tone down the novelty while retaining the sculptural silhouette.
Treat the Gill Ruffles as the Main Detail
The underside already introduces significant texture. Before adding extra leaves, flowers, dangling charms, or a decorative hat band, look at the completed ruffles from the front and side.
They may provide enough detail without further embellishment. This is especially important because additions near the brim can visually merge with the gill layers. If you customize, one restrained secondary detail will usually remain easier to read than several equally dimensional additions around the same edge.
Place Spots for the Finished Curve
Mushroom spots need to be judged on the three-dimensional cap rather than only on a flat or partially worked surface. A placement that looks evenly spaced while the fabric is relaxed can appear clustered once the hat assumes its final curve.
If you change the number or scale of the spots, temporarily position them before permanent attachment. View the hat from front, back, and side so one area does not accidentally become much more visually crowded than the others.
Creator: Mainmade Crochet
8. Crochet Pointed Pixie Bonnet
8. Crochet Pointed Pixie Bonnet
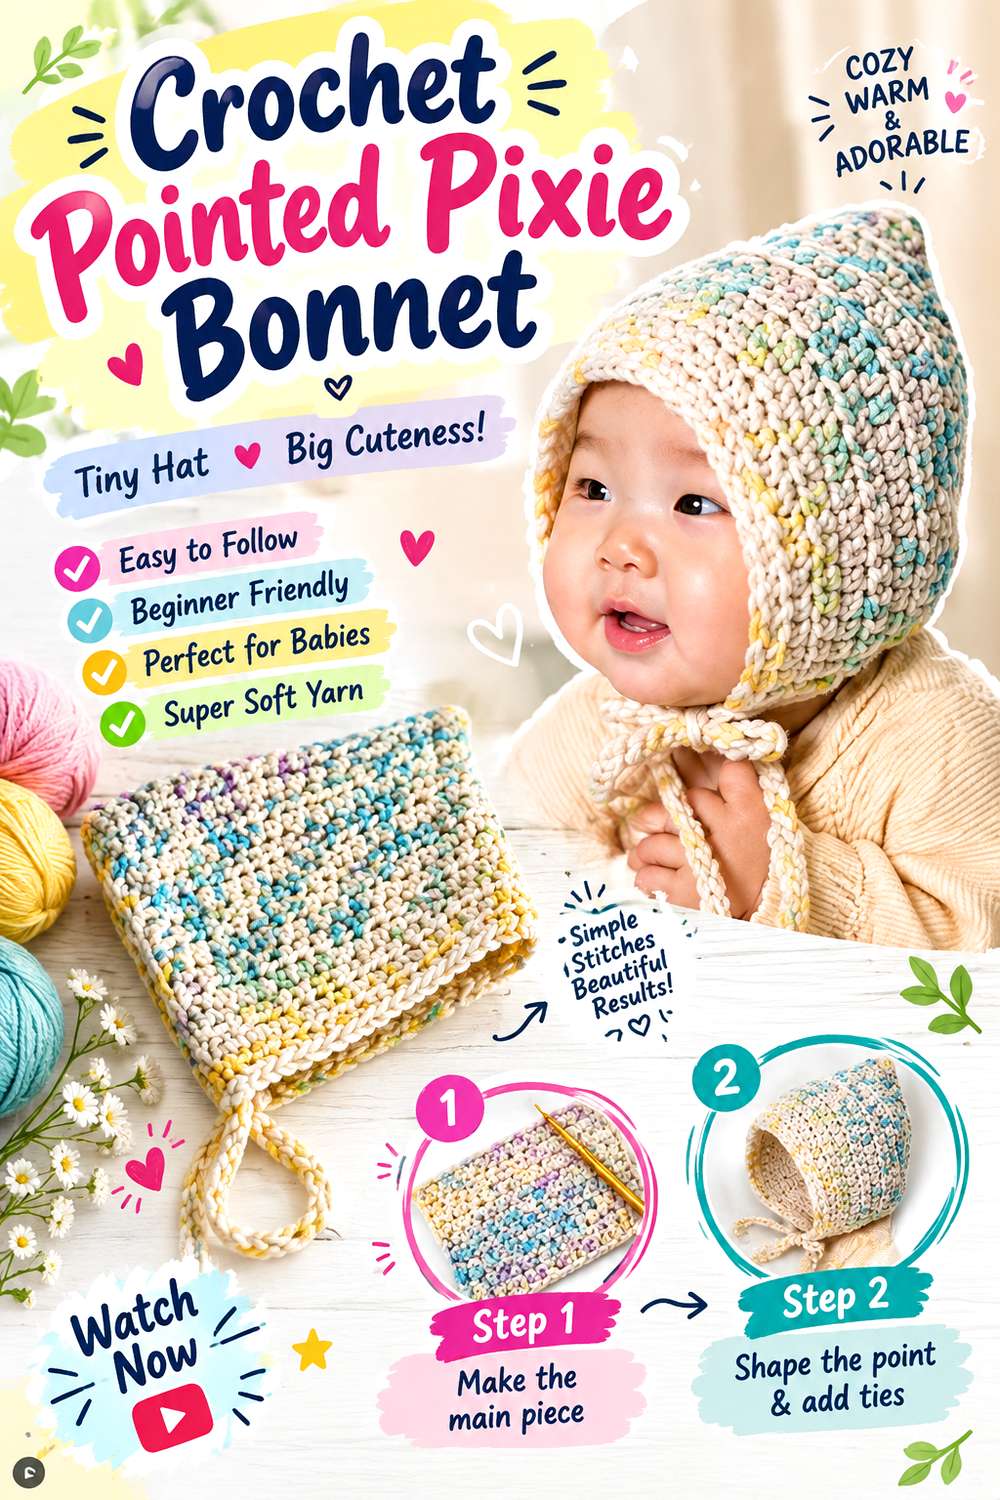
A pixie bonnet creates woodland character without attaching an animal, insect, flower, or mushroom at all. Sweet Softies’ tutorial shows how a crochet rectangle becomes a pointed bonnet and includes guidance for customizing the dimensions, straps, and edging for different head sizes. The creator explicitly describes the finished style as fairytale and woodland inspired.
That makes this one of the quieter Wilderkind options. The point supplies the storybook silhouette, leaving color and texture free to stay restrained. It is also fundamentally different from the mushroom hat: one relies on a broad sculptural cap, while the other uses the shape at the back of the head. If your wardrobe already includes butterfly or fungi motifs, this can provide forest atmosphere without adding another literal motif.
The Rectangle Controls More Than Overall Size
When the bonnet begins from a rectangle, changing its dimensions affects the eventual point as well as the amount of head coverage. Simply making every side larger can exaggerate the crown in ways you did not intend.
Follow the creator’s adjustment approach rather than treating resizing as a generic percentage increase. It is useful to decide first whether your priority is a subtle point or an intentionally elongated pixie profile, because those are different visual outcomes.
Keep the Edging Secondary to the Point
The silhouette is already distinctive, so a very thick or highly contrasting face border can pull attention away from the feature that gives the bonnet its woodland identity.
If you customize the edge, look at the piece while it is worn rather than flat. A trim that appears narrow on the worktable occupies a more prominent position once it frames the face. Subtle edging lets the crown point and overall bonnet shape remain the clearest design decisions.
Creator: Sweet Softies
9. Crochet Cheshire Cat Woodland Hood
9. Crochet Cheshire Cat Woodland Hood
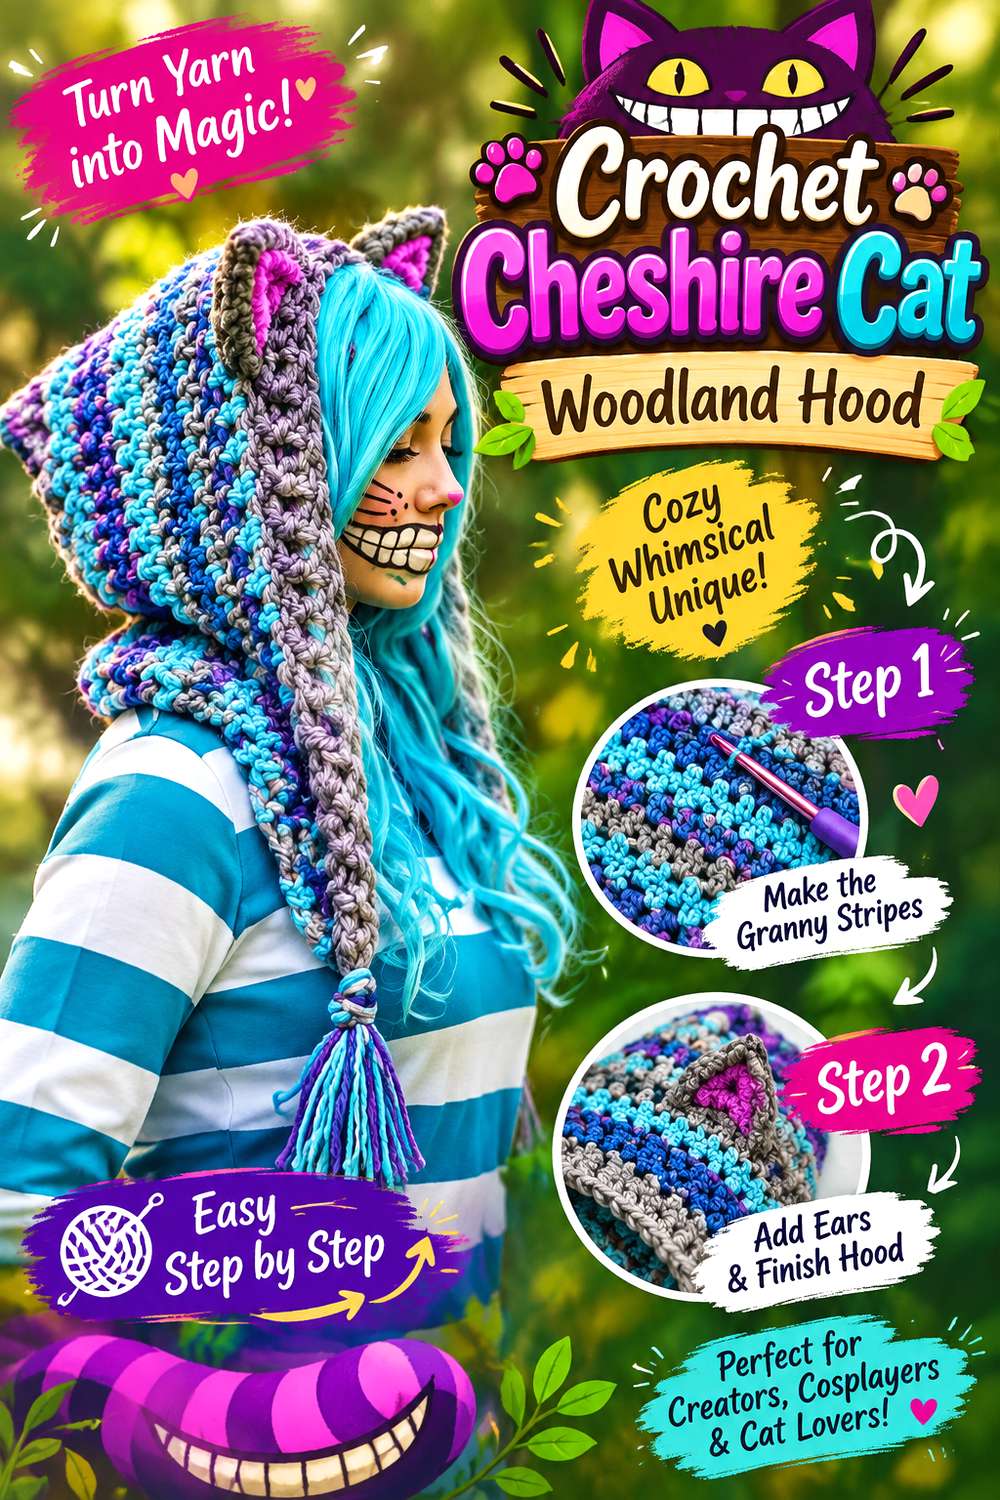
For an animal-driven interpretation, YARNutopia’s source project is an actual Cheshire Cat crochet hood with ears, front braids, and a laced treatment at the back. The creator’s accompanying pattern page also notes that the ears can be omitted or replaced with other animal-ear shapes, including bear or fox ears.
The tutorial therefore provides a complete animal hood rather than only an ear motif. For a Wilderkind adaptation, the underlying hood can stay intact while the color palette and ear identity shift toward a quieter woodland animal. That is an adaptation, not what the source video originally presents: the tutorial itself is for a Cheshire Cat design. This is most suitable for readers who want an unmistakable animal silhouette rather than the subtler botanical accessories elsewhere in the collection.
Choose the Animal Before Changing the Trim
Triangular cat ears, sharper fox-like points, and rounded bear ears create noticeably different profiles. Decide which species reference you want before adding other decorative elements.
The back lacing and front braids already contribute considerable detail, so changing the ears may be enough to redirect the design. If you simultaneously alter the ears, edging, braid treatment, and surface decoration, it becomes more difficult to judge which element is carrying the animal identity.
The Laced Back Is Already a Focal Point
Many animal hats concentrate every detail at the front. This hood distributes interest around the piece because the back treatment is visible too.
That makes it worth checking the hood from all directions before adding appliqués. A leaf or mushroom motif that seems like an empty-space solution from the front may compete with the lacing when seen from behind. A forest-colored version can rely on the existing construction instead of needing literal woodland decoration across every surface.
Creator: Fuad Azmat / YARNutopia by Nadia
10. Crochet Butterfly Scarf
10. Crochet Butterfly Scarf

Emma Fassio’s Farfalla scarf turns the butterfly theme into a long, narrow accessory rather than attaching separate butterfly appliqués. The creator provides a step-by-step tutorial and describes the sample as a slim scarf composed around the butterfly design.
That slender proportion makes this different from a conventional winter scarf. It behaves more like a decorative textile line around the neckline, allowing the repeated motif to remain visible without a large amount of fabric. Within a Wilderkind outfit, it can bridge two approaches: insects provide the recognizable nature reference, but the overall shape remains familiar and wearable. Because the pattern extends along the scarf, color does not have to carry the theme. A quiet single shade can put more emphasis on the motif itself.
Think About the Motif When the Scarf Is Wrapped
A repeated design may look perfectly spaced while the scarf is stretched out but overlap or disappear when the ends cross at the neck.
Before adding any optional embellishment, test the finished or nearly finished scarf in the way you expect to wear it. Notice which sections remain visible. There is little benefit in placing additional dimensional details exactly where the scarf folds over itself, especially when the butterfly structure already supplies visual interest.
A Narrow Scarf Leaves Room for Other Small Accessories
Because this design is relatively slender, it can share the neckline area more easily than a broad shawl or deep cowl. That does not mean every nearby accessory should also feature butterflies.
If pairing it with jewelry, consider a tiny mushroom earring, simple botanical stud, or plain metal piece rather than another large insect motif. Repeating the same symbol several times at the same scale can make the styling feel more themed than the soft Wilderkind approach requires.
Creator: Emma Fassio
11. Crochet Flower Bracelet
11. Crochet Flower Bracelet
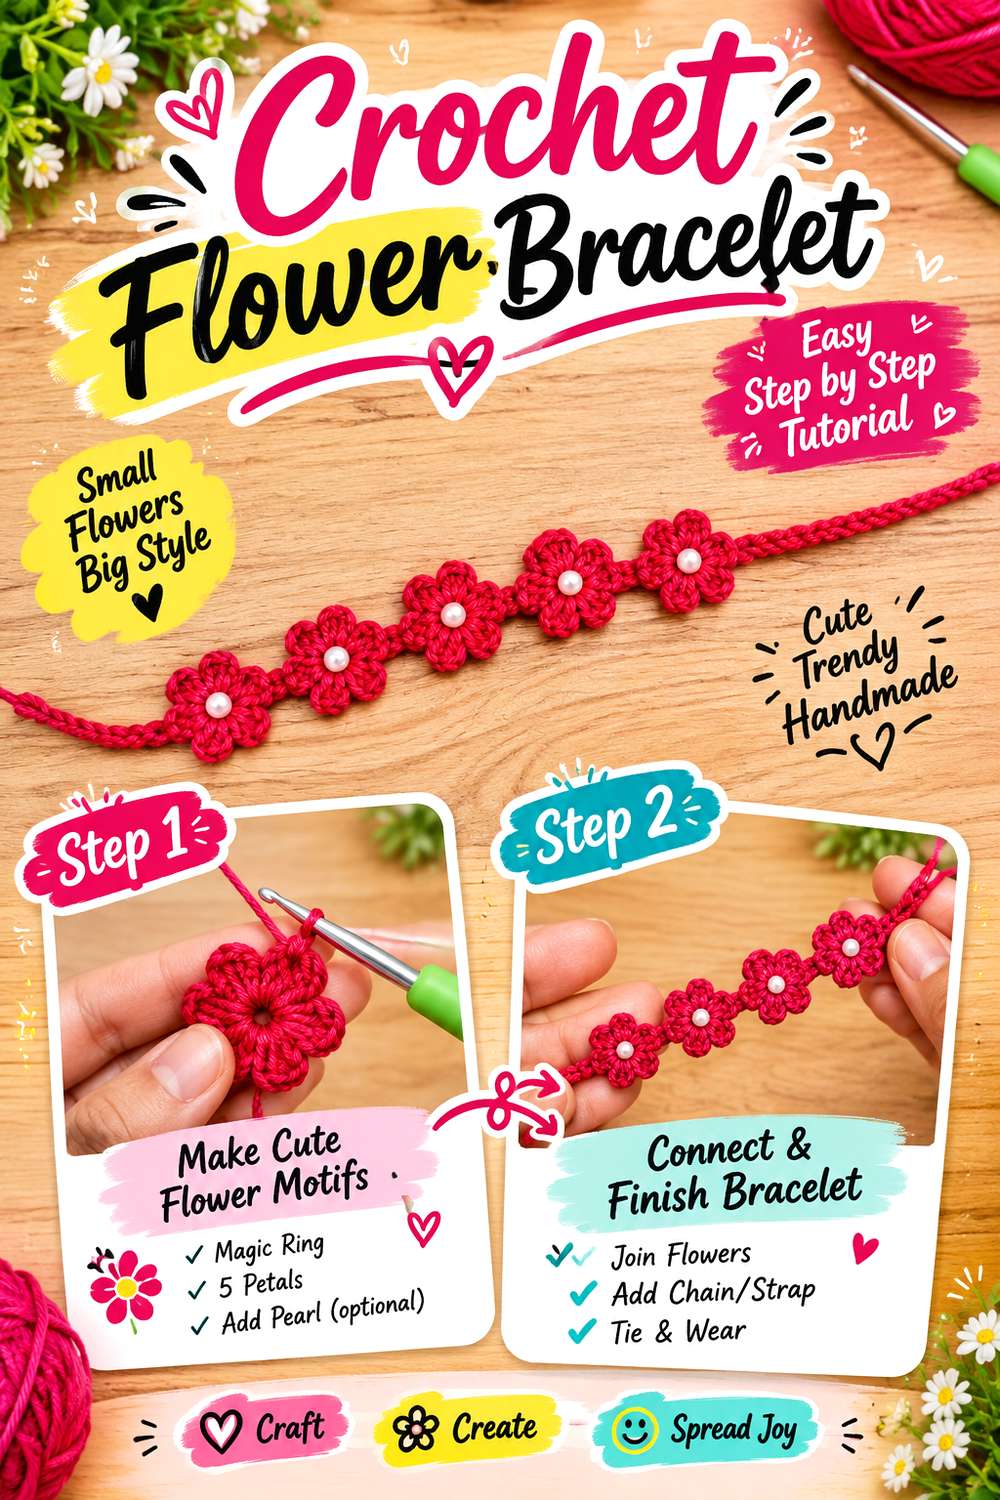
This flower bracelet offers a much smaller way to introduce organic shapes. hibouchoucaillou’s tutorial works the flowers directly into the developing bracelet rather than making a collection of separate blossoms that later need sewing. The creator presents the process from the bracelet start through the first flower and final finishing.
The continuous construction gives the flowers the appearance of a delicate chain rather than a bulky floral cuff. That is valuable in a Wilderkind collection because not every accessory needs to imitate an animal. A restrained botanical line at the wrist can support a stronger mushroom bag, butterfly scarf, or woodland bonnet without competing with it. It is also a useful place for a soft accent shade if the rest of the outfit already contains several moss and bark tones.
Repetition Matters More Than Individual Flower Size
A bracelet is viewed as a continuous curve around the wrist, so consistency between neighboring flowers matters as much as the appearance of one blossom.
As the piece develops, lay it in a circle occasionally rather than evaluating it only as a straight strip. This reveals whether the flowers overlap attractively or become crowded once curved. If you change yarn thickness, the same construction can occupy more space, which may alter both flower scale and the number that fits comfortably around the wrist.
Confirm the Fit Before Final Finishing
Crochet jewelry can change character when it moves from the table to the body. A bracelet that looks delicately spaced while flat may compress the flowers when closed around the wrist.
Use the tutorial for the construction method, but assess the actual developing piece against the intended wearer. If you modify the length, do so before final finishing wherever the construction allows. The goal is not simply fitting more flowers; it is preserving the visual spacing that made the design attractive in the first place.
Creator: hibouchoucaillou
12. Crochet Daisy-Chain Flower Choker
12. Crochet Daisy Chain Flower Choker
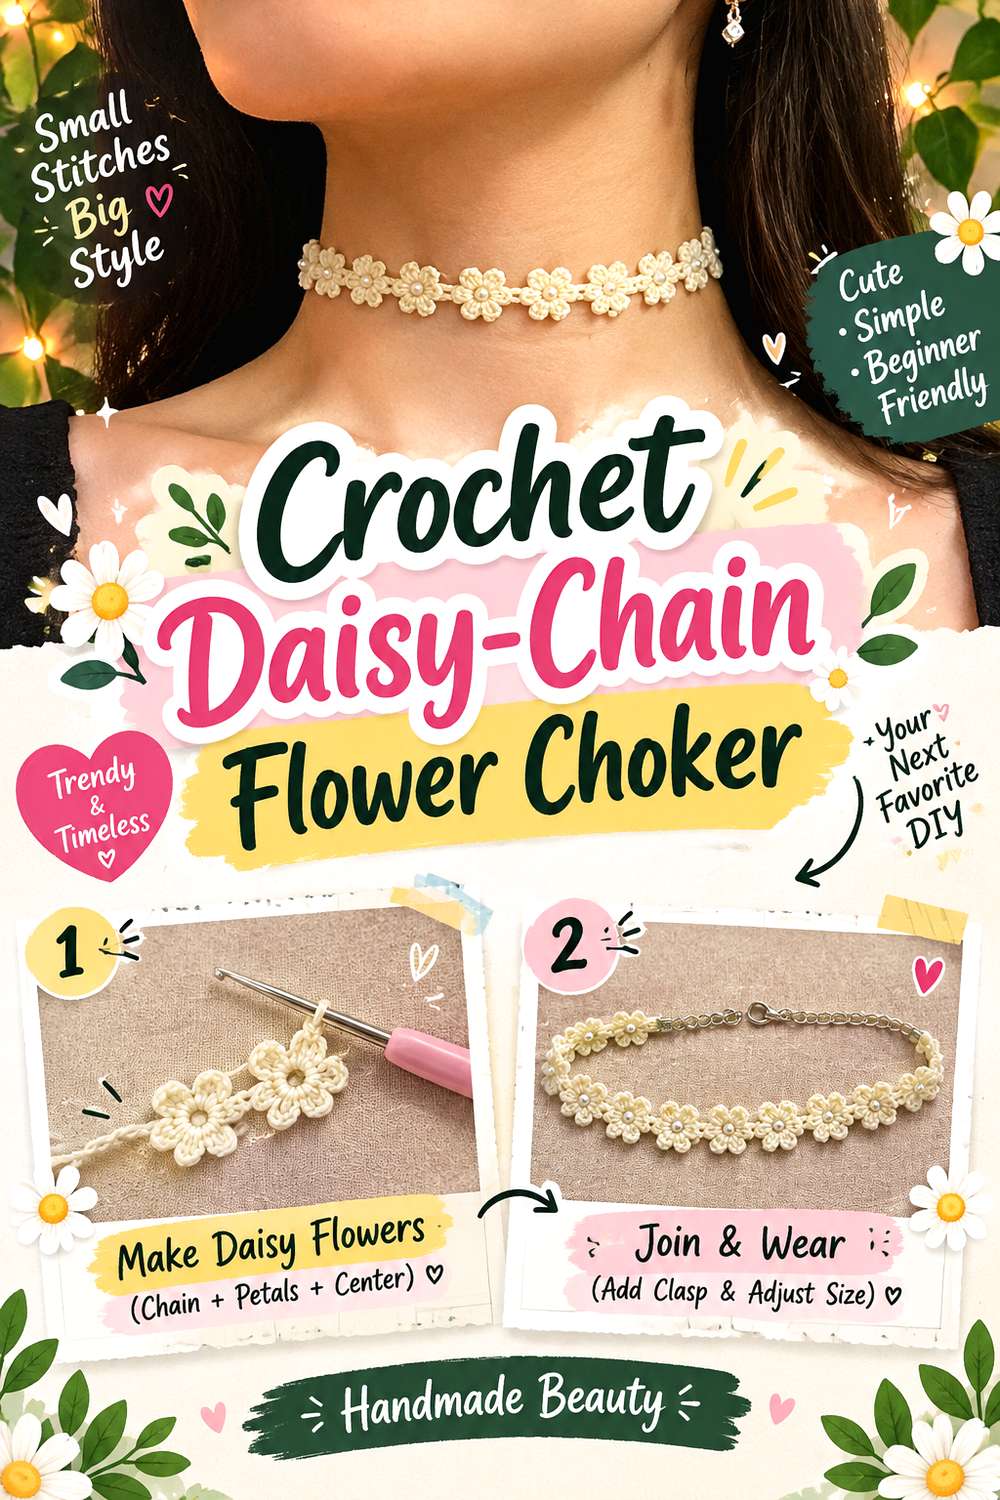
VivCrochets’ flower choker uses a continuous row of small blooms to create a daisy-chain effect around the neck. The creator’s tutorial uses chains and slip stitches, while the accompanying written pattern explains that different yarn thicknesses produce noticeably different flower and necklace scales.
That scale sensitivity is important. Worked in finer material, the necklace can read almost like textile lace; with thicker yarn, the same concept becomes a much more visible floral collar. For Wilderkind styling, that gives you control over how literal the botanical element becomes. A fine version can sit beside an animal-inspired accessory without dominating it, while a thicker version can act as the principal handmade detail around an otherwise simple neckline.
Yarn Thickness Changes the Entire Visual Weight
This is one of those projects where substitution affects more than softness or drape. Larger yarn produces larger flowers and a wider visual band around the neck.
Before committing to a full choker, crochet enough of the flower sequence to hold against the neckline. That quick comparison tells you more than the yarn label alone. If the blossoms look heavier than intended, changing material is usually a clearer solution than trying to force the same flower construction into a different proportion afterward.
Fit the Choker to the Intended Neckline
A choker has much less tolerance for approximate sizing than a long scarf. It also interacts directly with shirt collars, dress necklines, and other jewelry.
Measure the intended wearing position rather than copying a finished length without context. If you plan to layer it above a crew neck, the visual effect differs from wearing it against bare skin or with a low neckline. The flower scale and placement should make sense in the position where the necklace will actually sit.
Creator: VivCrochets
13. Crochet Butterfly Choker
13. Crochet Butterfly Choker
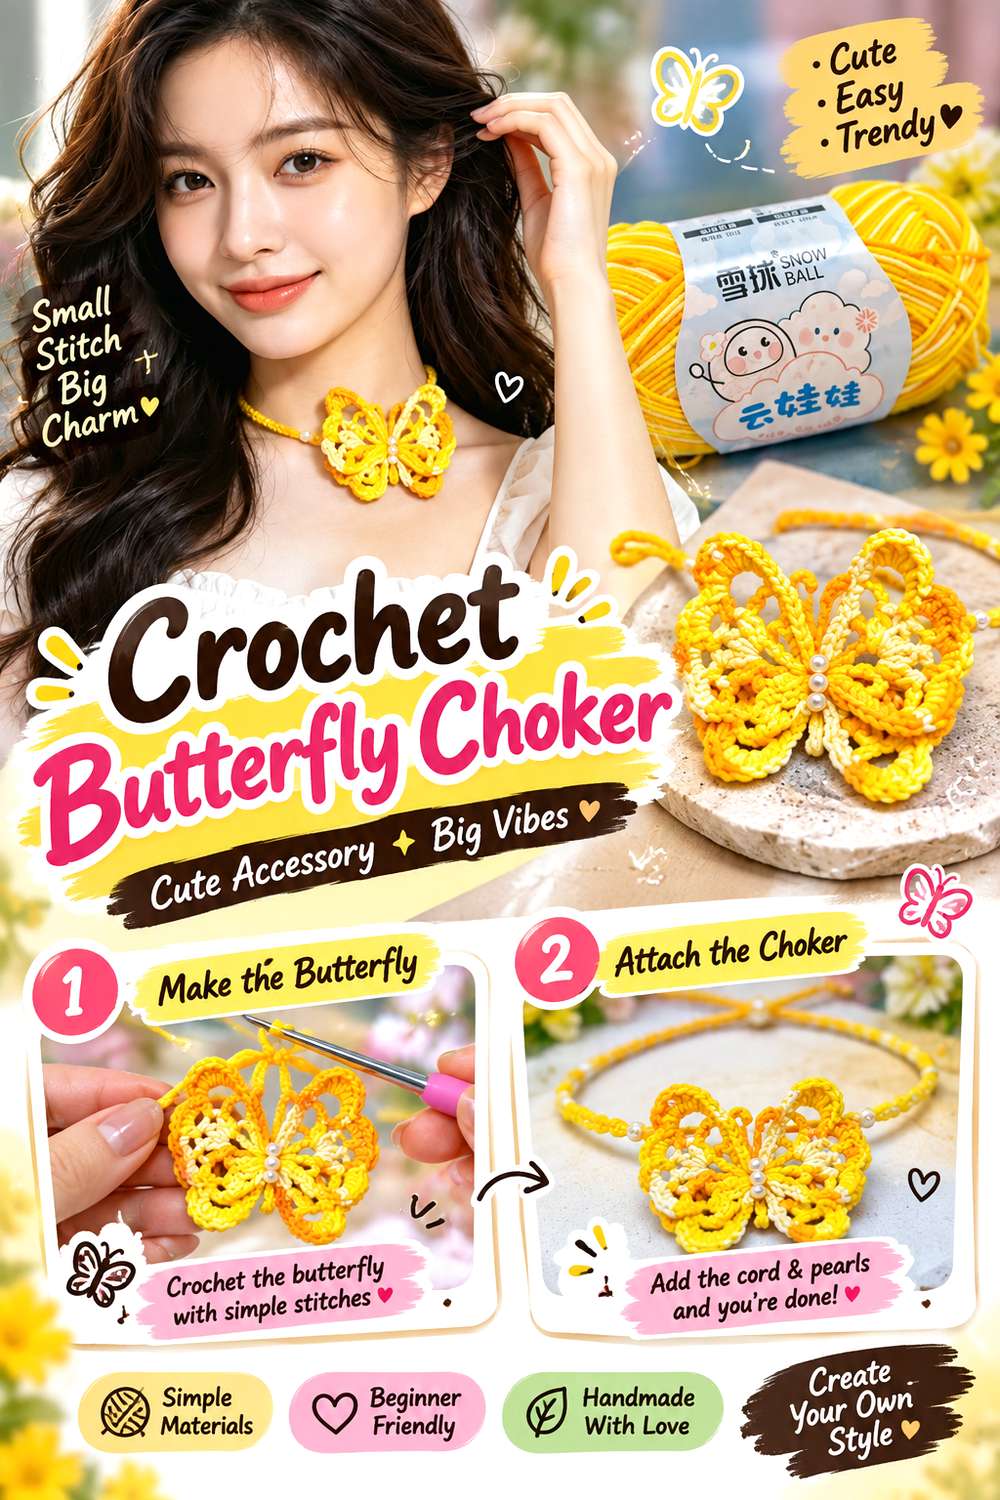
This butterfly choker makes the insect itself the necklace focal point. DreamFashionScarf’s tutorial covers forming butterfly wings, adding pearl or bead details, and creating an adjustable choker strap. The source description is written largely in Gujarati transliteration, so readers who depend on English-first spoken instruction should check the available audio or caption options before choosing it.
Compared with the repeating flower choker, this design concentrates attention in one central motif. That makes it a strong choice when you want an unmistakable Wilderkind reference without covering the entire neckline in pattern. A gradient material can add movement across the wings, while a quieter solid version would make their shape more graphic. Because the butterfly sits at the center, any beads or added details become visually important even when they are physically small.
Keep the Butterfly Center From Becoming Too Heavy
The source includes pearl or bead detailing, but additional hardware can quickly change how a lightweight crochet motif hangs. If adapting the center, consider both visual size and physical weight.
A very large bead may pull the butterfly downward or distort the way its wings spread. Test the intended embellishment against the completed crochet motif before securing it. The most decorative component is not necessarily the one that best preserves the butterfly silhouette.
Let the Adjustable Strap Stay Visually Quiet
The main reason to choose this choker is the butterfly, so the neck strap generally works best as support rather than a second focal point.
If you substitute the strap construction, compare its thickness with the body of the butterfly. An unusually wide or heavily textured band can make the necklace read as a collar with a small ornament instead of a butterfly-centered design. Decide which interpretation you want before making the supporting section more elaborate.
Creator: DreamFashionScarf
14. Crochet Mushroom Earrings
14. Crochet Mushroom Earrings
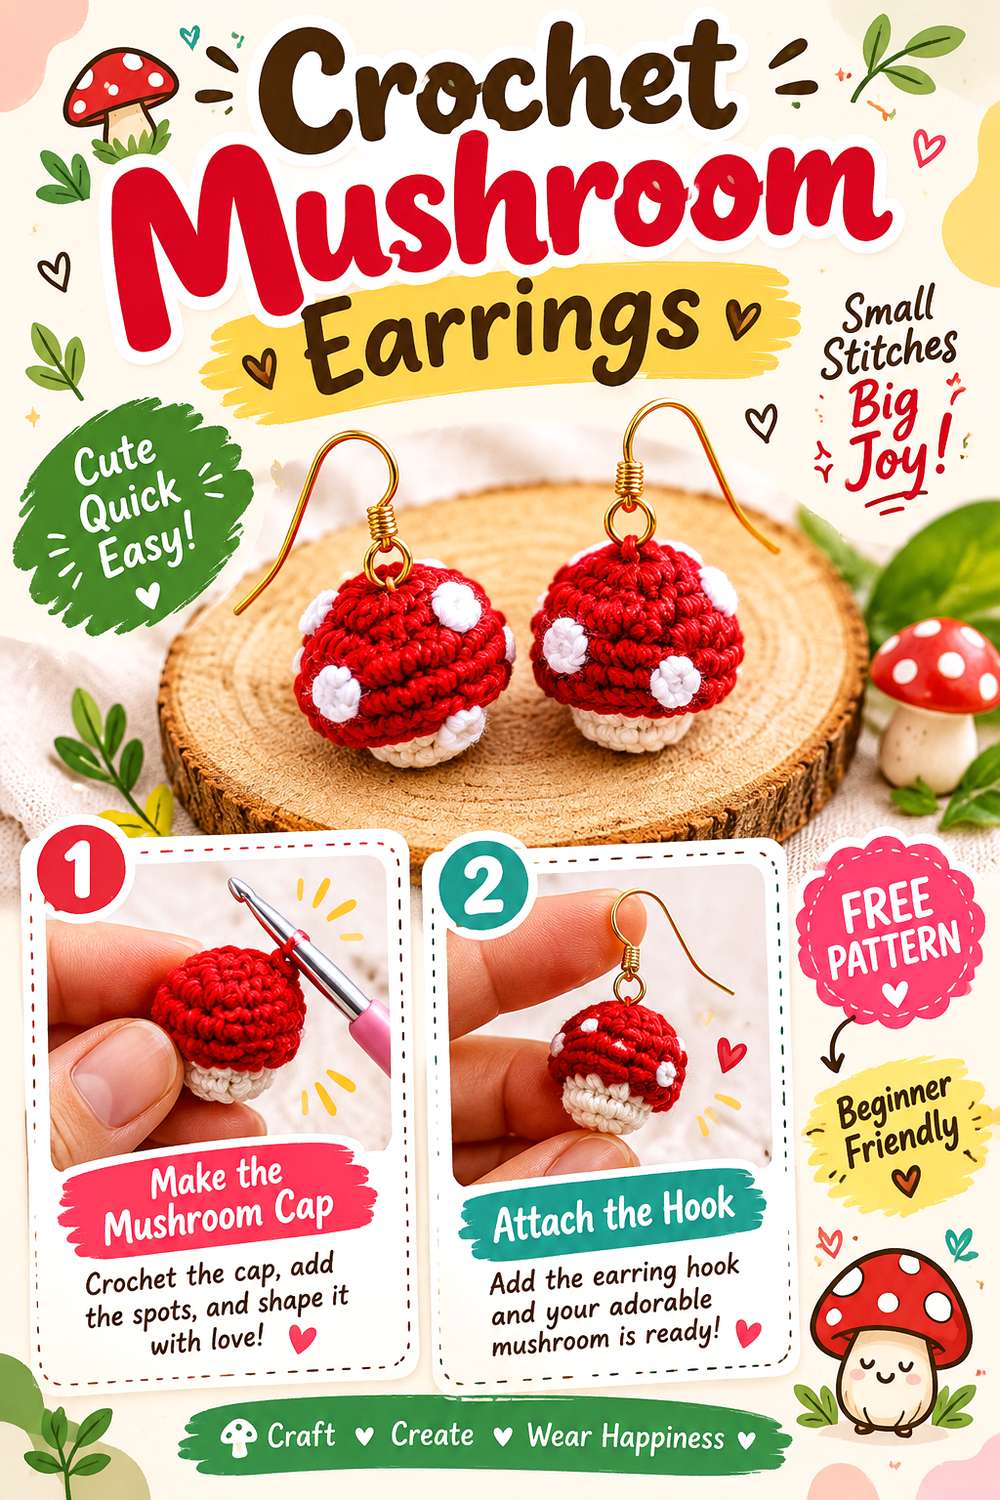
Mushroom earrings deliver the forest theme at the smallest scale in this collection. Jess Crafting’s tutorial shows a pair of dimensional mushrooms made with crochet thread, including the shaped mushroom, added surface knots, stuffing, and attachment to earring findings.
Unlike a flat appliqué, the small stuffed form gives the mushrooms visible volume from the side as well as the front. That makes them playful even though they occupy little space in an outfit. They can therefore work with a plain sweater, leaf bandana, or pixie bonnet without requiring another large fungi piece. They are also a useful alternative for someone who enjoys the mushroom motif but finds a full mushroom hat or sculptural purse too literal for everyday styling.
Match the Pair Before Adding the Findings
Small differences are often more noticeable when two handmade objects hang beside the face. Before attaching the final hardware, place both mushrooms together and compare cap shape, overall length, and the position of the hanging point.
The goal is not machine-perfect duplication. It is avoiding an accidental difference large enough that one earring hangs noticeably lower or presents a very different silhouette. Making the comparison before adding the findings gives you more options for minor finishing adjustments.
Stuffing Affects Both Shape and Scale
Because these mushrooms are dimensional, filling influences how round or firm the finished form appears. Adding more does not automatically improve definition.
Compare the two pieces repeatedly as you fill them. If one becomes noticeably broader, the pair can look mismatched even if the crochet itself is identical. Keeping the mushroom recognizable while preserving a small jewelry scale is more useful than maximizing volume. Follow the original tutorial for the actual construction and finishing sequence rather than treating the motifs like miniature plush toys.
Creator: Jess Crafting
Conclusion
For the most literal woodland statement, the Crochet Acorn Crossbody Satchel, Crochet Mushroom Crossbody Bag, Crochet Ruffled Mushroom Hat, and Crochet Cheshire Cat Woodland Hood make the accessory itself part of the forest imagery. The Crochet Leaf Bandana, Crochet Butterfly Scarf, and Crochet Pointed Pixie Bonnet keep the theme visible while feeling less costume-like.
For a smaller Wilderkind detail, start with the Crochet Flower Bracelet, either choker, or the Crochet Mushroom Earrings. The Crochet 3D Butterfly Bandana sits between those extremes because its base is familiar but its raised motifs are deliberately noticeable. Once you choose the scale and function you actually want, use the original creator tutorials for exact construction details rather than trying to reverse-engineer them from the finished look.
Frequently Asked Questions
What makes a crochet accessory look Wilderkind rather than simply cottagecore?
Pinterest’s original Wilderkind prediction emphasizes delicate animal aesthetics, including butterfly, fawn, fox, insect, and other forest-magic references. A crochet interpretation can stay close to that through butterflies and animal hoods, while leaves, fungi, acorns, and small flowers extend the surrounding woodland language.
The difference is less about using one mandatory motif and more about keeping the nature reference soft and intentional. One carefully chosen forest detail generally communicates the idea more clearly than covering every accessory with unrelated woodland symbols.
Which of these ideas works if I want only a subtle nature reference?
The Crochet Leaf Chain Headband, Crochet Flower Bracelet, Crochet Daisy-Chain Flower Choker, and Crochet Mushroom Earrings occupy relatively little visual space. They allow ordinary clothing to remain dominant while adding a small botanical, fungi, or floral detail.
The Crochet Butterfly Scarf is another option if you prefer textile pattern over jewelry. By contrast, the acorn satchel, mushroom hat, and animal hood make the nature theme a major part of the silhouette and will naturally read as stronger statement accessories.
Can I change the colors without losing the Wilderkind effect?
Usually, yes. Color is often a cosmetic change, while the silhouette or motif supplies the recognizable nature reference. A butterfly remains identifiable outside conventional butterfly colors, and a mushroom shape does not require classic red and white.
The main consideration is contrast. If a project depends on separate sections—such as a mushroom cap and body or a motif against its background—colors that are too similar can blur the form. Make a small sample or temporarily place finished pieces together before committing to the entire palette.
What should I check before resizing one of these accessories?
Start with the dimension that affects function. For a headband or choker, that is fit around the wearer. For a bandana, both width and depth matter. For a bag, changing the body can also affect the opening and strap relationship. For a bonnet or hood, enlarging the overall piece can alter a point, ear position, or face opening.
Use size-adjustment instructions supplied by the individual creator whenever available. Simply switching to thicker yarn or a larger hook changes fabric behavior as well as dimensions, so it is not a guaranteed one-step resizing method.
Can I sell accessories made from these tutorials?
A public tutorial does not automatically establish permission to sell finished pieces, redistribute the pattern, reproduce tutorial images, or use the creator’s media commercially. Those are separate rights questions.
Check the individual creator’s current pattern terms before making items for sale, particularly if you intend to produce multiples or use project photographs in a shop listing. Terms can differ between designers and can change over time, so the tutorial link is the appropriate place to begin checking the creator’s stated conditions.