Crochet brooches can be tiny textile-jewelry pieces, playful character pins, dimensional flowers, or small nature motifs that turn a plain jacket, tote, scarf, or hat into something more personal. The useful difference between designs is not simply the subject. A flat ginkgo leaf behaves very differently from a padded cat, while a radial sunflower needs another kind of backing than a narrow cherry pair or an open snowflake.

The 20 crochet brooch accessory ideas below deliberately mix silhouettes and construction styles. You will find flowers, foliage, fruit, insects, woodland forms, geometric accessories, and miniature animals rather than twenty variations of the same bloom. Several tutorials make the complete brooch, while a small number teach a motif that is explicitly suitable for pin use. Along the way, the focus stays on choosing scale, keeping the finished piece balanced, planning the pin position, and deciding where each type of brooch is most practical to wear.
Quick List
- Crochet Oval Cameo Brooch
- Crochet Ginkgo Leaf Brooch
- Crochet Snowflake Lace Brooch
- Crochet Padded Heart Brooch
- Crochet Classic Bow Brooch
- Crochet Daisy Brooch
- Crochet Sunflower Brooch
- Crochet Rolled Rose Brooch
- Crochet Layered Flower Brooch
- Crochet Botanical Poppy Brooch
- Crochet Ladybug Brooch
- Crochet Butterfly Character Brooch
- Crochet Textured Sheep Brooch
- Crochet Strawberry Brooch
- Crochet Cherry Brooch
- Crochet Mushroom Brooch
- Crochet Beaded Toadstool Brooch
- Crochet Owl Brooch
- Crochet Fox Brooch
- Crochet 3D Cat Brooch
Choose the Brooch Profile Before the Color
The front view is only half of a brooch decision. Flat motifs such as leaves, snowflakes, bows, and some flowers can sit comparatively close to fabric, while rolled roses, stuffed hearts, textured animals, and character brooches project farther outward. That difference influences where the accessory feels comfortable and how much support its backing needs.
Think about the wearing surface before scaling a pattern up. A sturdy coat, denim jacket, project bag, or firm hat can tolerate a different amount of depth than a lightweight blouse or loose open cardigan. Making a motif larger with thicker yarn may also enlarge the gaps, soften small details, and increase leverage on the pin.
Before sewing hardware permanently, hold the finished crochet vertically against fabric similar to the intended garment. This simple test can reveal tipping, rotation, visible hardware, or a backing position that looked centered only while the piece was lying flat.
Plan Embellishments Around the Fastening
Brooches often combine yarn with buttons, beads, stuffing, embroidery, wire, felt, or metal findings. Those additions should serve the design rather than accumulate simply because the project is small. A sunflower already has a strong center, while a fox depends more on facial placement and a snowflake depends on keeping its open geometry clear.
The reverse deserves equal attention. Keep yarn tails away from moving clasp parts, avoid letting beads or stuffing create a mound directly beneath the pin, and make sure any rigid component stays fully enclosed. If a tutorial includes wire or another structural material, follow the creator’s construction rather than guessing from the finished photograph.
Mixed materials also change care. A brooch containing metal, felt, stuffing, adhesive, beads, or stiffening treatment should not automatically be washed like an ordinary crochet swatch. Base cleaning and storage decisions on everything used in the finished piece.
1. Crochet Oval Cameo Brooch

An oval brooch immediately has a different character from the usual round flower pin. Lanas y ovillos’ tutorial uses a crochet oval with contrasting edging and surface decoration, creating the effect of a miniature textile medallion rather than a botanical motif. That framed shape is particularly useful when you want a brooch that resembles traditional jewelry in proportion while still looking unmistakably handmade.
The oval also gives you a controlled area for personalization. Decorative stitches can sit inside the border without increasing the physical depth as much as stuffed or heavily layered pieces. That makes this design suitable for a lapel, cardigan, scarf, fabric purse, or other placement where a large projecting flower would feel excessive. The main decision is restraint: the border, interior decoration, and background all need enough separation to remain readable.
Treat the Edge as a Frame
The border is one of the main features rather than merely a finishing row. Keep enough quieter surface inside it that the oval still reads clearly from normal viewing distance.
If you change the decorative stitching, lay out the visual idea before filling every available space. A few concentrated accents can reinforce the cameo effect more successfully than dense embellishment that turns the entire surface into one undifferentiated texture.
Protect the Oval While Decorating
Embroidery and edging can pull a small crochet base out of shape if tension is uneven. Periodically compare the two curved ends rather than waiting until the brooch is fully decorated.
Attach the pin only after the front is finished and the oval still lies as intended. Hardware can stabilize the back, but it cannot convincingly correct a foundation that has already become lopsided.
Creator: Lanas y ovillos
2. Crochet Ginkgo Leaf Brooch
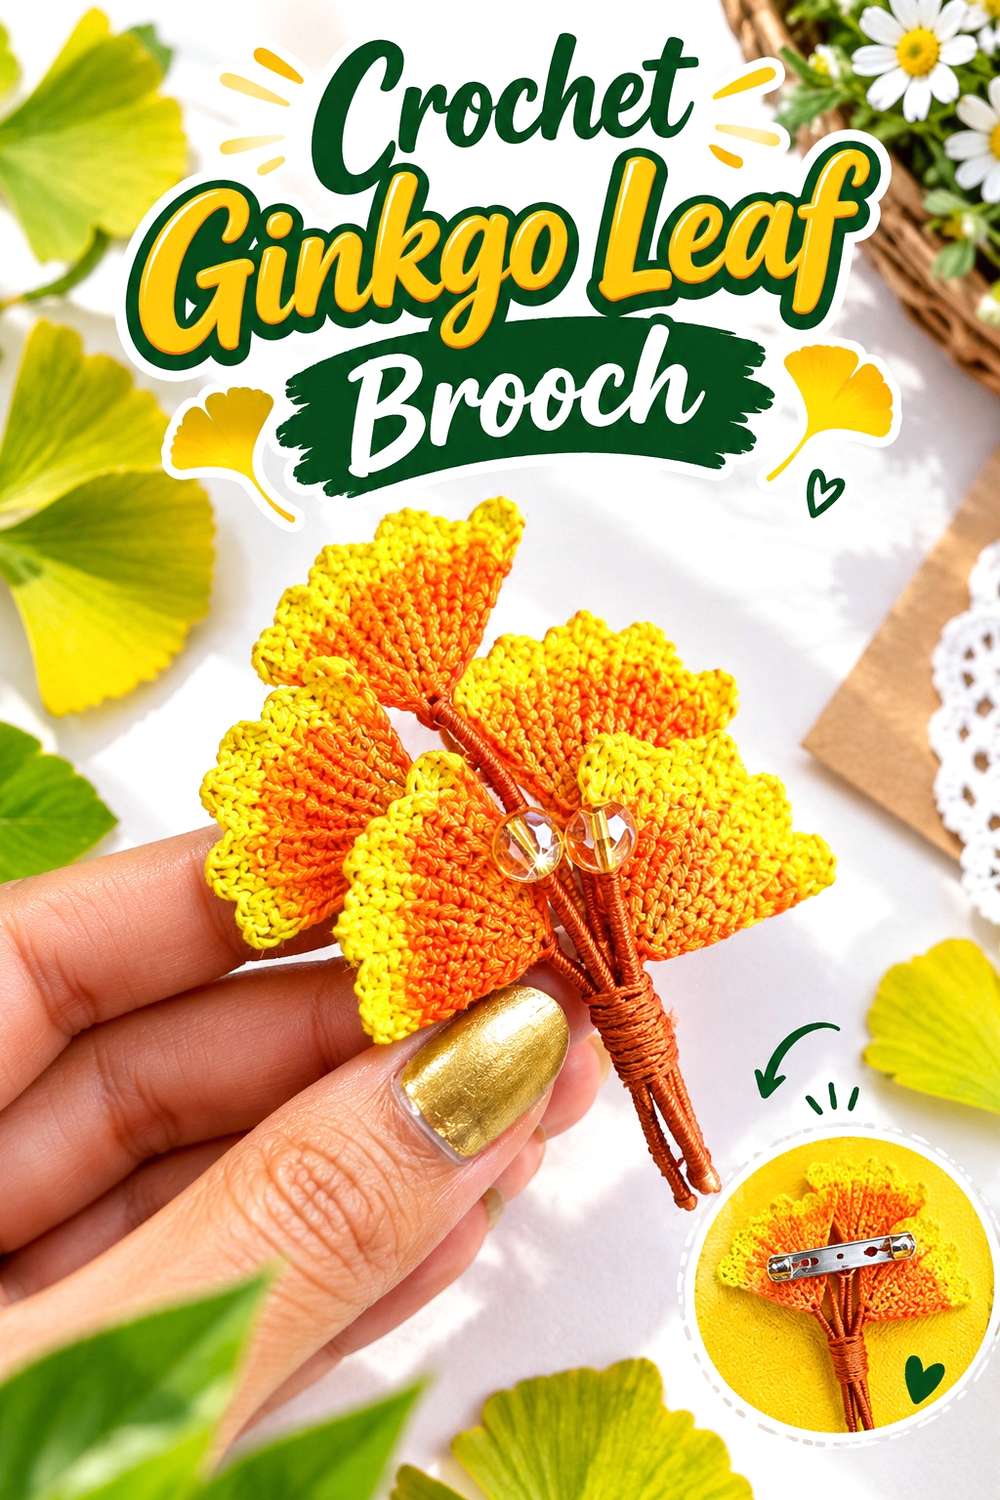
The ginkgo leaf offers a botanical brooch without the layered petals of a flower. Adishka Crafts presents the distinctive fan-shaped leaf specifically as a crochet brooch pin, using a fine approach that emphasizes outline and delicate structure rather than bulk.
Its broad upper edge and narrower stem also make this a directional accessory. Instead of automatically centering it vertically, you can decide whether the leaf should rise upward, follow a lapel diagonally, or lean slightly across a bag panel. That wearing angle becomes part of the composition. Because the silhouette supplies most of the interest, the design does not need a crowded collection of beads or extra motifs to look complete. It is a particularly useful option if you prefer botanical jewelry with a flatter profile or want something that can sit beside a collar without competing with a large three-dimensional flower.
Choose the Angle Before Adding the Pin
Place the completed leaf against the actual type of garment you want to decorate and try several orientations. A slight tilt can make the fan shape follow a lapel more naturally.
Once you find the preferred direction, mark the reverse before sewing the hardware. A pin attached according to the worktable orientation may make the finished leaf hang differently when worn.
Be Careful When Changing Yarn Scale
A thicker material can turn a delicate leaf into a noticeably broader textile motif. That is a valid adaptation, but it changes more than appearance.
Recheck the pin length, garment weight, and clarity of the fan-shaped edge after scaling up. If the leaf becomes much heavier, the backing solution from a fine-thread version may no longer provide the same stability.
Creator: Adishka Crafts
3. Crochet Snowflake Lace Brooch
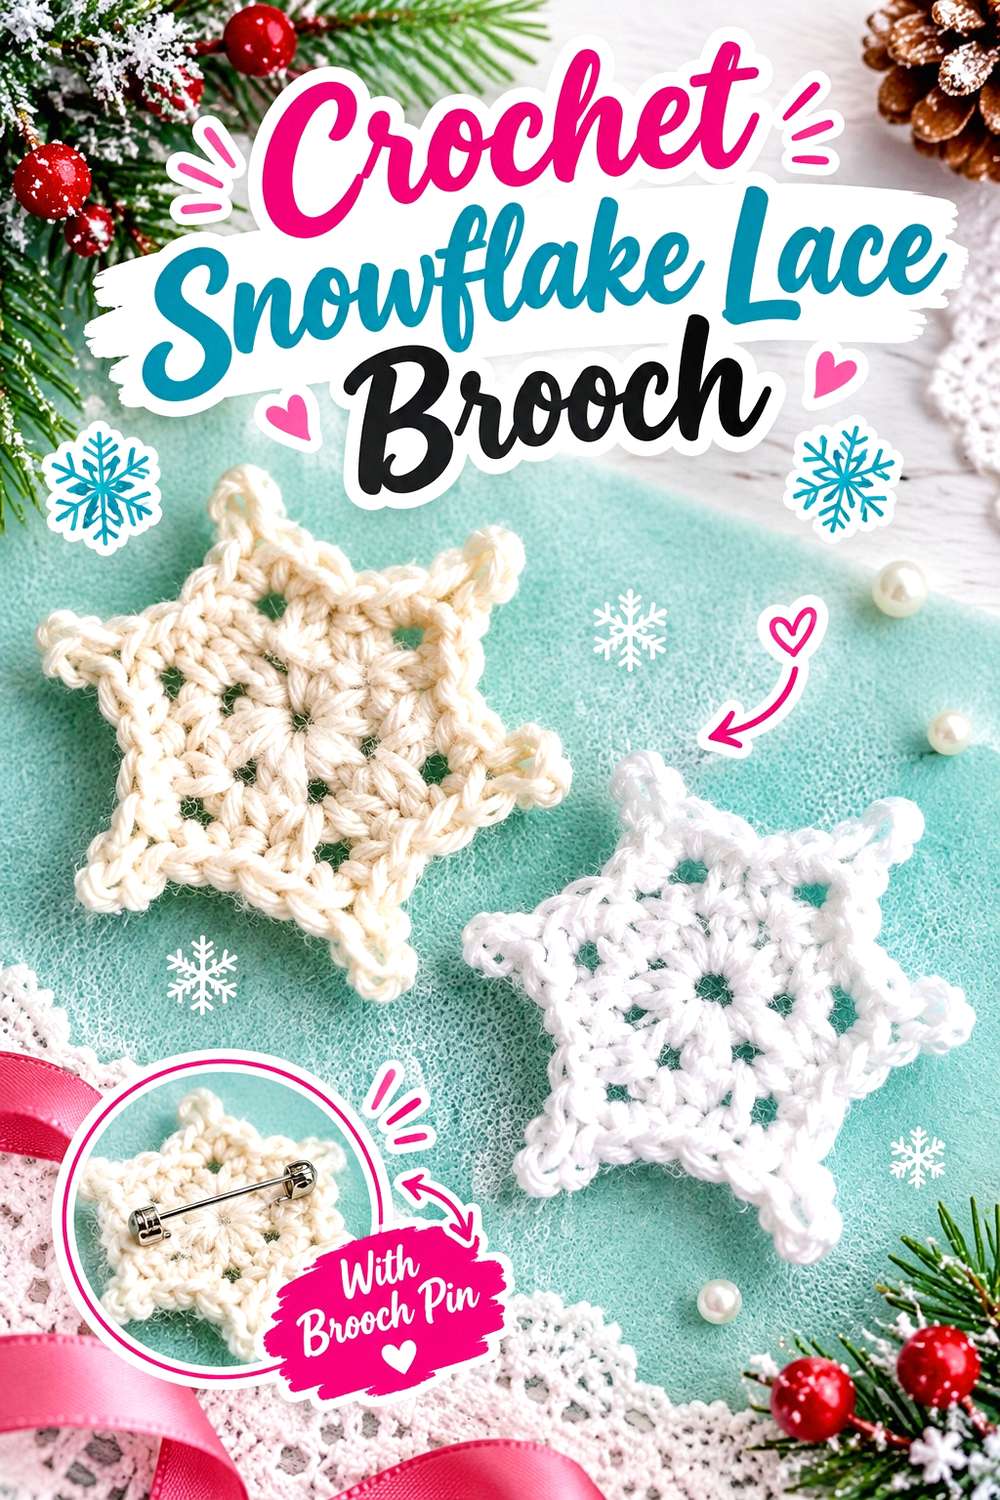
A snowflake brings openwork into the collection. Bella Coco’s snowflake tutorial has been presented for brooch use by adding a pin to the reverse, making it a useful motif base when you want an airy accessory instead of a dense flower or stuffed character.
The radiating points give the motif plenty of visual width without filling that entire area with yarn. Against a dark coat or scarf, those openings can become part of the design because the underlying fabric shows through. That also creates the project’s main finishing challenge: hardware that would disappear behind a solid brooch may be clearly visible through a snowflake. For that reason, pin placement deserves to be planned before the last finishing decisions. Metallic, white, cream, icy blue, or unconventional colors can all alter the mood, but preserving a clear radial outline matters more than reproducing a particular winter palette.
Hide the Hardware Behind Solid Crochet
Before sewing the brooch fitting, position it behind several areas and look from the front. Pay attention to where metal crosses the open center or arms.
The smallest possible fitting is not automatically the best choice; it still needs stable crochet beneath it. Aim for a position that supports the motif without turning the pin into an unintended visible line through the lace.
Let the Points Stay Separate
A snowflake depends on distinct arms and negative space. Very fuzzy yarn, oversized beads, or too many added decorations can make those sections merge visually.
Shape the basic motif first. If it already reads clearly against the intended garment, additional embellishment may contribute less than simply keeping the geometry crisp and unobstructed.
Creator: Bella Coco
4. Crochet Padded Heart Brooch
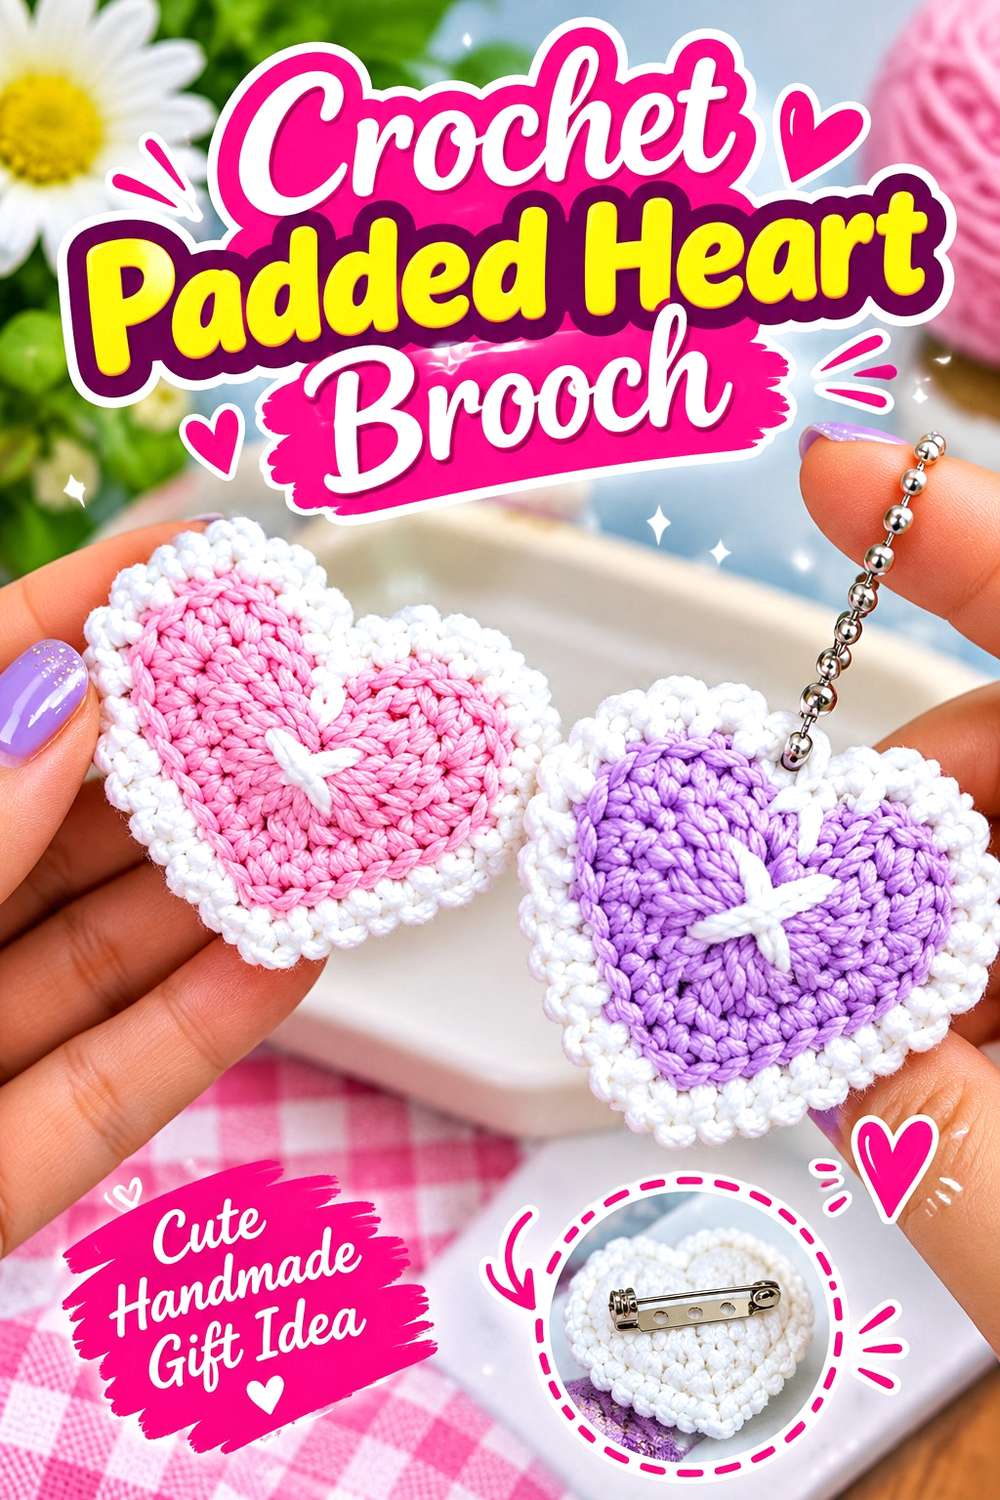
A padded heart shifts the brooch from flat motif to soft miniature form. Mimosa Handmade’s tutorial presents the crochet heart for uses including a keychain and heart brooch, with the recognizable center indentation, rounded upper sections, and pointed lower end carried through a dimensional construction.
That small amount of volume can make the heart feel more like a keepsake than a simple appliqué. It also creates useful space for color symbolism without demanding additional surface decoration. One strong shade, a two-color combination, or restrained embroidery can be enough. The important practical issue is the reverse: stuffing should support the shape without creating such a rounded back that the pin cannot rest reasonably close to the garment. If you intend to personalize the heart further, finish the basic silhouette first so added initials, beads, or ribbon do not conceal the very shape that identifies the piece.
Keep the Three Heart Landmarks Clear
Check the central notch, both rounded lobes, and the bottom point before attaching the hardware. Uneven stuffing can make one half appear larger or soften the point.
Redistribute filling before closing the piece rather than trying to pull the final silhouette into shape with backing stitches. The pin should support the completed heart, not become a shaping device.
Decide How Much Personalization Fits
A brooch-sized heart has limited visual space. Initials, one tiny flower, or a small stitched symbol may read more clearly than a long message surrounded by additional trim.
Test any planned decoration at actual size. A detail that looks restrained on paper can occupy a surprising amount of a small crochet surface.
Creator: Mimosa Handmade
5. Crochet Classic Bow Brooch

Club Crafteria’s bow tutorial is designed specifically so the finished crochet bow can become a brooch or hair clip. The construction produces a recognizable gathered center with broader sections on either side, giving you a nonfloral accessory that can look playful or polished depending on yarn and placement.
A bow is useful when you want symmetry without the circular outline of a flower. It can sit neatly on a jacket collar, beret, tote, scarf, or project pouch, and it can also work in pairs when the surrounding surface is large enough. The central wrap naturally gives the eye a focal point, so added beads or buttons are optional rather than necessary. Pay more attention to the two sides: they should appear intentionally related when the brooch hangs vertically. A bow that looks even on a table can twist if the hardware sits too low or the center has been wrapped unevenly.
Check Both Loops Together
Judge the complete bow rather than perfecting one side at a time. Small differences in width or gathering become more noticeable once the center wrap visually divides the motif into two halves.
Before sewing the pin, hold the bow upright and look at the outside edges. If one side drops noticeably, correct the gathering or attachment rather than relying on the garment to hold it straight.
Use Scale to Change the Mood
A small bow can behave like a conventional lapel pin, while a wider version becomes more of a statement accessory. If you change yarn or hook size, compare the finished width with the intended placement.
A broad bow may be excellent on a tote or coat but overwhelm a narrow blouse collar. Let the wearing surface determine whether enlarging the tutorial is actually useful.
Creator: Club Crafteria
6. Crochet Daisy Brooch
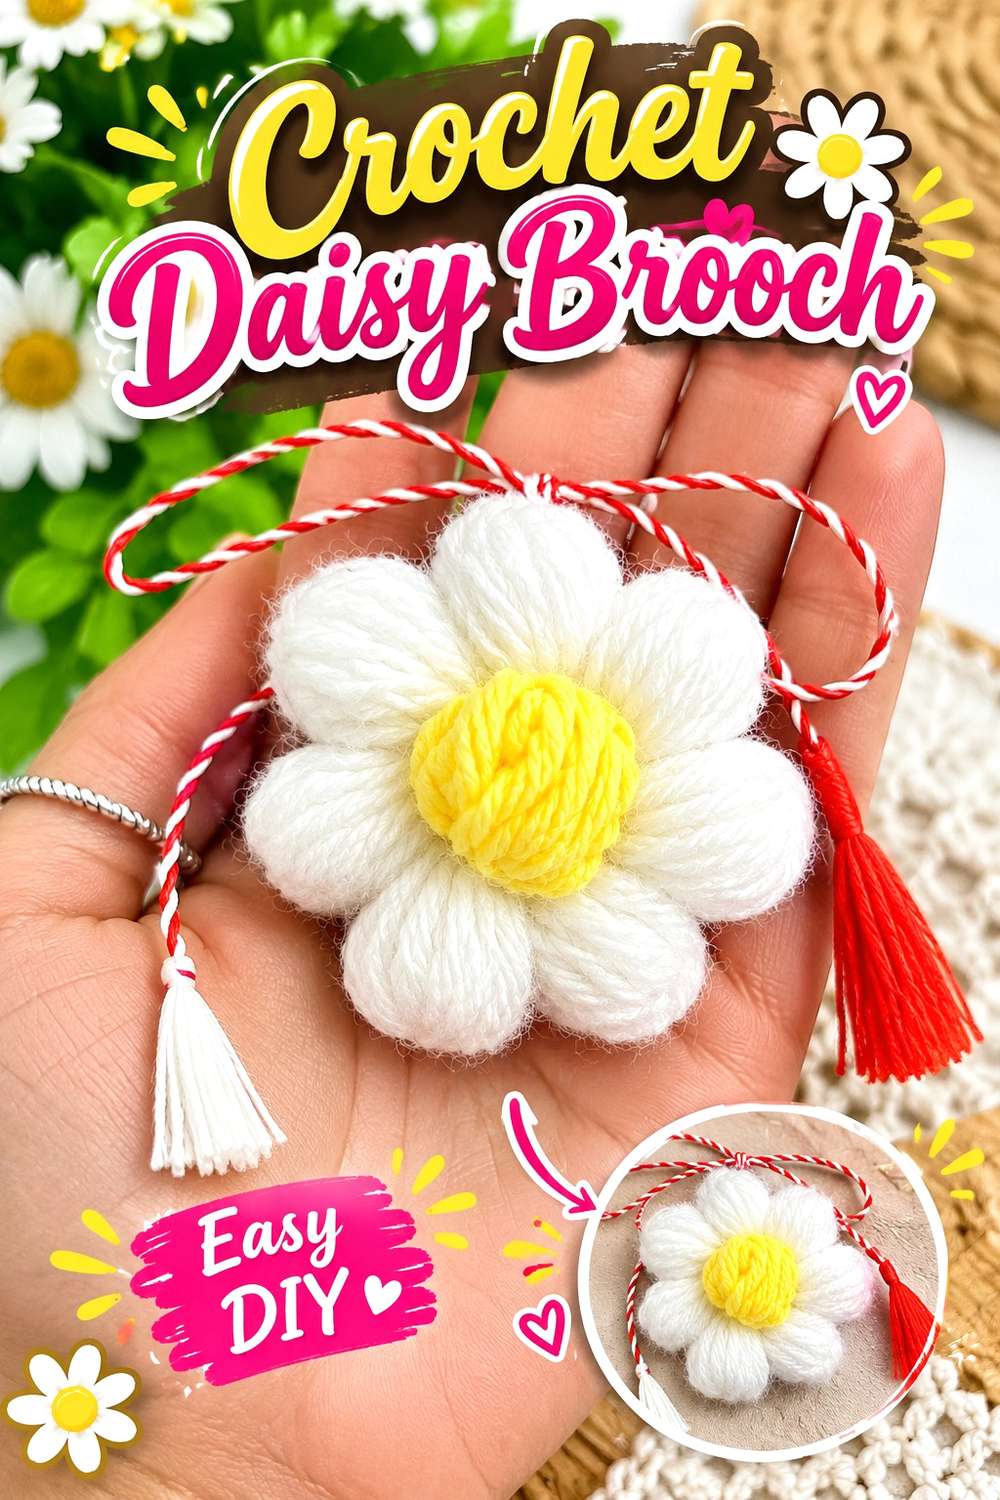
A daisy gives you one of the cleanest floral silhouettes: a defined center surrounded by a repeated petal ring. Oana Ursy’s source is specifically presented as a crochet daisy brooch tutorial, so the project already has wearable-pin intent rather than requiring a large decorative flower to be repurposed.
Compared with a rolled rose or dense poppy, this shape can stay visually flatter and more graphic. That makes the daisy useful on cardigans, denim, hats, or bags where you want a recognizable flower without a deep corsage profile. Color changes can move it far beyond the familiar white-and-yellow combination, but center-to-petal distinction helps preserve the radial design. Because the petal ring forms the entire outer boundary, consistency around the circumference matters more here than elaborate embellishment. Check the whole flower repeatedly instead of judging each petal only while it is being worked.
Rotate the Flower Before Mounting It
Repeated elements can hide gradual spacing changes until you look at the complete circle. Place the daisy flat, rotate it, and inspect the outline from several directions.
If one section looks noticeably crowded, determine whether the cause is tension, placement, or finishing. Avoid stretching individual petals randomly simply to force the flower into a circle.
Keep the Back Proportionate
A relatively flat flower does not automatically need a thick or oversized foundation. Heavy backing can defeat one of the daisy’s main advantages: its light visual profile.
The reverse still needs enough stability for repeated fastening, but keep structural additions inside the flower’s silhouette and check that the front remains flat after the pin is sewn.
Creator: Oana Ursy
7. Crochet Sunflower Brooch
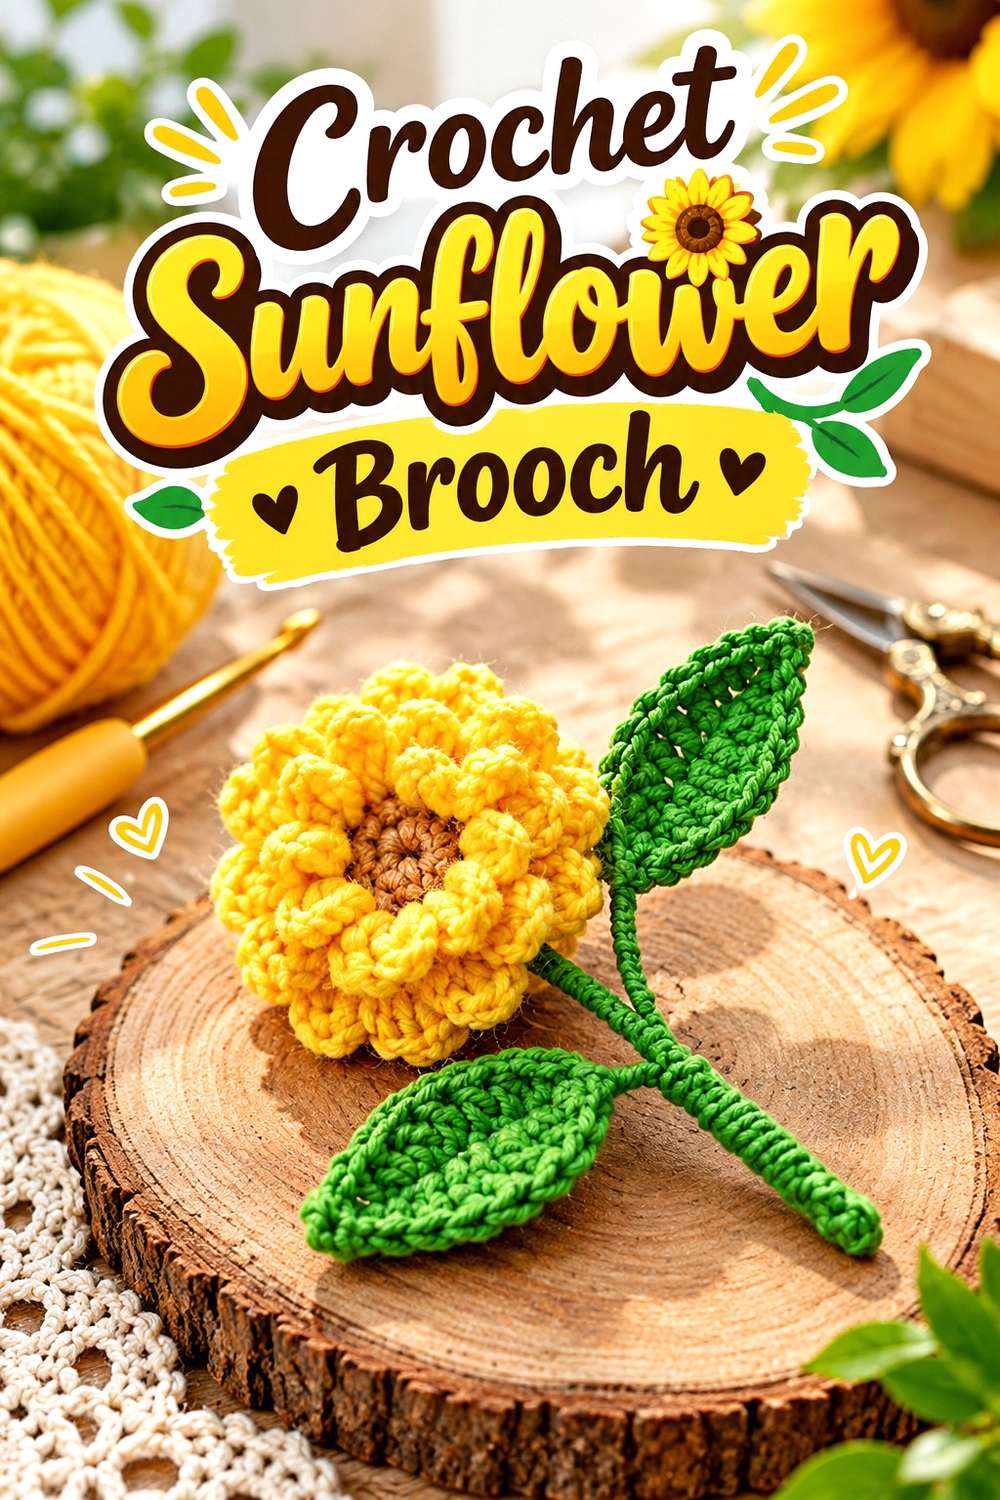
Lilyrosycrafts teaches the sunflower as a finished flower pin rather than only as a loose appliqué. The tutorial centers the design on a strongly defined middle surrounded by radiating petals, giving the brooch a broad circular presence that can remain recognizable from farther away.
The sunflower’s usefulness lies in that graphic structure. It can carry bright traditional colors, autumn shades, monochrome combinations, or a more stylized palette while still reading as a radial flower as long as the center and petal ring remain visually distinct. Its width also means placement deserves thought. A sunflower crowded directly under a lapel fold, bag strap, or scarf edge can lose several petals and appear oddly cropped. Give the outside circumference enough room to stay visible. Because the dense center naturally provides a potential backing zone, check whether the pin can sit there without pulling the flower forward.
Keep the Petal Rhythm Even
Radial flowers make uneven distribution easy to notice. Look at groups of petals rather than inspecting each one in isolation.
Once the flower is complete, turn it slowly and look for large gaps or sections where petals overlap more than elsewhere. Correct finishing issues before the brooch hardware makes reshaping more difficult.
Preserve Center-to-Petal Contrast
You do not have to use natural sunflower colors, but the middle should still be visually separate enough from the outer petals to explain the design.
With variegated yarn, place the two planned sections beside each other first. If the colors merge at normal viewing distance, a simpler combination may make the flower structure easier to read.
Creator: Lilyrosycrafts
8. Crochet Rolled Rose Brooch
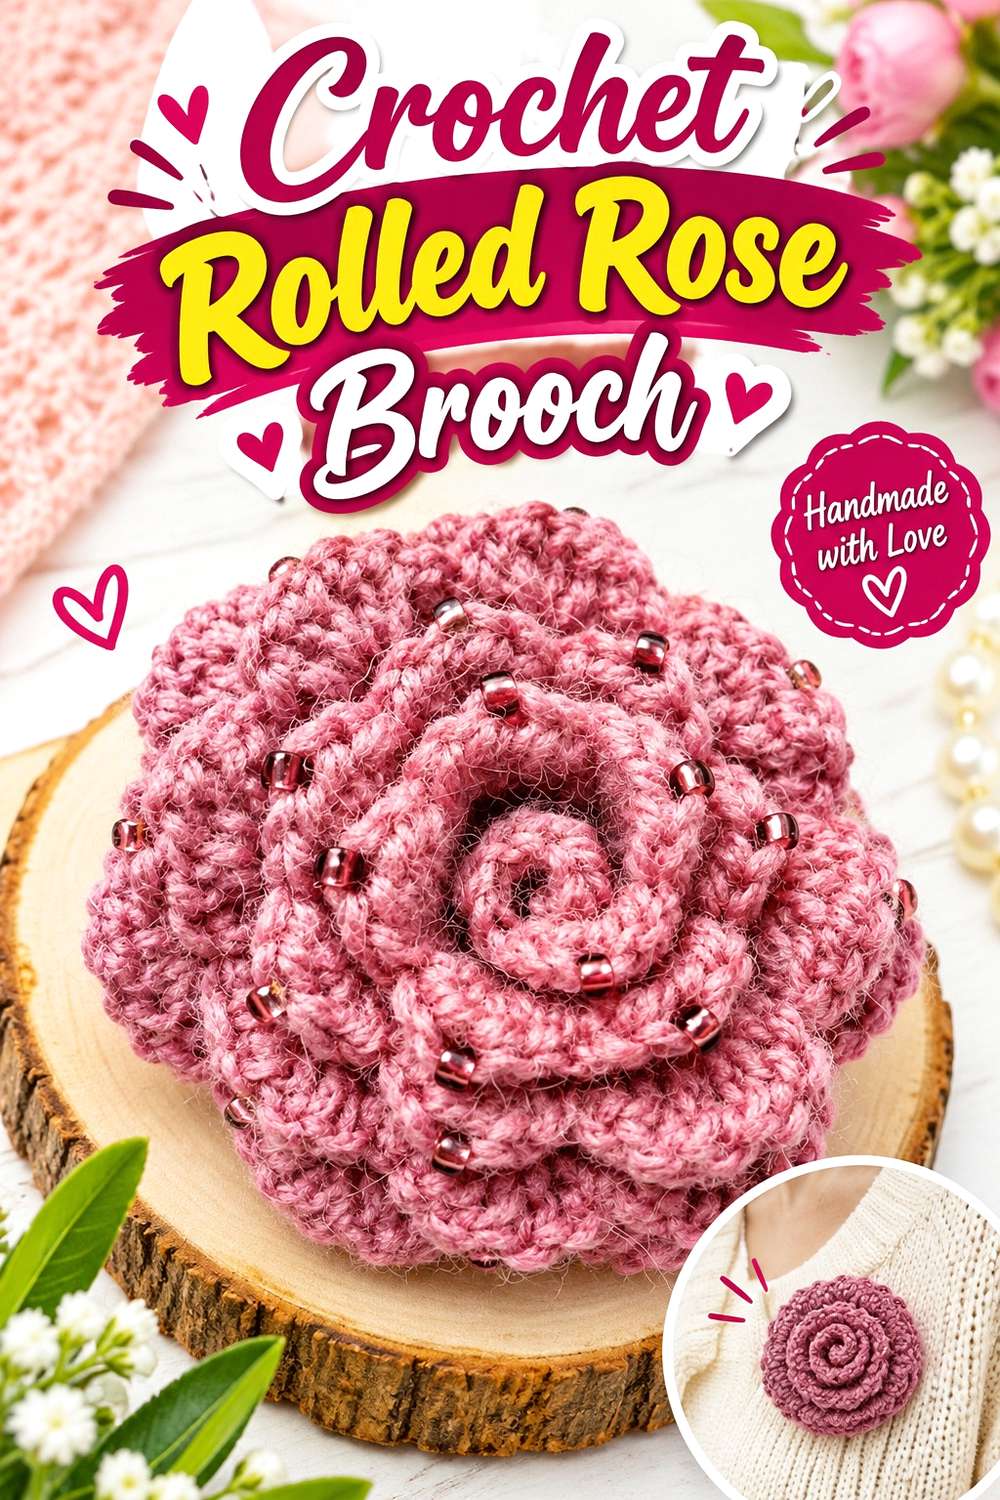
The rose from szydełko is specifically demonstrated as a flower that can be worn as a brooch or used on other accessories. Its rolled arrangement creates natural depth without needing the stuffed body of an amigurumi-style pin.
That spiral depth is what separates this idea from the daisy and sunflower. The rose projects outward, so it can create a stronger jewelry-like focal point even when its overall diameter is modest. A deep flower works well on coats, shawls, bags, or sturdy cardigans where the fabric can support the profile. On very light material, the same rose may pull forward. Color can push it toward romantic, vintage, dramatic, or minimalist styling, but the most important visual decision is how the petals settle after assembly. Too tightly compressed and the spiral may become dense; too loose and the controlled rose form can disappear.
Check the Rose From the Side
A front view can make a very deep rose look perfectly balanced. Turn it sideways before attaching the pin and see how far the flower projects.
If most of the mass sits noticeably forward, consider a firmer wearing surface rather than trying to flatten the petals. The three-dimensional quality is part of the design and should not be removed merely to suit unsuitable fabric.
Find the Actual Balance Point
A visually symmetrical rose can still have more material on one side because of the way the strip or petals are assembled.
Temporarily position the pin and hold the flower upright. A slightly higher attachment may support it better than placing the hardware automatically through the geometric center.
Creator: szydełko
9. Crochet Layered Flower Brooch

Mi’s Handmade Hobbies teaches a crochet flower specifically as a brooch, offering a useful middle ground between a flat daisy and a deeply rolled rose. The project focuses on a recognizable petaled flower shape that can function as a general-purpose accessory rather than imitating one particular botanical species.
That neutrality can be an advantage. You can use color, center treatment, and placement to make the brooch playful, understated, retro, or coordinated with another handmade item without worrying about botanical realism. A layered or shaped petal surface also gives you texture while keeping the outline relatively compact. This is a good option when the garment already has strong patterning and a highly detailed poppy or character pin would feel too busy. The design decision becomes proportion: make sure the center, outer petals, and pin backing feel like parts of one small accessory rather than three unrelated layers.
Let the Petals Create the Texture
A flower with a shaped surface already has movement. Before adding a decorative button, bead cluster, or contrasting border, look at the finished crochet alone.
If the petals supply enough depth, a simpler center may preserve their role. Extra ornament should finish the design rather than hide the construction that makes the brooch interesting.
Match the Flower to the Wearing Surface
General floral shapes are versatile, but scale still matters. Pin the finished motif temporarily to a cardigan, bag, coat, and scarf if you are unsure where it belongs.
A size that feels modest on a tote can look dominant near a blouse collar. Choose the placement first before deciding that the flower needs to be enlarged.
Creator: Mi’s Handmade Hobbies
10. Crochet Botanical Poppy Brooch

TinyLimeCraft’s poppy is one of the more detailed botanical projects in this collection. The tutorial is divided into two parts: the first covers the individual crochet components, including petals and foliage, while the second addresses coloring and final brooch assembly.
That multipart structure matters because this is not simply a round flower with a dark button added to the center. The recognizable poppy effect comes from the relationship between petal shape, center details, and directional foliage. The result suits someone who enjoys a more specimen-like flower brooch and is willing to spend extra attention on assembly. Because the source uses additional structural and finishing materials, review both videos before substituting components. Changing a supporting element can affect how the leaf and petals hold their intended relationship when the brooch is worn vertically.
Assemble the Major Shapes Before Fine Finishing
Detailed flowers can encourage you to focus on tiny components too early. Place the major petals, center, and foliage together first and judge the full silhouette.
If the poppy does not already read convincingly at that stage, extra surface detail will not solve an imbalanced arrangement. Correct the broad composition before concentrating on the smallest finishing work.
Treat This as a Multipart Project
The starting video is Part 1, and the second tutorial continues through later finishing and assembly. Do not treat the first upload as a complete standalone brooch lesson.
Review both before beginning so you understand which components and finishing materials are required across the complete project.
Creator: TinyLimeCraft
11. Crochet Ladybug Brooch
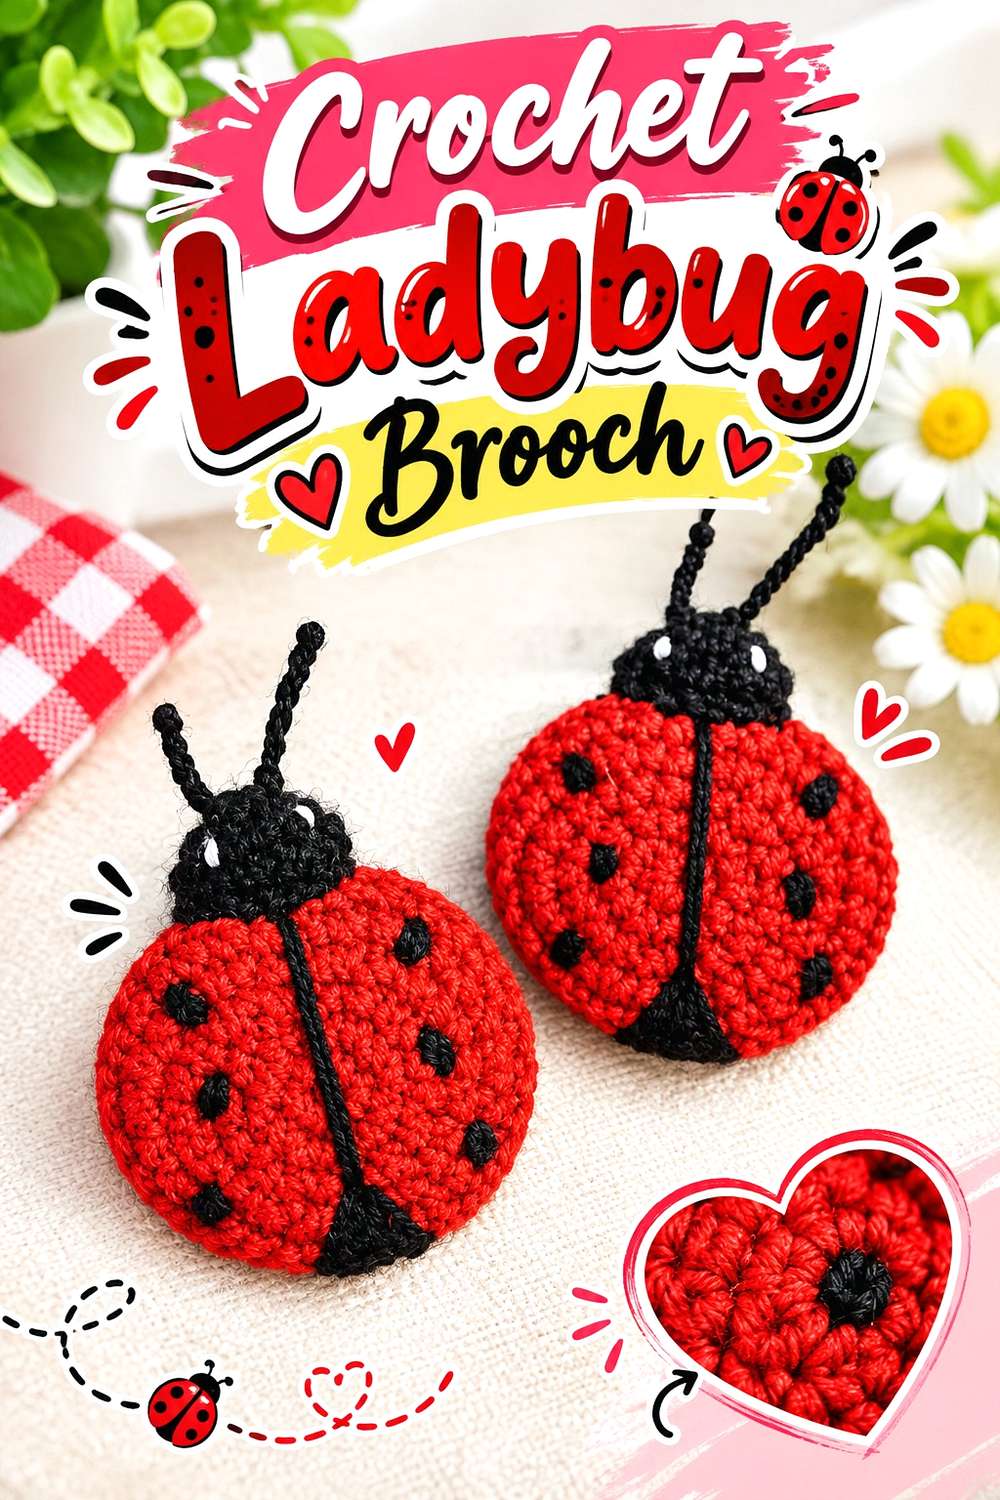
Olga Lukoshkina’s tutorial is specifically devoted to a crochet ladybug brooch, giving this collection a compact insect option with a strong rounded silhouette and recognizable surface contrast.
A ladybug works differently from the butterfly later in the list because it concentrates almost all of its visual information inside a small oval or rounded body. There are no broad wings extending beyond the backing area, so the accessory can feel tidier on a lapel, hat, bag, or project pouch. The familiar red-and-dark combination is only one styling direction; what matters is retaining enough distinction between the body sections and markings for the insect motif to remain legible. Tiny surface details can become surprisingly dominant at brooch scale, so add or alter markings with restraint rather than assuming more spots automatically improve the result.
Keep the Body Shape Strong
The rounded outer form should read clearly before any small markings are expected to identify the insect. Check that finishing has not pulled one side inward.
Hold the brooch upright as well as flat. A compact body can still rotate if the pin is too narrow or sits noticeably away from the physical center of the piece.
Use Surface Details Sparingly
Small contrasting spots, head features, or embroidery can clarify the ladybug, but each addition occupies a significant percentage of the tiny surface.
Step back after each finishing stage. If the body already reads clearly, additional decoration may make the motif busier without making it more recognizable.
Creator: Olga Lukoshkina
12. Crochet Butterfly Character Brooch

CrochetConfetti’s butterfly is not a simple flat wing appliqué. The tutorial builds a character-style brooch with a body, wings, antennae, facial finishing, and the pin attachment, making it one of the most dimensional and detailed accessories in this collection.
That personality comes with a different practical trade-off. Projecting wings and fine antennae create more opportunities for snagging than a compact ladybug or flat leaf. A coat lapel, firm cardigan, or protected area of a bag may therefore make more sense than a placement that constantly rubs against straps. Color choices can be playful, realistic, or entirely imaginary, but the wing pair should remain the strongest visual cue. If facial details become too elaborate or fuzzy texture hides the outline, the character may read as a small doll before it reads as a butterfly.
Give the Wings First Priority
Before permanently attaching the body or pin, compare both wings from directly in front. They do not need machine-perfect symmetry, but their overall span should feel intentional.
If one wing is pulled inward by assembly stitches, solve that connection first. Extra embroidery or decoration will not compensate for an unbalanced outer silhouette.
Protect Projecting Details
Antennae, hair-like elements, and wing edges deserve consideration during storage as well as wear. Avoid keeping the brooch loose beneath heavier jewelry or beside snag-prone fasteners.
A shallow box or separated compartment gives a dimensional character more protection than a crowded accessory pouch where fine components can be repeatedly bent.
Creator: CrochetConfetti
13. Crochet Textured Sheep Brooch

The defining feature of hello stitches’ sheep brooch is surface texture. The creator provides a crochet sheep brooch tutorial in which a fur-like crochet effect helps form the animal’s woolly character rather than functioning as an optional border.
That makes yarn behavior particularly important. A smooth flower can tolerate some changes in texture and remain recognizable, but a miniature sheep can lose its head-to-body distinction if the fleece becomes excessively bulky or fuzzy. This is therefore a useful project for anyone interested in stitch texture as part of the image itself. The finished brooch can work well against denim, sturdy knitwear, craft bags, or other surfaces where its irregular fleece remains visible. It also differs nicely from polished flowers: small inconsistencies in the textured area can contribute character as long as the overall animal silhouette stays clear.
Practice the Texture Separately
If the fur-style stitch is unfamiliar, a small sample can save considerable frustration. It lets you see how the chosen yarn forms loops or texture before those stitches need to fit into a tiny animal.
The sample also reveals whether the yarn is too fuzzy for the scale. A beautiful plush fiber may hide more of the brooch shape than expected.
Keep Texture Away From the Clasp
Loops and fuzzy fibers can catch around moving pin parts. When attaching the backing, work through a stable rear area and keep decorative surface strands away from the mechanism.
Open and close the fastening several times before wearing the brooch. The front should remain undistorted while the clasp moves freely.
Creator: hello stitches
14. Crochet Strawberry Brooch
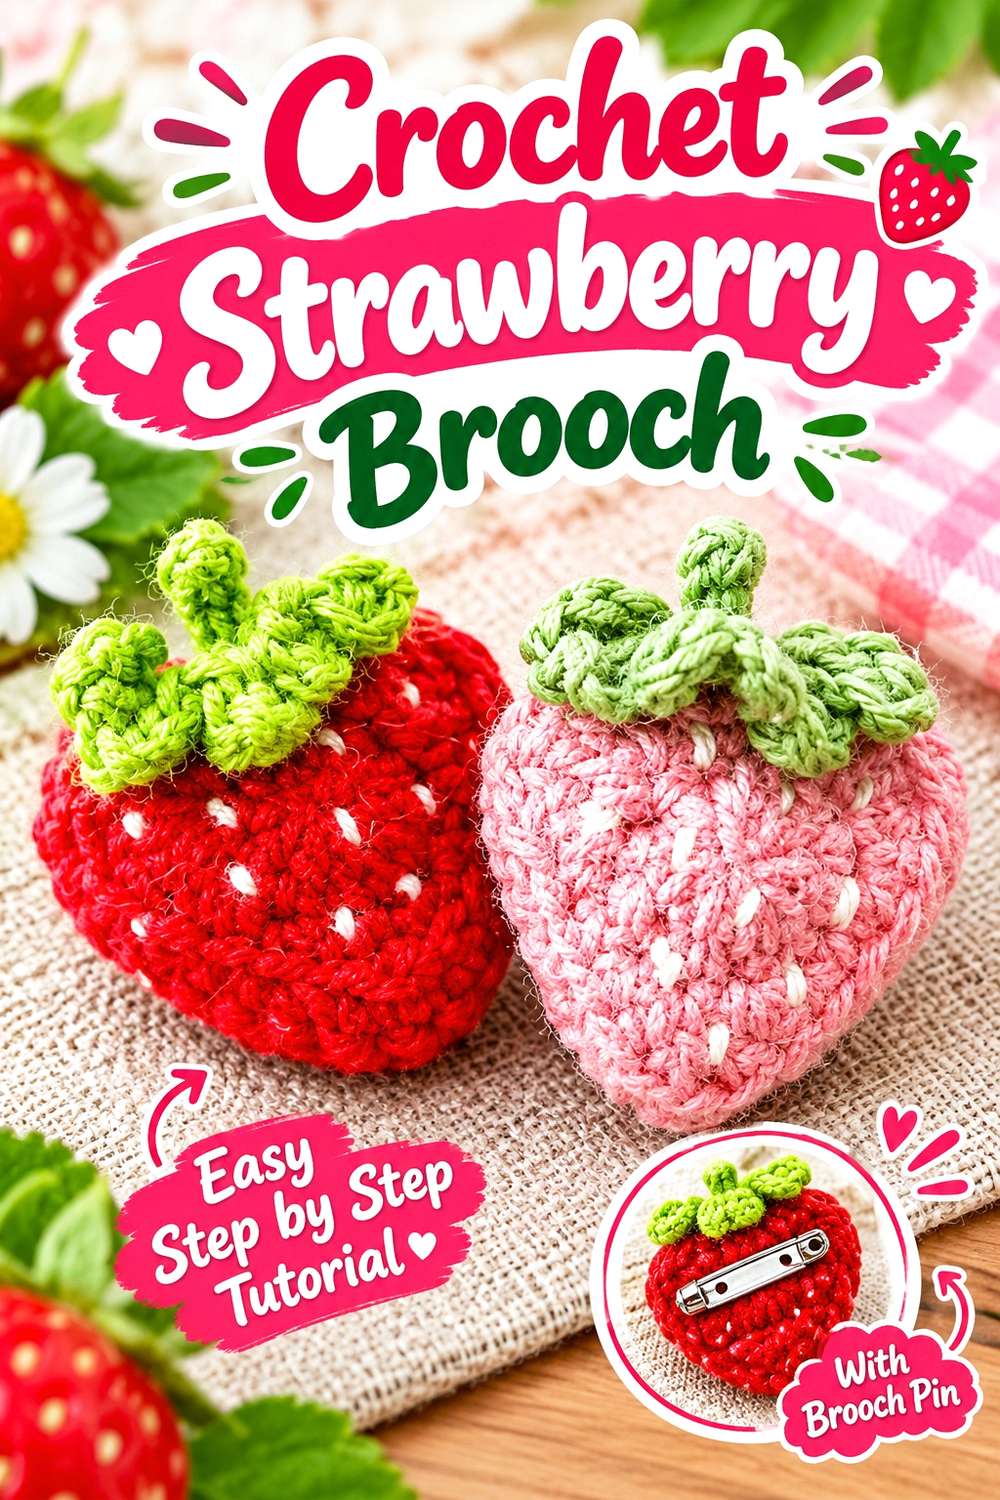
The strawberry brooch from 수수달퐁susuDalfong uses a compact fruit silhouette with a leafy top, giving you a motif that is easy to recognize without relying on a circular flower or animal face. The source is specifically presented as a strawberry brooch rather than an unrelated fruit decoration.
Its tapered shape creates a strong top-to-bottom direction. That makes the hardware orientation more important than it would be on a perfectly round badge. The leafy section should remain visibly connected to the berry without overpowering it, and the lower point should hang cleanly rather than twisting to one side. Traditional red and green make recognition immediate, but pinks, creams, dark berries, or stylized palettes can work if enough separation remains between fruit and foliage. Surface seed details are optional styling territory; on a small accessory, a few carefully placed marks often communicate more clearly than filling the entire berry.
Keep the Leafy Top Visible
The upper foliage explains the fruit shape as much as the tapered berry itself. Check that it does not fold behind the body when the brooch is held vertically.
If you change the berry’s scale, reassess the top as well. Enlarging one component without the other can make the familiar proportion look unexpectedly awkward.
Judge Seed Details at Wearing Distance
Tiny decorative marks can appear subtle when the brooch is inches from your face but surprisingly busy once the whole strawberry is viewed at normal distance.
Add embellishment gradually. If the color division and silhouette already identify the fruit, extra surface detail should remain secondary.
Creator: 수수달퐁susuDalfong
15. Crochet Cherry Brooch

Hobisever’s tutorial teaches a crochet cherry design for uses including a brooch, hair accessory, or keychain. The project combines the rounded fruit with connecting stems and foliage, creating a hanging composition rather than one centralized solid motif.
That gives the brooch useful movement and asymmetry. Two small fruits can sit below a narrower upper connection, which means the physical balance point may be higher than the most visually obvious center. This is the kind of project where sewing the pin through the middle of the total height could cause the cherries to rotate. The foliage also affects recognition: without enough distinction between fruit, stem, and leaf, the arrangement can become a collection of small shapes rather than a readable cherry motif. Because the pieces project in different directions, choose a wearing spot where they are less likely to be continually caught beneath a bag strap.
Support the Brooch From the Upper Structure
Hold the completed cherries upright before attaching any fastening. Watch where the pair naturally hangs and whether one fruit pulls the composition sideways.
A backing placed closer to the stable upper portion may control the arrangement more effectively than one positioned halfway down simply because that is the geometric center.
Avoid Crowding the Fruit Pair
The charm of a cherry motif comes partly from seeing two distinct rounded fruits. If additional leaves, bows, or beads fill the space between them, that recognizable separation can disappear.
Keep the outer outline clear first. Add decorative details only after the cherries and foliage already read as one coherent brooch.
Creator: Hobisever
16. Crochet Mushroom Brooch
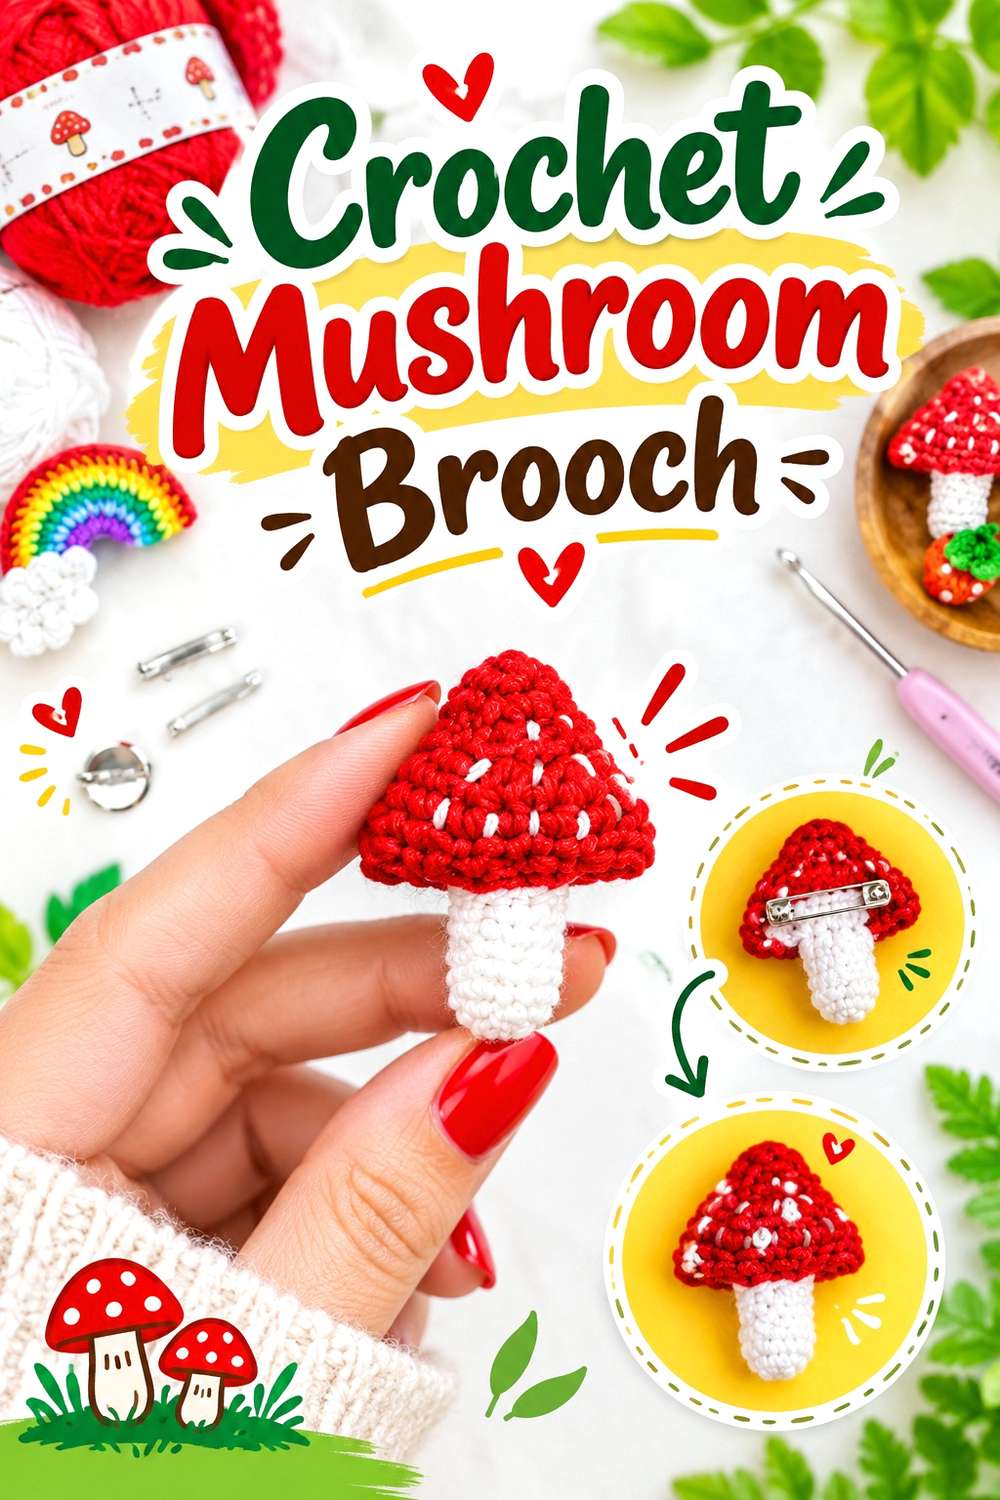
MYBAGZING Crochet Studio’s tutorial teaches a complete mushroom brooch, including the cap, stem, assembly, and pin finishing. That direct brooch construction makes it a convenient woodland option rather than a motif that requires you to invent the final attachment yourself.
The mushroom’s widest area sits at the top, so its visual center and physical balance can differ. A broad cap creates the recognizable outline, while the narrower stem gives the eye a clear downward direction. That same shape can encourage forward tipping if the pin sits too low. Traditional red-and-white styling is only one possibility; browns, creams, pastels, autumn tones, or fantasy colors can all work if cap and stem remain distinguishable. Compared with the beaded toadstool in the next entry, this design is the cleaner choice when you want the silhouette itself to carry most of the interest.
Test the Cap Vertically
Lay the mushroom flat to check its outline, then immediately hold it upright. A cap that appears balanced on a table can fold forward once gravity changes the orientation.
Before stiffening or reinforcing the whole piece, experiment with the backing position. The problem may be attachment balance rather than insufficient rigidity.
Let Color Support the Silhouette
Highly variegated yarn can be attractive, but on a miniature motif it may blur the division between cap and stem.
If you want unconventional colors, preserve some contrast between those major areas. Recognition usually depends more on that shape relationship than on copying a natural mushroom palette.
Creator: MYBAGZING Crochet Studio
17. Crochet Beaded Toadstool Brooch
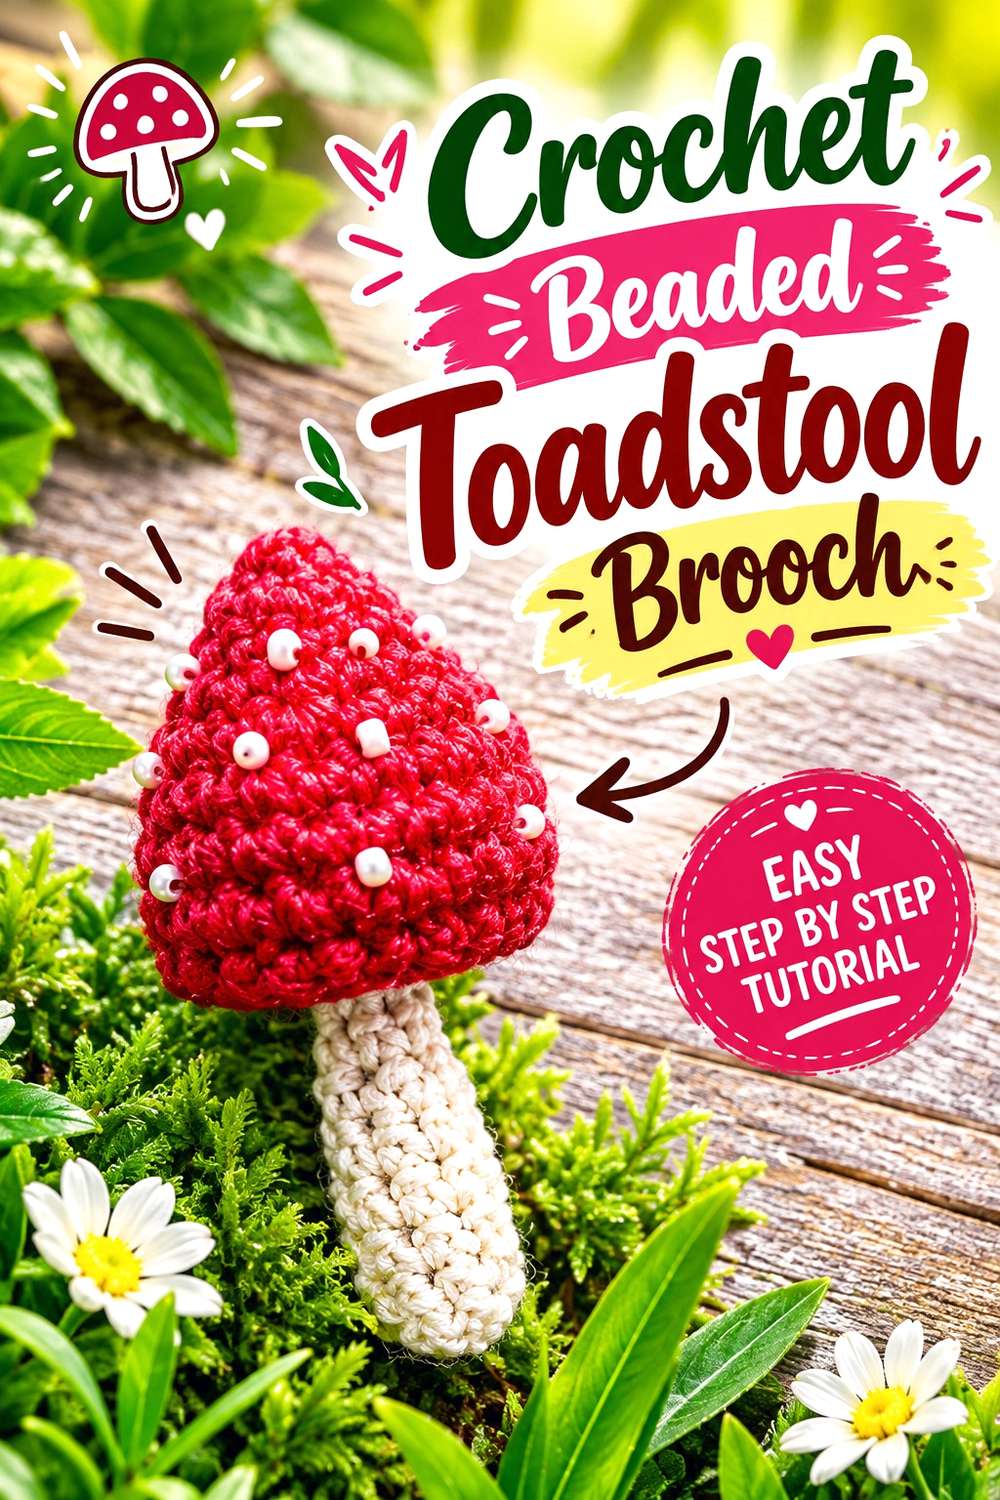
DOSSOVA’s source presents a fly-agaric-style mushroom specifically as a crochet brooch and incorporates bead embellishment into the finished piece. That makes it meaningfully different from the simpler mushroom above: here, the hard decorative elements contribute to the dotted woodland look rather than the crochet alone carrying every detail.
The broad cap and narrow stem still establish the basic silhouette, but bead size now becomes another design variable. Small beads can accent the surface; larger substitutions can add enough concentrated weight to change how the brooch hangs. This is therefore a good project for someone who likes mixed textile jewelry and is comfortable thinking about both crochet and finishing materials. It can work particularly well on sturdy fabric where the beads have space to remain visible rather than being pressed beneath a collar.
Keep the Beads Secondary to the Mushroom
Place proposed beads over the completed cap before sewing everything permanently. The cap should still read as the main shape rather than becoming a support surface for oversized embellishments.
If the beadwork starts to dominate, reducing quantity or size may preserve both the woodland motif and the lighter handmade profile of the crochet.
Inspect the Hard Components
Beads and brooch hardware create points where yarn repeatedly contacts harder materials. Check the reverse and attachment stitches for exposed edges or unnecessary rubbing.
After assembly, hold the brooch vertically and move it gently. If accumulated bead weight makes the top rotate, revisit pin placement before adding further decoration.
Creator: DOSSOVA
18. Crochet Owl Brooch
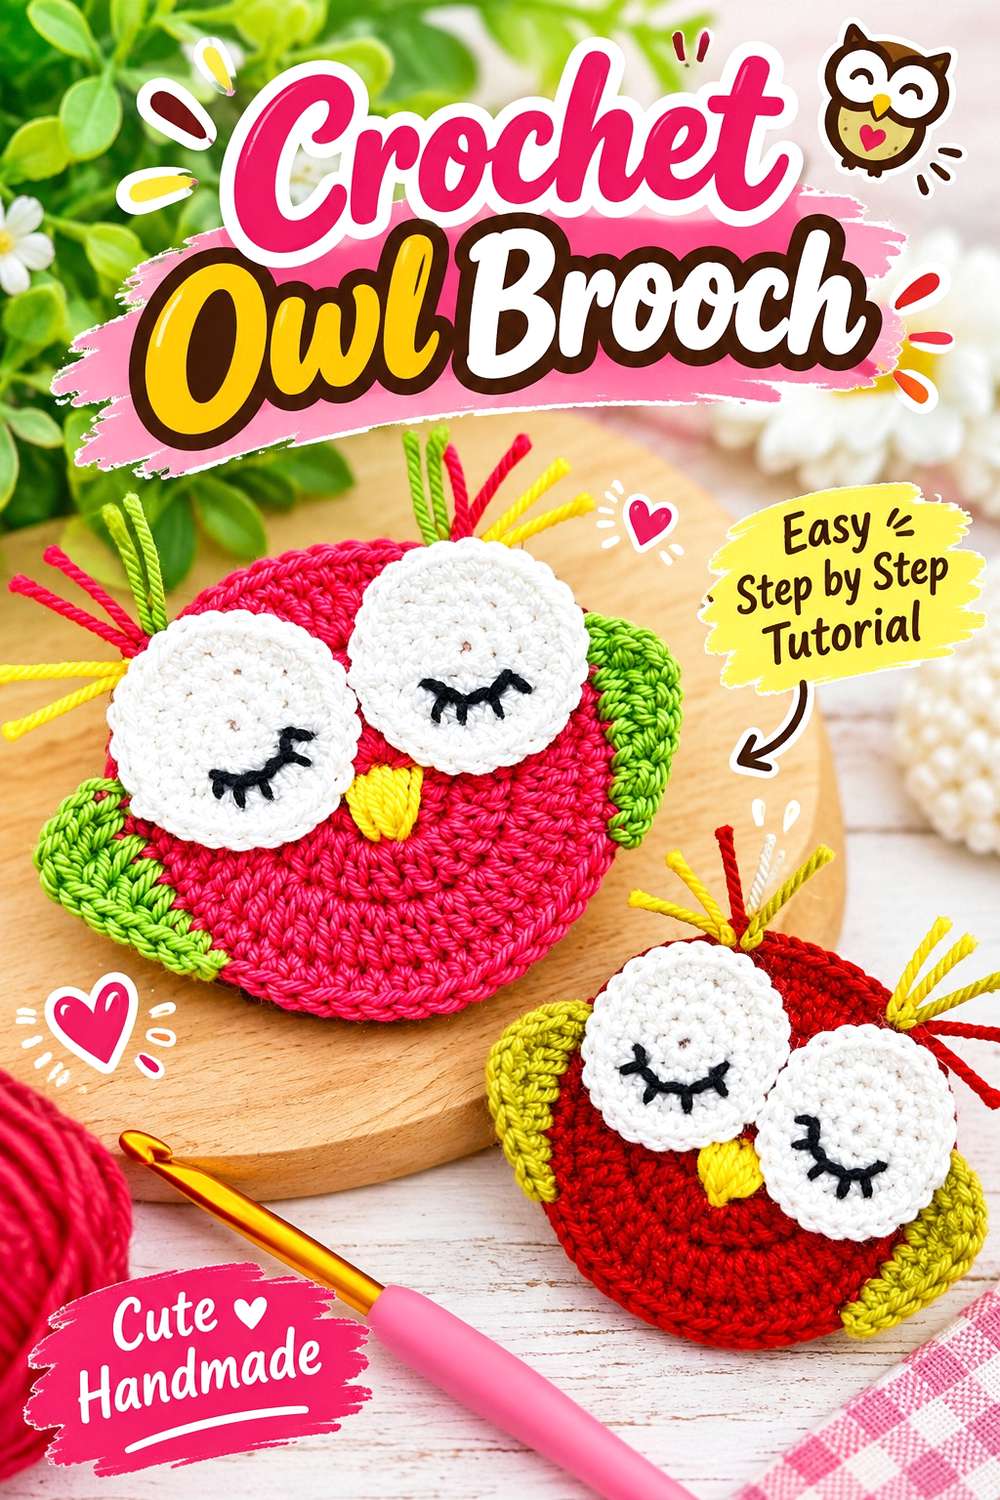
The owl tutorial from do with reyhane is specifically presented as a crochet owl brooch, giving you a compact animal pin in which the face becomes the main point of recognition.
An owl works particularly well at brooch scale because the eyes can provide a strong focal pair while the body remains comparatively simple. That also means placement errors are easy to notice. Two eyes positioned individually can look correct up close yet appear uneven when the whole face is viewed from farther away. Compared with the textured sheep or projecting butterfly, this project can be styled more graphically: color blocks and facial placement matter more than elaborate surface dimension. It is a useful choice for bags, cardigans, denim, or project pouches when you want a recognizable character without a large horizontal wing span.
Position Both Eyes Before Securing Either
Treat the eye pair as one design decision. Temporarily place both and compare their height, distance from the center, and relationship to the beak.
Only secure them when the expression works as a whole. Tiny differences can be charming, but they should ideally look intentional rather than like the second eye was forced into leftover space.
Keep the Back From Distorting the Face
Several components can meet behind a small character motif. When sewing on the pin, avoid pulling so tightly that the front puckers or one facial section moves.
Take a front-view photograph before adding the backing. Compare it afterward; subtle distortion is easier to notice when you have the earlier shape as a reference.
Creator: do with reyhane
19. Crochet Fox Brooch
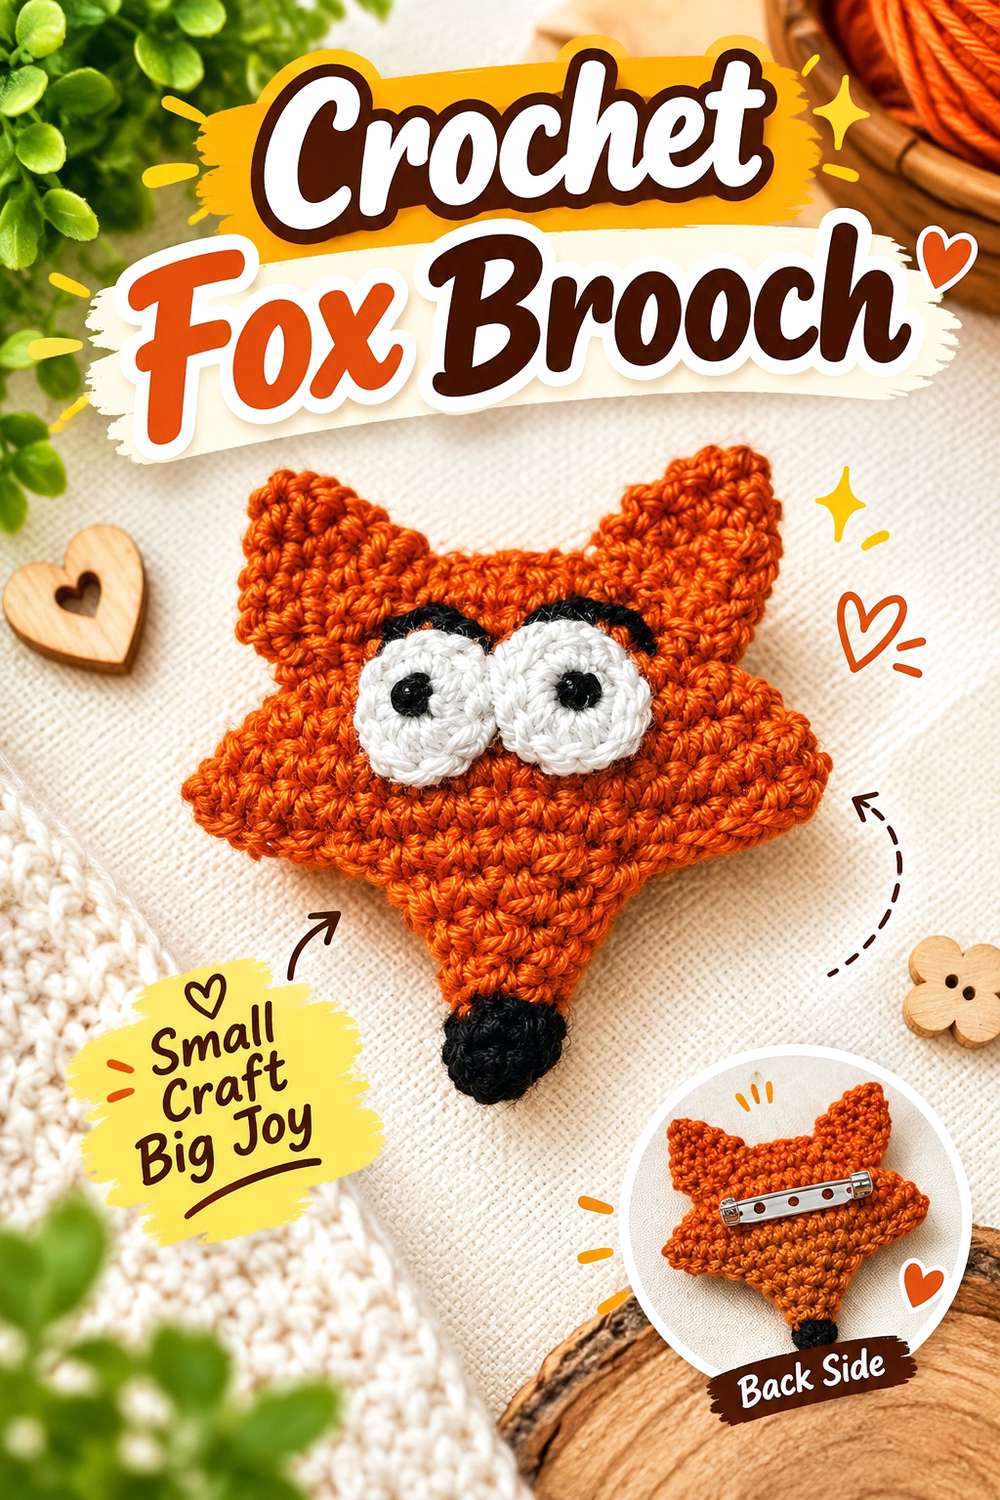
Lilium Handmade’s fox tutorial is devoted specifically to a crochet fox brooch and is presented for left-handed crocheters. The project’s identity depends heavily on its pointed outline and facial contrast rather than a large amount of surface texture.
That makes the fox an interesting option for anyone who prefers a slim character pin over a round stuffed animal. Ears and muzzle placement do much of the visual work, so those sections should remain clear after the hardware is attached. Traditional rust and cream are obvious choices, but gray, white, darker brown, or stylized colors can work if the face retains enough contrast to stay readable. Because the tutorial orientation is left-handed, right-handed readers should consider whether they are comfortable mentally mirroring the demonstration rather than assuming every video presentation will feel equally intuitive.
Protect the Pointed Silhouette
Check the ears before and after assembly. Finishing stitches placed too tightly along the upper edge can pull the defining points inward.
The back does not need to become perfectly flat at the expense of the front shape. Stabilize the hardware through appropriate areas without sacrificing the outline that identifies the animal.
Choose the Facing Direction on the Garment
A fox character has an obvious directional face. Try the finished piece on both sides of a jacket, cardigan, or bag before fixing the final pin orientation.
A brooch that looks natural lying on the table can seem to stare directly into a collar fold once worn. Placement is part of the composition for directional characters.
Creator: Lilium Handmade
20. Crochet 3d Cat Brooch

Sure It’s cat tutorial presents the project specifically as a three-dimensional crochet brooch rather than a flat feline appliqué. The finished character uses dimensional shaping and additional facial or decorative components, so it behaves much more like miniature textile jewelry than an ordinary badge.
This extra depth is exactly what gives the cat personality, but it also increases the importance of backing position. A rounded character can tip away from clothing if the pin sits low or on an unstable section. Complete the face before choosing the final wearing angle because small changes to eye and feature placement can alter which direction the character seems to look. This is also a design where restraint helps. Once the ears, face, and three-dimensional form are readable, extra bows, beads, and charms may compete with the character rather than enhance it.
Finish the Expression Before Mounting
Facial details can radically change how a tiny cat reads. Position them while you can still turn and examine the brooch freely from several angles.
Once the expression is complete, hold the cat against the intended garment and decide exactly how upright it should sit. Then align the pin with that finished orientation.
Support the Form Without Flattening It
The purpose of a 3D brooch is not to lie completely flat. Instead, find the strongest rear area that allows the character to keep its shape while staying reasonably stable against fabric.
Test the pin temporarily before sewing it permanently. If the cat falls forward, shifting the backing may work better than adding stiffness throughout the entire body.
Creator: Sure It
Conclusion
These 20 crochet brooch accessory ideas cover very different kinds of small wearable projects. For a flatter profile, the Oval Cameo, Ginkgo Leaf, Snowflake, Bow, and Daisy keep most of their interest close to the fabric. The Rose, Poppy, Butterfly, Sheep, and 3D Cat provide noticeably more texture or depth.
For clear motifs without large floral volume, consider the Ladybug, Strawberry, Cherry, Mushroom, Owl, or Fox. If mixed materials appeal to you, the Beaded Toadstool introduces another finishing dimension. Whichever design you choose, decide where it will be worn before permanently positioning the fastening. Use each creator’s original tutorial for the exact construction, assembly, and project-specific material details.
Frequently Asked Questions
What is the best type of crochet brooch for lightweight clothing?
A comparatively flat, small motif is generally easier to pair with lightweight fabric than a large stuffed or layered design. The Ginkgo Leaf, Snowflake, Bow, or a modest Daisy are useful options to consider. The actual result still depends on yarn, scale, hardware, and the garment itself. Before wearing the brooch for a full day, pin it temporarily to similar fabric and check whether the material sags, distorts, or develops an uncomfortable pull.
Where should the pin back go on a crochet brooch?
Do not assume the geometric center is automatically correct. Hold the completed brooch vertically and find where its weight naturally settles. Top-heavy mushrooms, hanging cherries, foliage, and dimensional flowers may need the hardware positioned higher than expected. Open motifs also require the pin to remain discreet from the front. Temporarily place the fitting first, test the brooch on fabric, and sew it permanently only after the piece hangs in the intended orientation.
Can I make a brooch larger by using thicker yarn?
You can experiment, but changing yarn thickness is a design adaptation rather than a guaranteed size conversion. A thicker yarn may increase width, depth, weight, gap size, and backing requirements at the same time. Fine details on an owl, fox, or ladybug may also become less precise. If you want a larger version, make one test piece before producing a set and reassess the pin hardware and intended garment after seeing the actual finished scale.
Do crochet brooches need felt backing?
Not every design needs it. A stable crochet motif may already provide an appropriate place for securely sewing the brooch fitting, while a layered, open, or dimensional project can sometimes benefit from an additional backing solution. Follow the individual tutorial where one is specified. If you add felt yourself, keep it inside the visible silhouette and avoid making the reverse so thick that the pin sits farther away from the garment.
How should dimensional crochet brooches be stored?
Keep projecting flowers, wings, ears, antennae, and stuffed forms where they will not remain crushed beneath heavier accessories. A shallow box, compartmented organizer, or protected drawer area can help preserve their shape. Beaded and wired pieces also benefit from separation so harder components do not catch neighboring yarn. Before storage, close the pin mechanism and check that no sharp or rough element remains exposed to other handmade pieces.