Striped cardigans can look dramatically different even when the basic idea is simply changing colors. Narrow bands create a busier rhythm, wide stripes can feel closer to color blocking, granny stripes add open texture, and side-to-side construction can turn the stripe direction completely around. Cardigan length, front treatment, pockets, ribbing, and yarn character also change how those stripes read on the body.

These 18 crochet striped cardigan ideas cover classic button fronts, oversized layers, long rainbow cardigans, pocketed designs, lace, granny stripes, made-to-measure constructions, and a baby cardigan. Rather than choosing by color palette alone, compare the garment shape, stripe scale, fabric density, and finishing details first. The original tutorials linked with each idea provide the exact construction information, while the notes below help you decide which approach fits the cardigan you actually want to make.
Quick List
- Crochet Two-Color Button-Front Striped Cardigan
- Crochet Oversized Granny-Stripe Cardigan
- Crochet Side-to-Side Striped Drape Cardigan
- Crochet Long Rainbow Scrap-Stripe Cardigan
- Crochet Herringbone Striped Cardigan with Pockets
- Crochet Wide-Band Color-Block Striped Cardigan
- Crochet Oversized Moss-Stitch Striped Cardigan
- Crochet Edge-Striped Cotton Cardigan
- Crochet Classic Granny-Stripe Cardigan
- Crochet Black-and-White Striped Cardigan with Neon Ribbing
- Crochet Four-Color Ribbed Striped Cardigan
- Crochet Made-to-Measure Sport-Weight Striped Cardigan
- Crochet Mohair-Style Pink Striped Button Cardigan
- Crochet Long Wide-Stripe Oversized Cardigan
- Crochet Unisex Buttoned Striped Cardigan
- Crochet Lace Cardigan with Striped Border
- Crochet Soft Everyday Striped Cardigan
- Crochet Baby Granny-Stripe Button Cardigan
How Stripe Width Changes the Finished Cardigan
Stripe width affects more than the color scheme. Closely spaced bands create more frequent transitions and can make a cardigan visually active, while wider bands give each shade more room and may read almost like color blocking. A long cardigan can carry broad stripes without crowding the design, whereas a shorter body gives fewer opportunities to repeat a large sequence.
Think about where color changes will meet the front opening, shoulders, side seams, and sleeve joins. Perfect matching is not mandatory, but accidental near-matches can look less intentional than either clearly aligned or deliberately offset stripes. If sleeves use the same palette as the body, decide whether they should echo the body repeat or act as a separate color feature before you begin them.
Match Yarn Character to the Cardigan Shape
Two cardigans with identical stripe spacing can behave differently when their yarns produce different levels of spring, density, or drape. A crisp cotton fabric can emphasize stitch definition and clear color boundaries, while a fuzzy yarn can soften them. Open granny or lace fabric generally gives stripes more negative space than a dense textured stitch.
Length also matters. A long cardigan carries more fabric than a cropped one, so its finished hang deserves attention before you commit to the full garment. Make a useful swatch in the actual stitch pattern and more than one intended color, then assess it after any finishing treatment you plan to use. The goal is not simply to match a yarn label; it is to check whether the fabric behaves the way the cardigan shape requires.
Check Stripe Alignment Before Joining or Edging
Before joining cardigan pieces, lay them flat in the orientation they will have in the finished garment. Compare stripe height, color order, and the position of major transitions. Small gauge differences can become much easier to see when two supposedly matching bands meet at a seam.
Front borders deserve a separate check because ribbing, button bands, and other edging can change the way an opening hangs. If the tutorial allows a try-on before the final edging, use that opportunity to look at length, shoulder position, and whether the two fronts balance. With made-to-measure designs, rely on the actual crocheted fabric and your intended fit rather than assuming that matching someone else’s stitch or row totals will give the same result.
Crochet Two Color Button Front Striped Cardigan
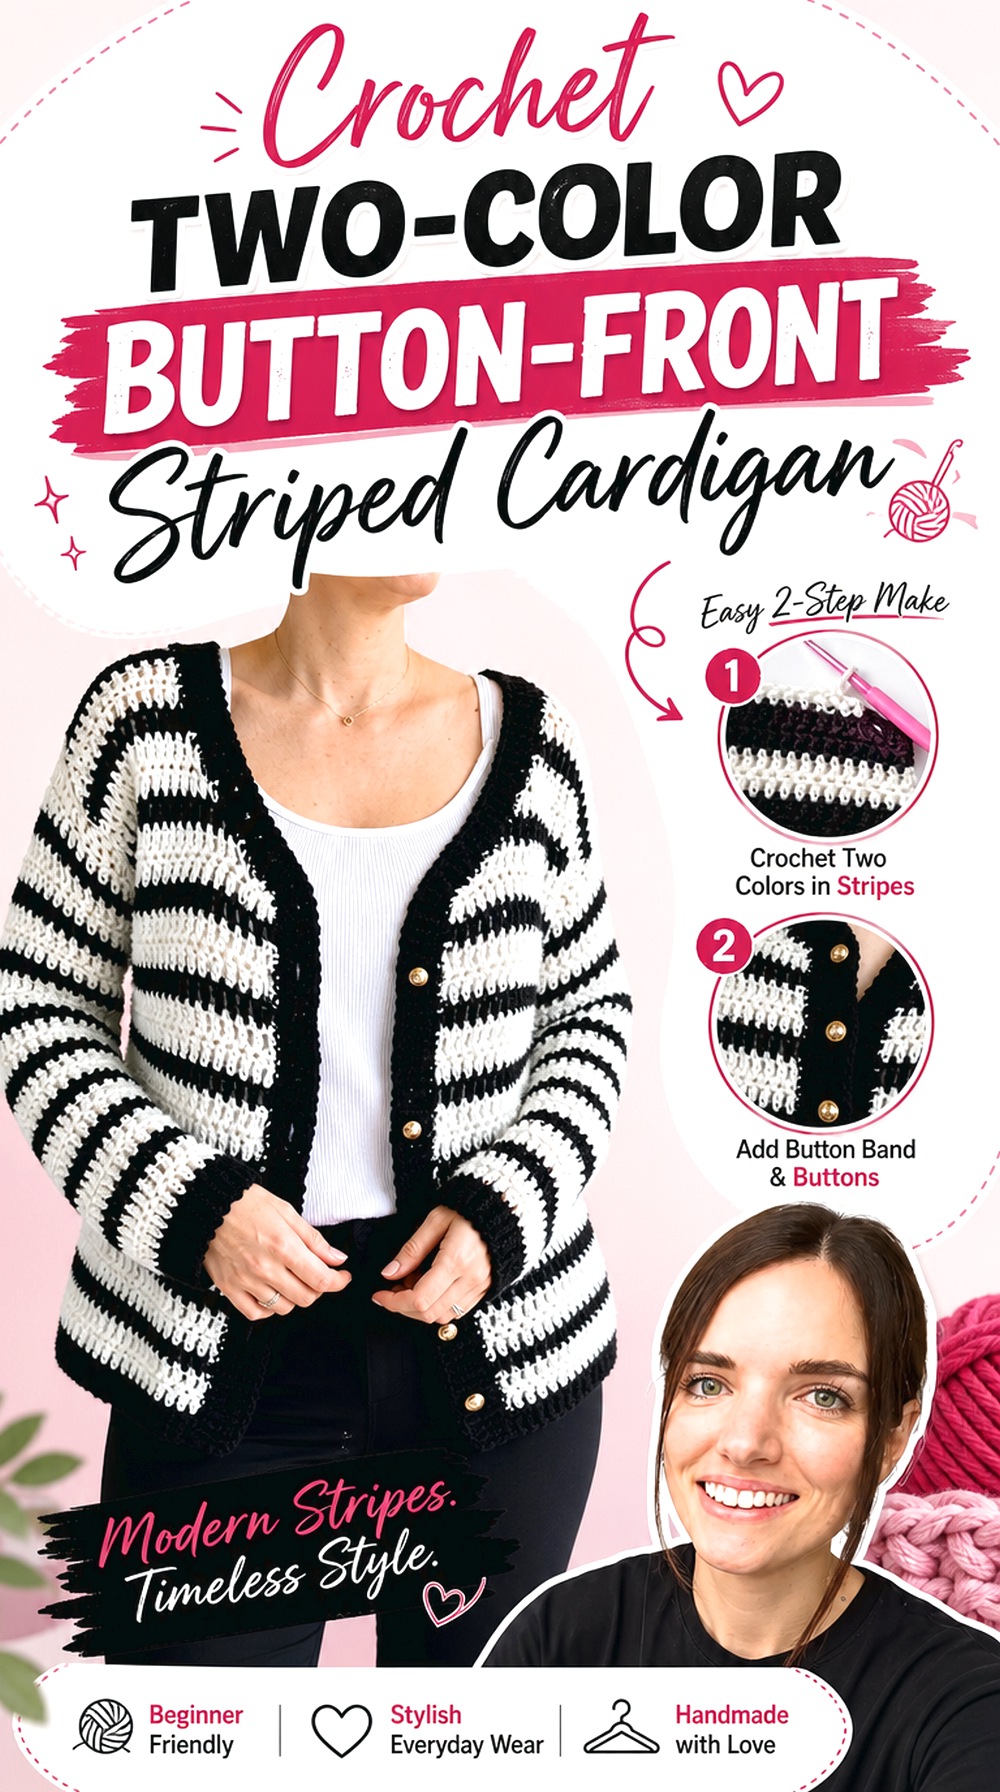
A two-color button-front cardigan is one of the clearest ways to make stripes the main design feature without adding a complicated palette. Cat Kemble’s tutorial builds a striped cardigan with separate body components, sleeves, finishing around the lower edge, and a button band with buttonholes. That makes this option useful if you want a more conventional cardigan front rather than a loose open layer.
The strongest visual decision is how evenly the two colors travel across the garment. Because the front closes, color placement on the left and right sides becomes especially noticeable when the cardigan is worn buttoned.
Keep the Front Stripes Visually Continuous
If you want the closed cardigan to read as one uninterrupted striped surface, compare the two front pieces before final assembly. A color band that starts noticeably higher on one side may stand out more at the center front than it would at a side seam. Lay the fronts next to each other periodically so you can spot differences while they are still easy to evaluate.
The Button Band Needs Its Own Fit Check
A button band adds structure along an edge that otherwise might hang freely. Its tension can influence whether the front lies flat, pulls inward, or ripples. Before treating it as a decorative finishing step, check how the cardigan hangs and where the opening naturally meets. Follow the creator’s construction for the band and buttonholes rather than estimating their spacing from another garment.
Sleeve Bands Look Cleaner When Planned Before Joining
Sleeves do not have to duplicate the torso stripe sequence exactly, but the relationship should look deliberate. Decide whether the sleeve colors will continue the rhythm of the body or use their own repeat. If you care about symmetry, compare both sleeves side by side during construction rather than waiting until the cardigan is fully assembled.
Crochet Oversized Granny Stripe Cardigan
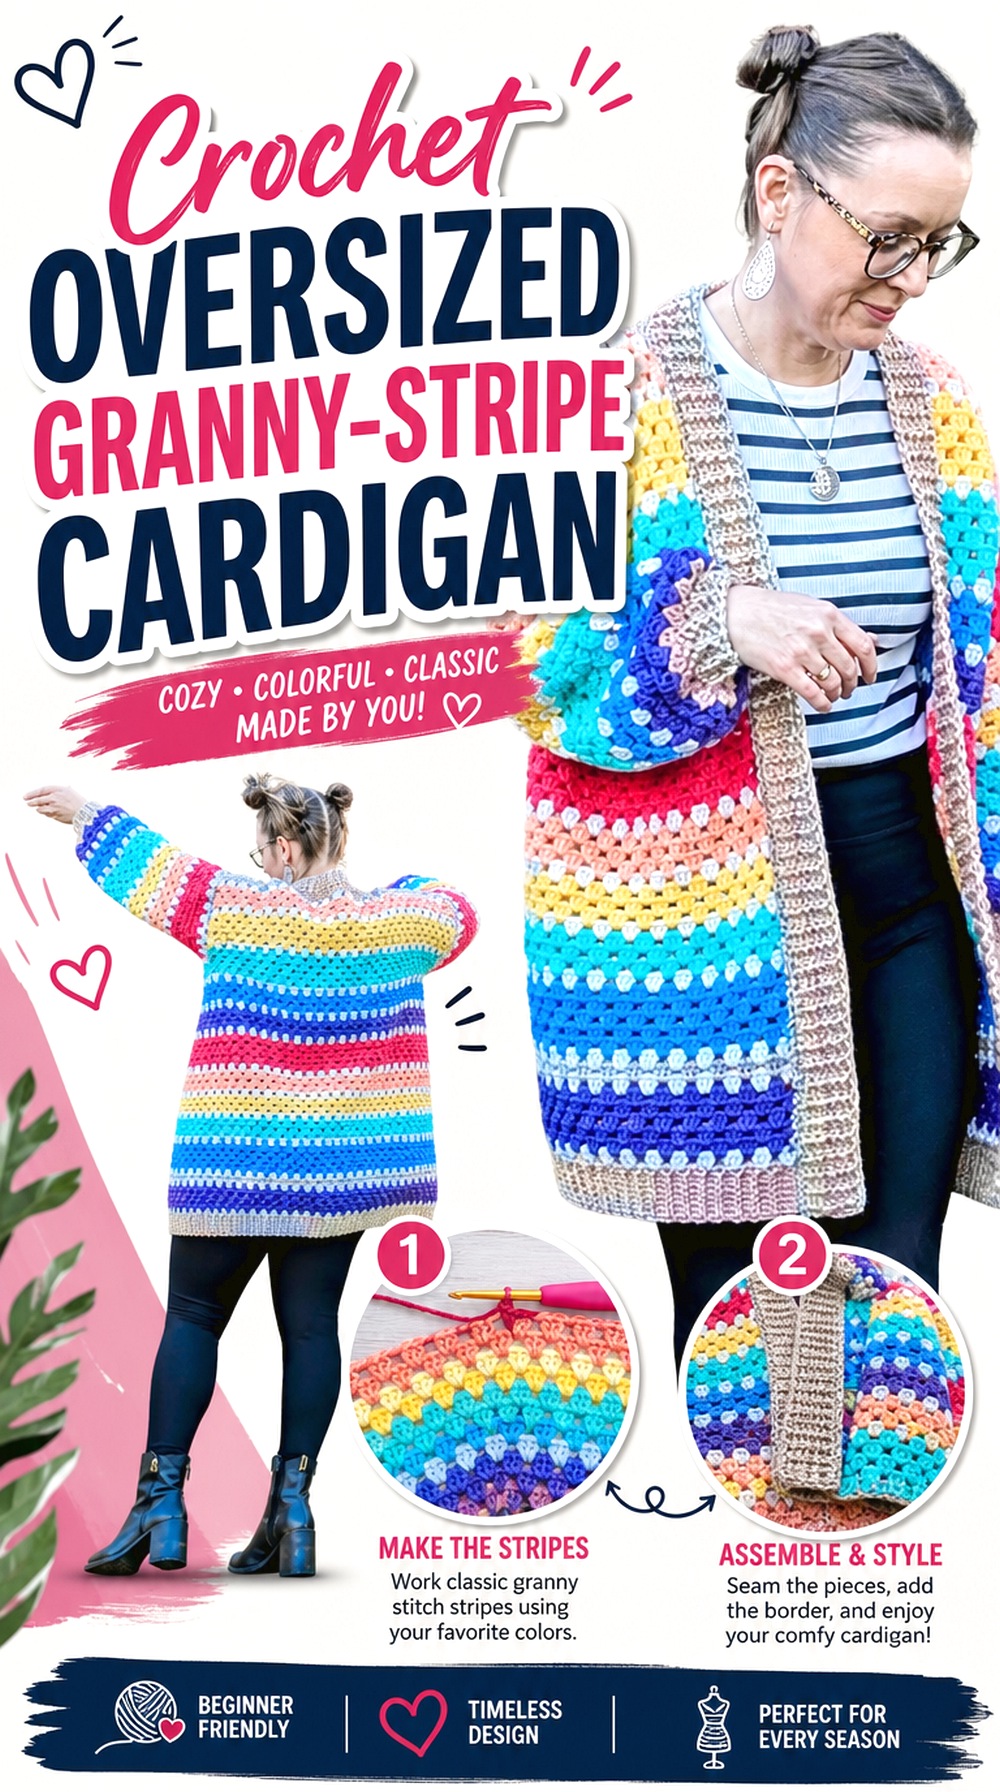
This cardigan combines the familiar color rhythm of granny stripes with a deliberately roomy silhouette. Craft and a Cuppa presents the design as a made-to-measure cardigan with an oversized fit and relatively little seaming, giving it a different feel from more structured paneled cardigans.
The open cluster texture lets multiple colors remain prominent without producing the solid horizontal bands of a dense stitch. It is a strong choice for someone who wants the stripes and the crochet texture to share equal visual importance. The generous shape also makes fit planning more about intentional ease than simply matching a standard garment width.
Oversized Ease Is Part of This Silhouette
Do not automatically reduce a roomy cardigan until it matches the width of a fitted sweater you already own. The extra space is part of the finished look. Instead, compare your preferred cardigan dimensions with a loose layer that already feels comfortable, then use the tutorial’s measuring method to decide how much room you actually want.
Granny Clusters Create a More Open Stripe
A granny stripe contains gaps as well as color, so the visual result is lighter and more broken than a solid band of dense stitches. That can be useful when several shades are involved because the fabric does not become one uninterrupted block of color. It also means you should judge both coverage and drape from the actual crocheted fabric rather than color sketches alone.
Ribbing Gives the Loose Body a Clear Frame
On a relaxed cardigan, edging can provide valuable definition at the front and other openings. Check that the ribbing or border sits smoothly without compressing the larger body. If the body fabric is very relaxed, an overly tight edge can change the silhouette instead of simply finishing it.
Original Tutorial and Creator Credit
Creator: Craft and a Cuppa®
Crochet Side to Side Striped Drape Cardigan
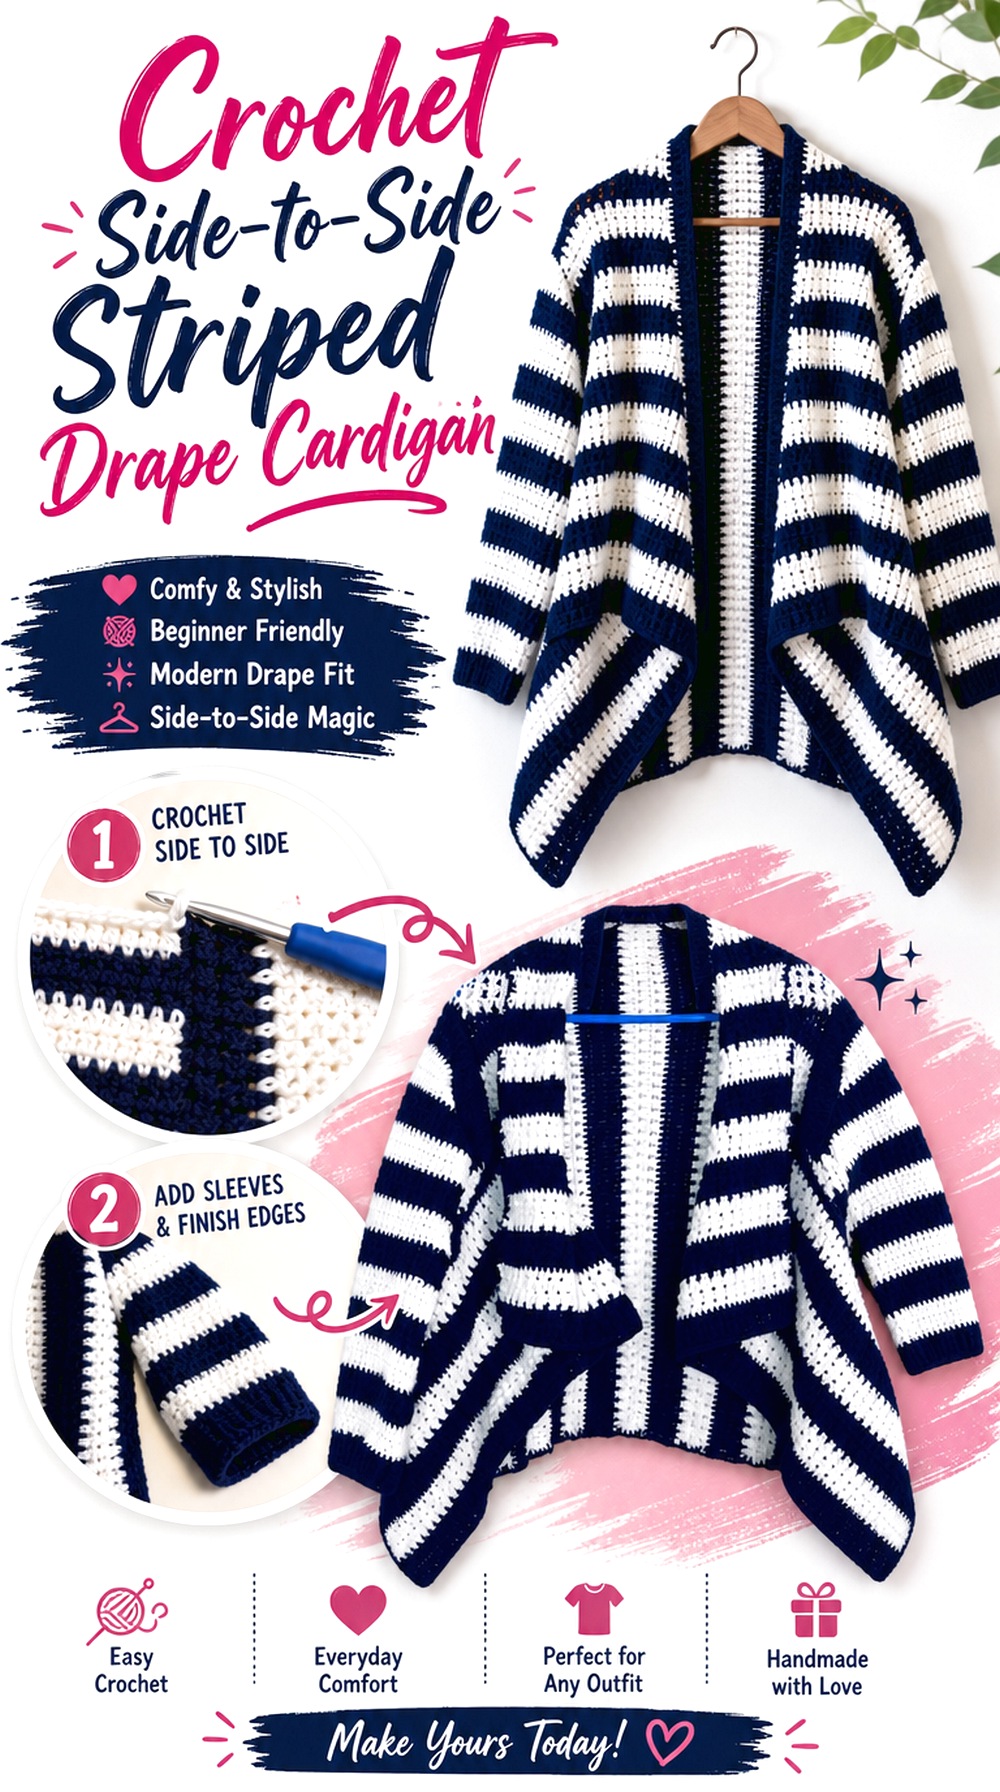
Instead of building horizontal stripes from the hem upward, this AC Crochets design is worked side to side from a rectangular foundation, changing the relationship between construction direction and the visible bands. The tutorial uses a black-and-white striped look and includes wrist ribbing as part of the finished cardigan.
This makes the idea worth considering if ordinary bottom-up striping feels too predictable. A side-to-side garment can also make width planning feel different, because the dimension you are building toward is not the same one you would monitor in a conventional hem-up cardigan.
Side-to-Side Construction Changes Stripe Direction
Construction direction determines what each repeated row contributes to the finished garment. Before choosing colors, look at the completed cardigan and identify where the stripes will run when worn. This is especially important if you plan to adapt the palette, because a color sequence that looks balanced on a flat rectangle may feel different once that rectangle becomes the body.
Shoulder-to-Shoulder Width Is the First Checkpoint
The tutorial specifically works with shoulder-to-shoulder measurement as part of planning. Instead of guessing from a generic size name, take the relevant measurement carefully and compare it with the tutorial’s method. A draped cardigan can tolerate more openness at the front than a buttoned style, but the shoulder area still determines whether the garment sits where intended.
Wrist Ribbing Controls an Otherwise Fluid Shape
A fluid body paired with a closer wrist finish creates useful contrast. If you substitute yarn, compare how readily the body drapes and how well the ribbed area returns after stretching. The two sections perform different jobs, so a yarn that looks attractive in a loose rectangle should also be checked in a smaller ribbed swatch.
Original Tutorial and Creator Credit
Creator: AC Crochets
Crochet Long Rainbow Scrap Stripe Cardigan
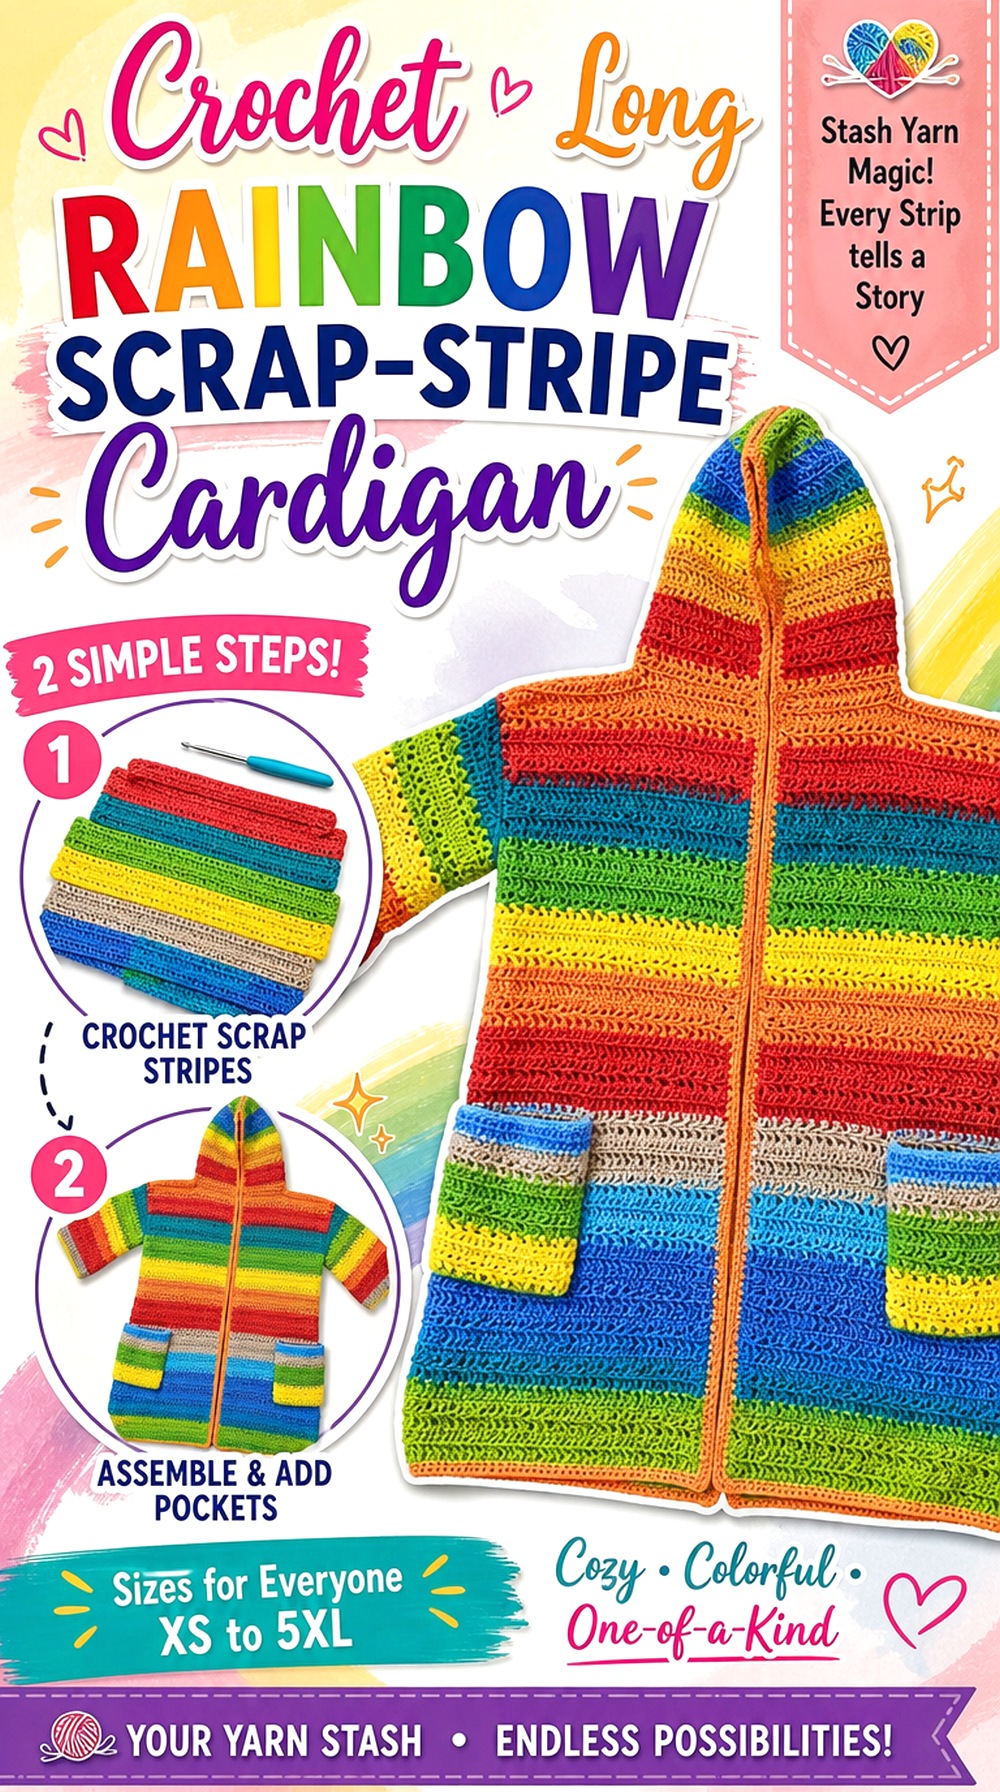
A long rainbow cardigan gives leftover yarn a more intentional destination than a completely random scrap project. Let’s All Crochet presents a long cardigan designed to accommodate scrap yarn and notes that the yarns combined should have a similar thickness. The creator also discusses adapting the garment for different sizing and an oversized look.
For a striped interpretation, group scraps into planned color bands instead of switching shades only when a ball runs out. That keeps the finished cardigan looking designed while still letting you use smaller quantities from your stash. The long body gives enough surface area for several color families to appear.
Scrap Yarn Works Better When Thickness Stays Consistent
Color variety does not need to mean fabric inconsistency. If one leftover yarn is much thicker or thinner than the others, its band may change the width or texture of that section. Compare the strands before committing and make a small mixed-yarn sample when they behave differently. Similar thickness is specifically recommended by the tutorial creator.
A Long Body Makes Yarn Weight More Noticeable
Long cardigans carry more crocheted fabric below the shoulders than cropped styles. When evaluating scraps, pay attention to how your sample hangs rather than looking only at color compatibility. If a mixed fabric already feels unexpectedly dense in a small sample, multiplying that effect through a long garment may change the drape you imagined.
Plan the Rainbow as Bands, Not Random Color Noise
Before crocheting, arrange your available shades in a sequence on a table or photograph them together. You do not need identical amounts of every color. Instead, decide which shades deserve wider bands and which can be brief accents. Repeating one or two anchor colors can also make unrelated scraps feel more connected without requiring a perfectly symmetrical sequence.
Original Tutorial and Creator Credit
Creator: Let’s All Crochet
Crochet Herringbone Striped Cardigan with Pockets
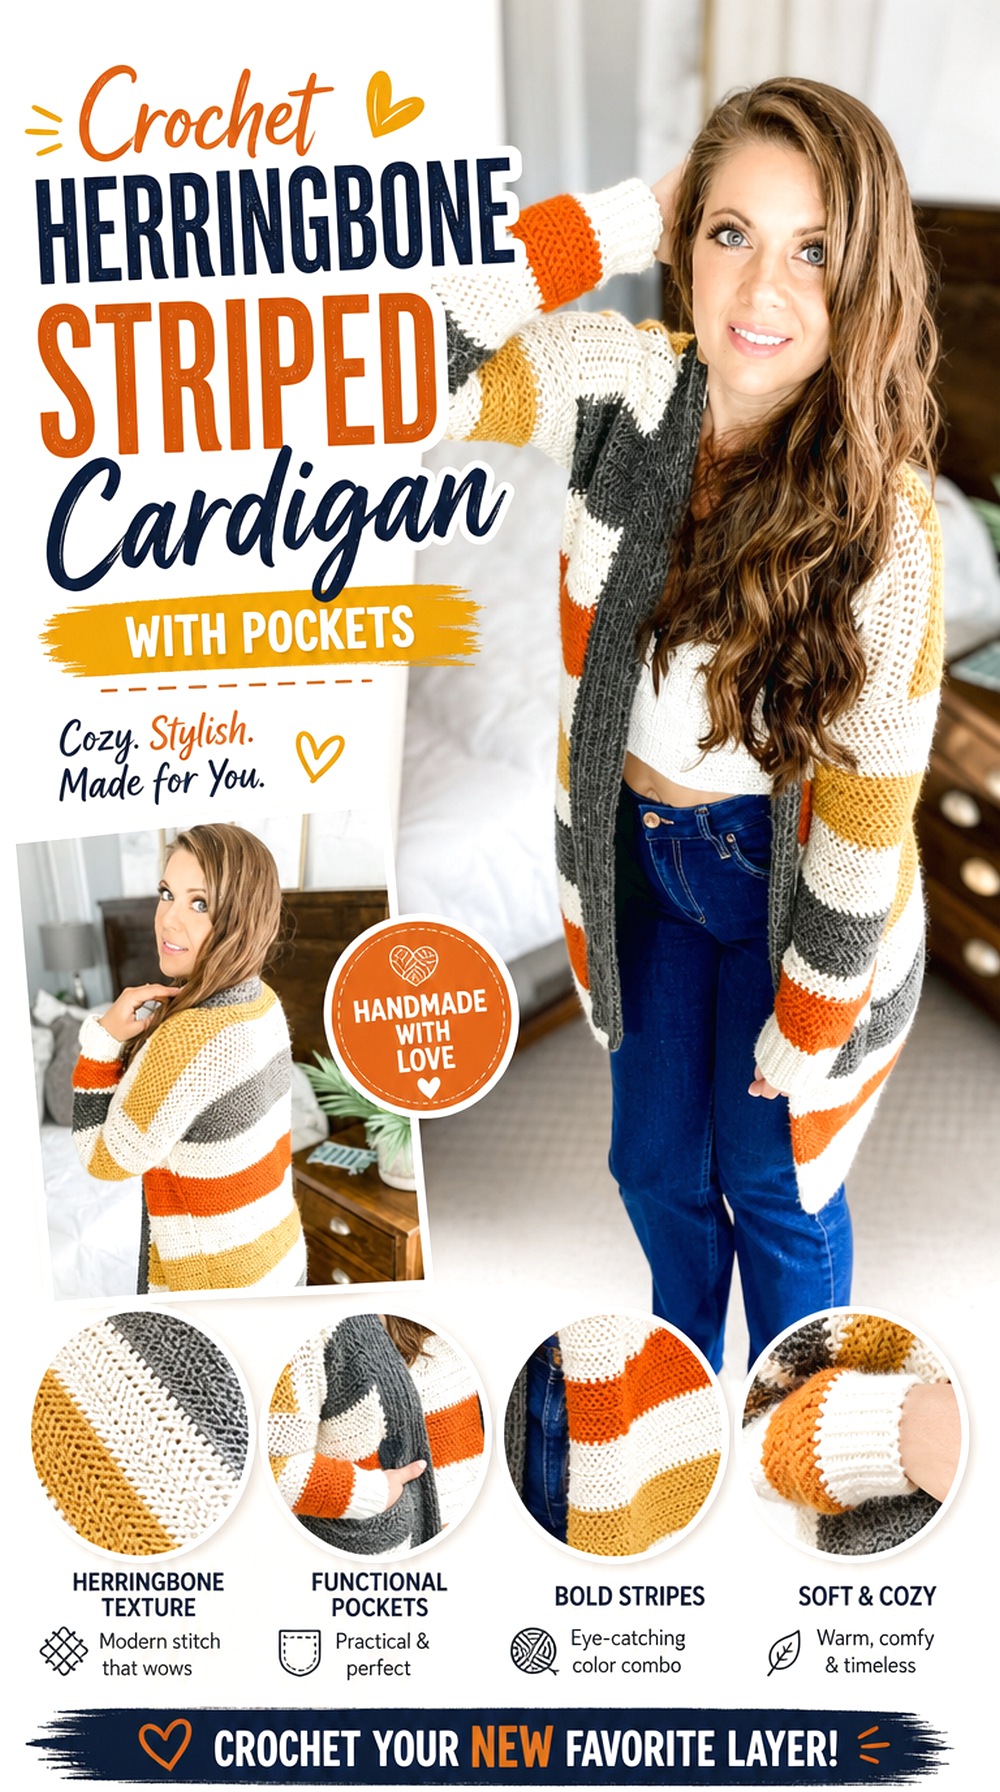
This option combines three strong visual elements: horizontal color changes, directional herringbone texture, and inset pockets. MJ’s Off The Hook Designs presents the striped cardigan tutorial with pockets, while the accompanying design information identifies herringbone double crochet as part of the fabric and a ribbed collar as another defining detail.
Because the stitch texture already has movement, the stripes do not sit on a visually neutral background. The pockets also interrupt the front surface, making placement and color continuity more important than they would be on a plain uninterrupted panel.
Herringbone Texture Makes Every Stripe More Directional
A textured stitch can make color bands look more active than they would in a simple flat stitch. Before choosing a highly contrasting palette, make a sample that includes both the herringbone texture and at least one color transition. You may find that close shades emphasize the stitch itself, while stronger contrast makes the striping dominate.
Pocket Placement Adds Visual and Physical Weight
Pockets are functional, but they also create additional fabric on the cardigan front. Look at how their upper edges interact with nearby stripes and whether the pocket fabric visually interrupts a major color band. Follow the tutorial’s pocket construction rather than moving them casually, because placement affects both appearance and practical hand access.
A Ribbed Collar Keeps the Long Front Edge Defined
When a cardigan includes strong texture, stripes, and pockets, a consistent front border helps frame the design. Check the collar or front ribbing after the main body is assembled and make sure its tension does not draw the opening upward. A neat border should support the silhouette without overpowering the herringbone fabric beside it.
Original Tutorial and Creator Credit
Creator: MJ’s Off The Hook Designs
Crochet Wide Band Color Block Striped Cardigan
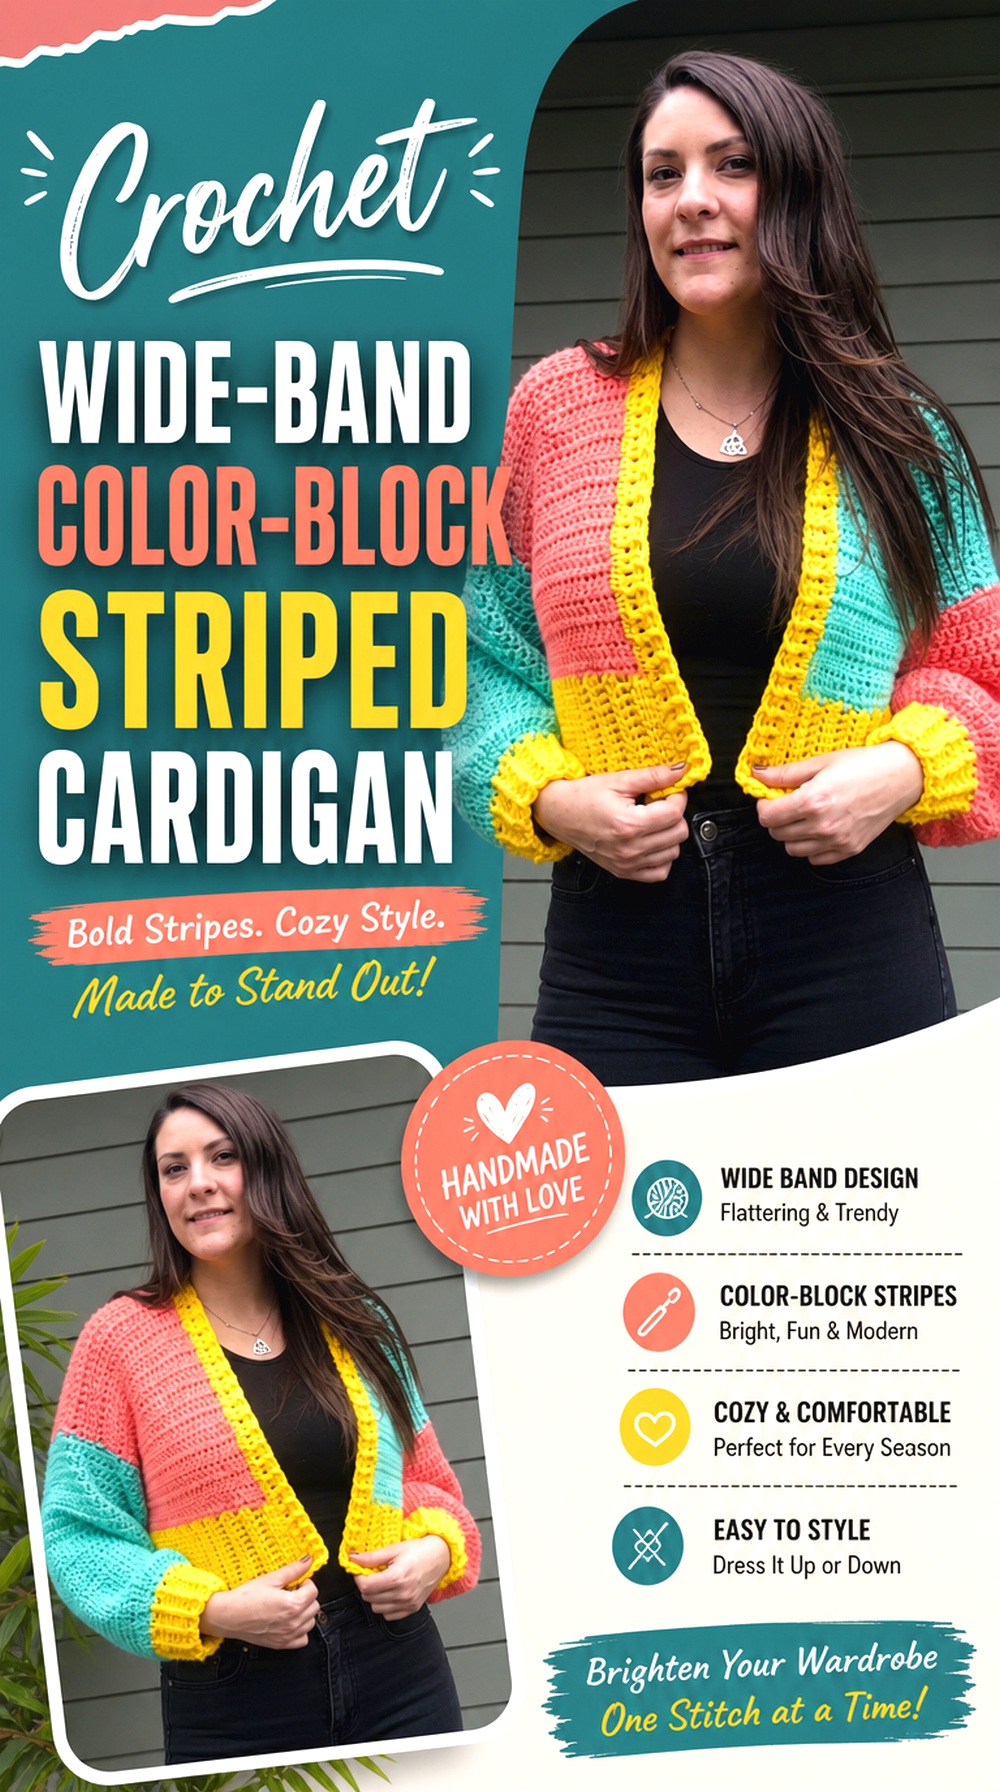
Some striped cardigans look more modern when the color changes are spaced far apart. Carroway Crochet’s tutorial demonstrates a color-block cardigan and explicitly notes that the same idea can be worked with smaller color blocks or stripes, making it a useful foundation for broad striped bands.
This style works well when you want each yarn color to occupy a substantial area instead of appearing in a rapid repeat. It can also simplify palette planning: three or four larger zones may be easier to balance than many narrow rows of alternating color.
Wide Bands Read Differently From Narrow Stripes
A broad band functions almost like a separate design panel. If you use high-contrast colors, every transition becomes a major visual dividing line. Sketch the cardigan as a few large horizontal zones before choosing the final order. This helps you see whether one color will dominate the torso or end abruptly at a place you did not intend.
Choose Color Breaks Before Reaching the Armholes
Major color changes can become more noticeable around armholes and shoulders, where the garment shape is already changing. Decide roughly where your broad bands should fall using measurements and the tutorial’s construction logic rather than relying on a fixed row count from another maker. Your personal gauge and intended length determine where those transitions actually land.
A Simple Stitch Surface Lets Color Carry the Design
When the underlying stitch pattern is visually restrained, the palette becomes the main feature. That gives you room to use saturated or strongly contrasting shades without competing with heavy texture. If you prefer a quieter cardigan, use closer values or related hues while keeping the same broad-band structure.
Original Tutorial and Creator Credit
Creator: Carroway Crochet
Crochet Oversized Moss Stitch Striped Cardigan
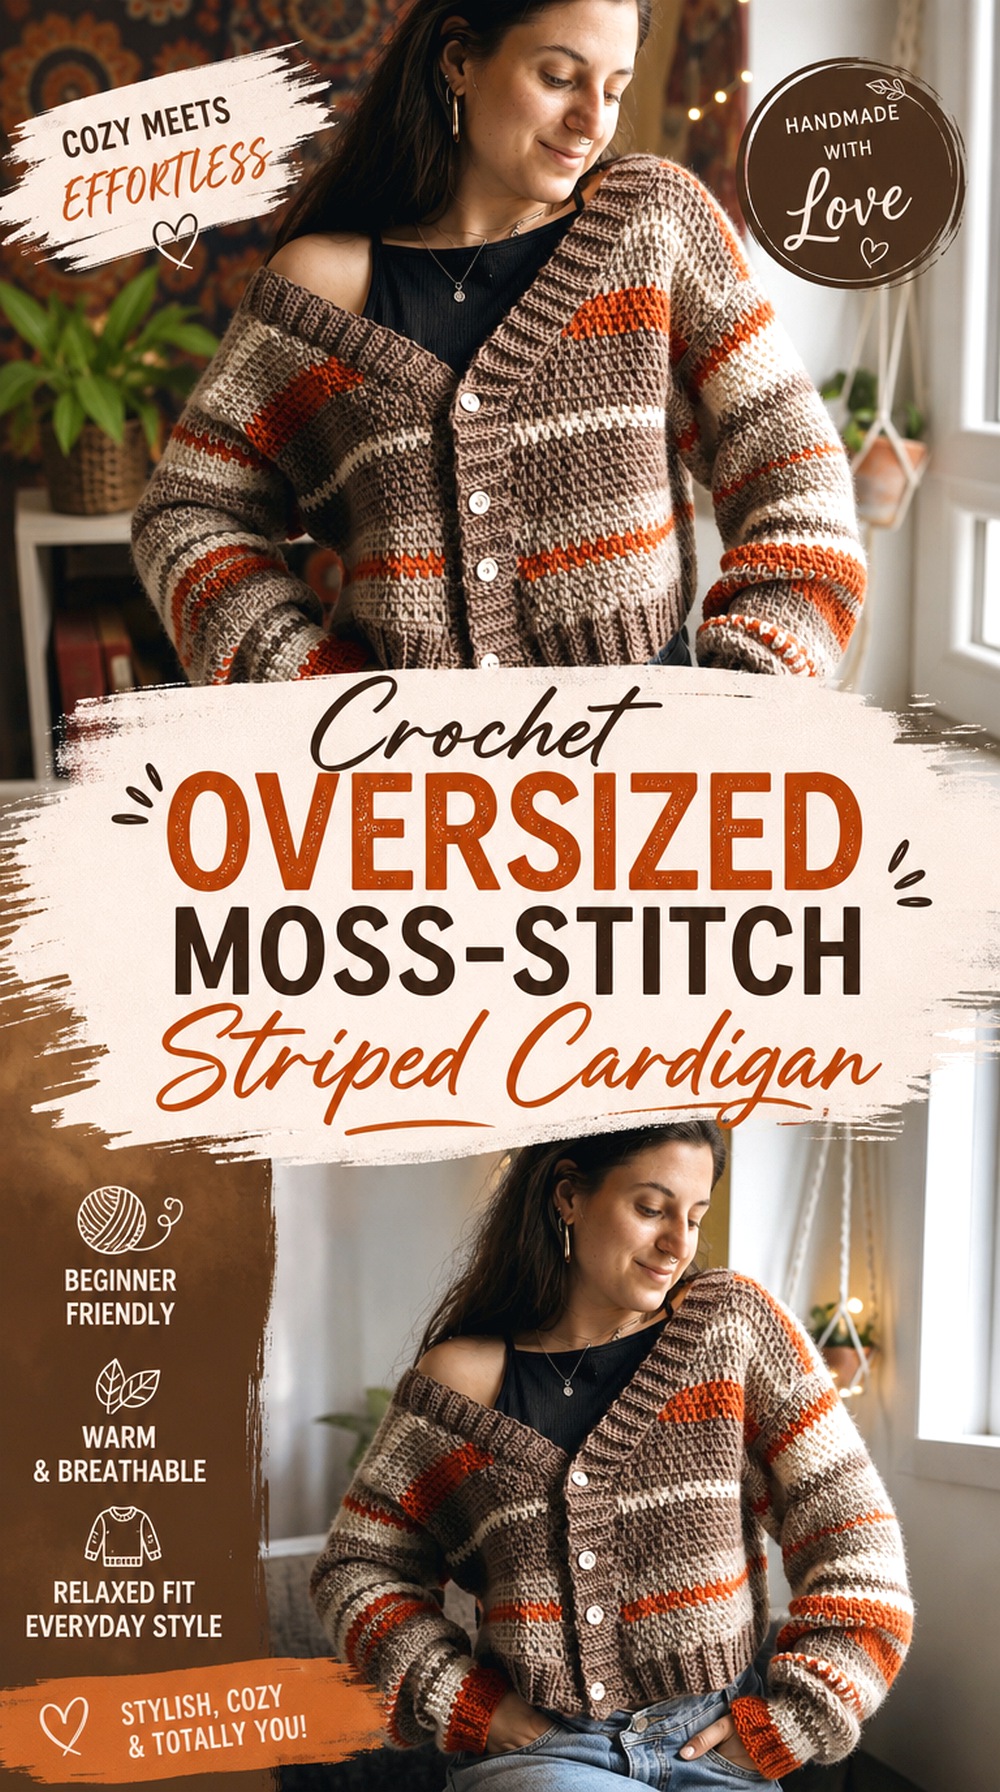
Bloodimaryart Crochet’s tutorial pairs an oversized striped cardigan shape with moss stitch, creating a denser visual rhythm than an open granny stripe. The video covers the main panels, shoulder joining, sleeves, and finishing ribbing around the closure.
Moss stitch mixes small units of color and texture, so the transition between bands feels less like a perfectly solid painted stripe. This cardigan is worth considering when you want a relaxed silhouette but prefer a more compact stitch surface than the granny-cluster options elsewhere in the collection.
Moss Stitch Softens the Edge Between Colors
Moss stitch has built-in texture that can make a stripe transition feel slightly more blended. Test adjacent colors together before committing to the entire palette. Similar shades can create a subtle woven effect, while black against a pale shade will still produce a sharply graphic result even with the textured surface.
Cropped Length Balances an Oversized Width
A wide cardigan does not necessarily need to be long. A shorter body can keep an oversized silhouette from feeling visually overwhelming, especially when the stripes are bold. Compare the desired hem position with the garments you actually layer underneath and check the tutorial’s fit approach before adjusting length.
Closure Ribbing Can Change How the Front Hangs
The front border sits beside every body stripe, so it becomes one of the most visible finishing elements. If you choose a contrasting ribbing color, it will frame the entire palette; if you repeat a body shade, it can unify the design. Either way, keep the edge relaxed enough to follow the cardigan opening smoothly.
Original Tutorial and Creator Credit
Creator: Bloodimaryart Crochet
Crochet Edge Striped Cotton Cardigan
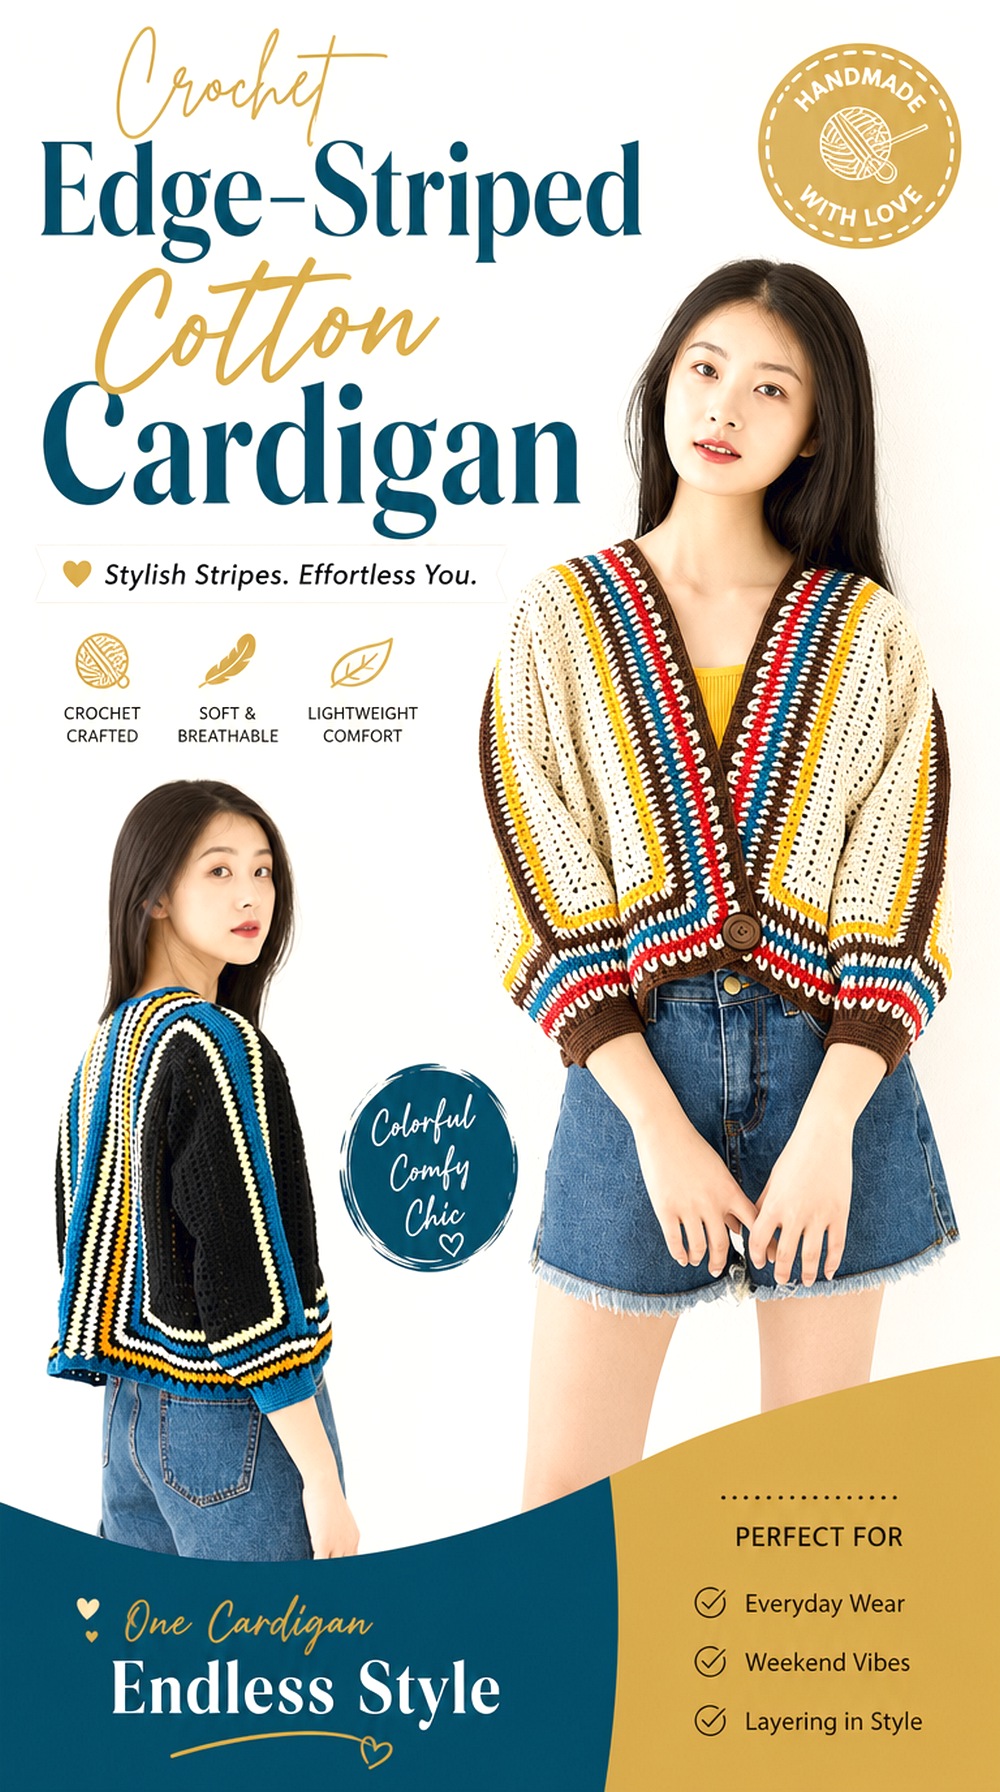
Not every striped cardigan needs bands across the entire torso. Susan’s Family offers a striped cardigan tutorial that includes the body, sleeve sections, cuffs, front band, and hem, giving you a useful reference for treating the finishing areas as an important part of the color design. The listed project yarn is a cotton option.
For an edge-focused interpretation, concentrate multiple colors near borders, cuffs, or lower sections while allowing larger areas of the cardigan to stay quieter. This creates a framed look and can be easier to coordinate with an everyday wardrobe than uninterrupted high-contrast striping.
Concentrated Stripes Frame the Cardigan
When stripes sit mainly near edges, the eye follows the outline of the garment rather than reading repeated bands from top to bottom. Decide which edges deserve the strongest color emphasis: cuffs can highlight hand movement, while a striped lower border creates more visual weight near the hem. Repeating the same accent colors in two locations can make the treatment feel intentional.
Cotton Gives Crisp Definition but Less Spring
Cotton can produce clearly defined stitches and clean color changes, but it may behave differently from a more elastic fiber. If you substitute yarn, compare how the cuff and front-band fabric recovers after stretching. Do not assume that a border worked to the same dimensions in another fiber will sit identically on the body.
Front Band and Hem Become Part of the Color Layout
Treat finishing as part of the palette plan rather than deciding it from leftover yarn at the end. Place your candidate colors next to the completed body and consider whether the border should blend, contrast, or repeat an earlier stripe. That small decision can shift the cardigan from restrained to strongly graphic.
Original Tutorial and Creator Credit
Creator: Susan’s Family 蘇蘇姐家
Crochet Classic Granny Stripe Cardigan
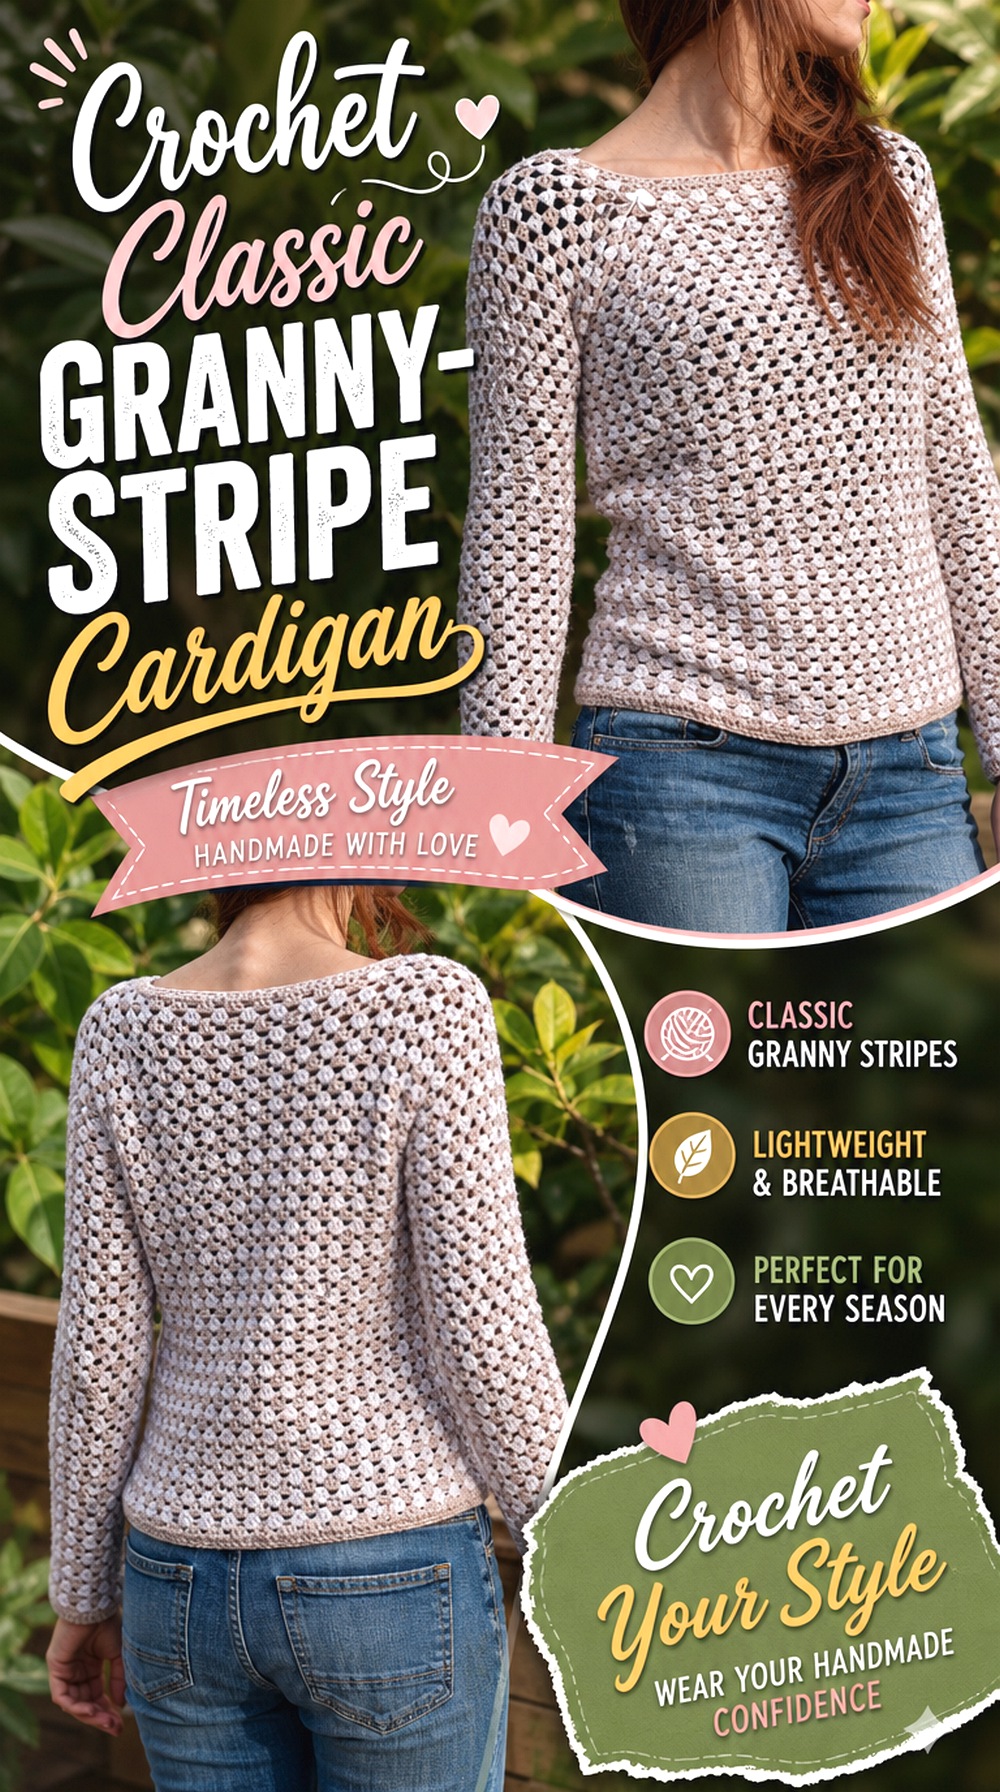
Lanas y Ovillos in English provides a traditional granny-stripe cardigan tutorial built around the recognizable clustered stripe texture. It offers a useful alternative to the deliberately oversized granny cardigan earlier in this list because the emphasis here is on a straightforward classic granny-stripe learning route. The creator also flags a correction in the video description, which is worth reviewing before beginning.
This type of cardigan works especially well when the color sequence is the main decorative feature. Even a simple two- or three-color repeat becomes more dimensional because every band contains the characteristic granny texture.
Check the Creator’s Posted Correction Before Starting
When a tutorial creator publishes a correction, treat it as part of the current project information. Read the description before crocheting rather than relying only on what appears on screen. There is no advantage in memorizing or reproducing the correction elsewhere; the creator’s current source is the right place to confirm the amended detail.
Granny Stripes Need Consistent Cluster Spacing
Visual alignment depends not only on the color repeat but also on consistent fabric width. If one section begins widening or narrowing, the stripes can make that change easier to notice. Periodically compare your fabric against the tutorial’s intended shape and your own measurements rather than waiting for the cardigan to be assembled.
A Smaller Color Repeat Creates a Busier Surface
Alternating colors frequently can emphasize every granny row, while longer runs of one shade make the texture calmer. Before buying or dividing yarn, decide whether you want the eye to notice individual bands or the overall silhouette first. A short sample with your intended sequence can answer that more reliably than looking at yarn balls together.
Original Tutorial and Creator Credit
Creator: Lanas y Ovillos in English
Crochet Black and White Striped Cardigan with Neon Ribbing
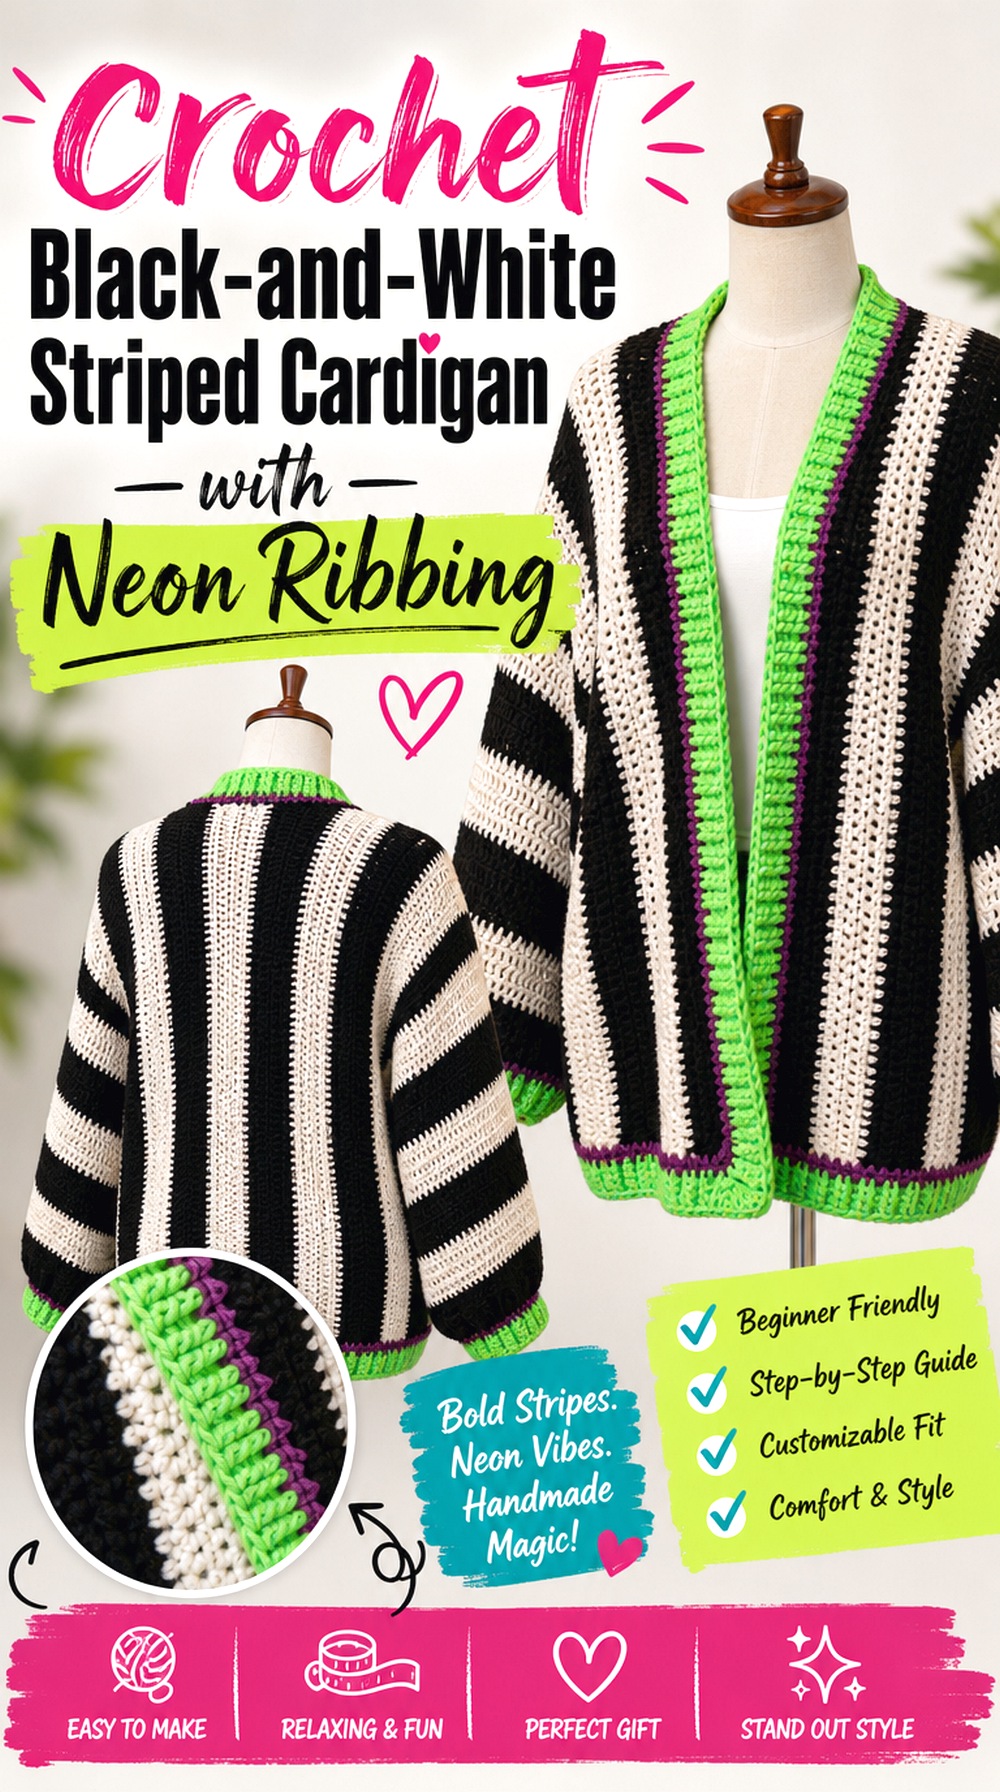
Amora’s striped cardigan uses a high-contrast black-and-white body with bright green and purple ribbing, showing how the borders can become a completely separate color story rather than simply repeating the stripe palette. The tutorial also covers body construction, sleeves, decreases, and a try-on before final ribbing and cuffs.
This is a strong reference for anyone who likes graphic stripes but does not want the entire garment restricted to two colors. The neon-toned edging demonstrates how cuffs and borders can behave almost like accessories attached to a more neutral striped base.
Contrast Ribbing Breaks Up a Two-Color Body
If the body already uses a strong black-and-white repeat, another saturated color at the edge immediately draws attention to the openings. Choose that accent deliberately. One border color will feel more unified, while using separate bright shades at different edges can make the cardigan more playful and asymmetrical.
Try the Body On Before Committing to the Edging
The tutorial includes a try-on point before the final ribbing and cuffs. Use that check for more than length. Look at how the fronts fall, where the shoulder sits, and whether the sleeves need the intended amount of room before adding finishing that will make later adjustments less convenient.
Sleeve Decreases Keep Bold Stripes From Feeling Boxy
A striped sleeve naturally emphasizes its width because every horizontal band acts like a measuring line to the eye. Follow the creator’s shaping rather than turning the sleeve into a straight tube by default. If you adapt the fit, keep comparing the actual sleeve circumference and mobility instead of reducing purely for appearance.
Original Tutorial and Creator Credit
Creator: Amora
Crochet Four Color Ribbed Striped Cardigan
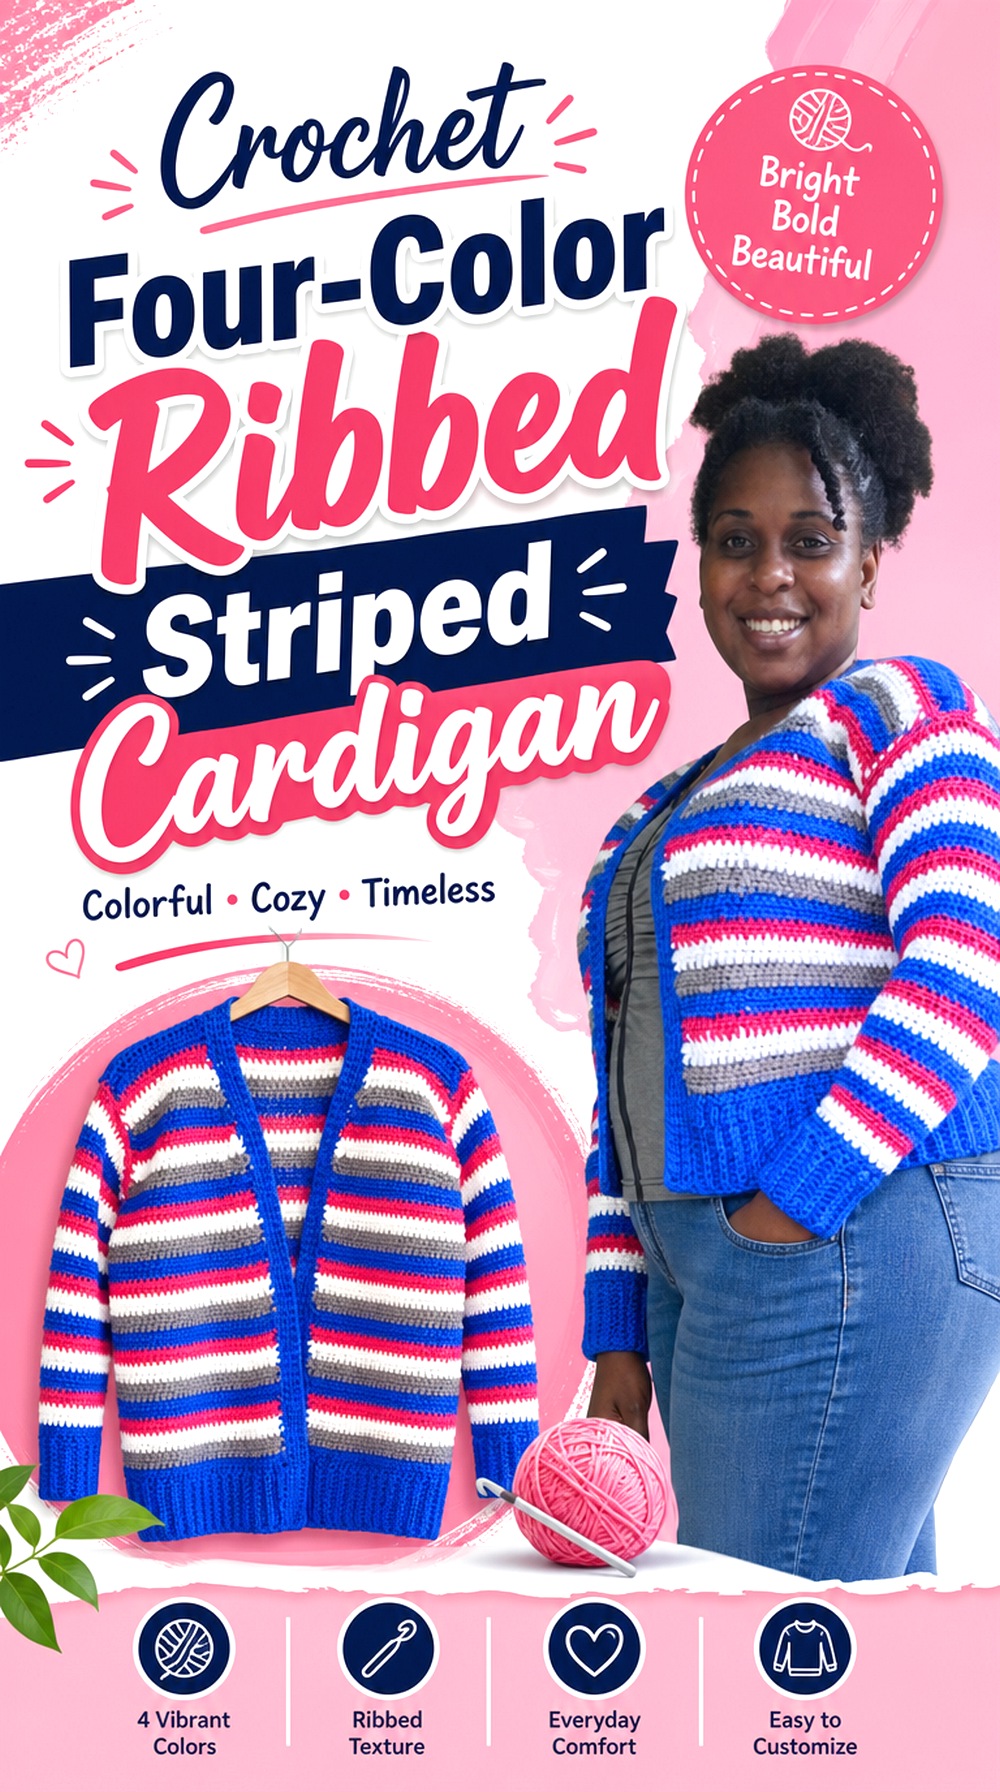
Keifa Krochets presents a striped cardigan tutorial using four yarn shades, with separate front and back sections, sleeves, ribbed borders, and a front band. The tutorial is labeled for sizes XS through 3XL.
Four colors create more planning choices than a two-color repeat because the order itself becomes part of the design. You can create an obvious repeating cycle, cluster similar shades together, or allow one dominant color to recur more frequently. Whatever approach you choose, decide it early enough that the front, back, and sleeves feel related.
Four Colors Need a Deliberate Repeat
Write the proposed color order down instead of relying on memory once several bands are complete. This is especially helpful if two shades are close enough to look similar in low light. A simple sequence also makes it easier to decide where to restart after shaping or when moving from the body to a sleeve.
Ribbed Borders Give the Palette a Resting Point
A single-color ribbed border can calm a four-color body and give the eye a visual endpoint. Alternatively, using one of the least prominent stripe colors at the edge can bring it forward without introducing a fifth shade. Place your finished body beside each border candidate before making that choice.
Check Panel Width Before Copying the Sleeve Stripe Rhythm
Body panels and sleeves have different proportions, so an identical stripe repeat may not look identical once worn. Decide whether the sleeve should reproduce the same sequence exactly or simply use the same palette. If symmetry matters, work both sleeves with a recorded color plan so the transitions correspond intentionally.
Original Tutorial and Creator Credit
Creator: keifa krochets 🧶
Crochet Made to Measure Sport Weight Striped Cardigan

Granny Gaia’s updated striped cardigan tutorial takes a made-to-measure approach and uses sport-weight yarn. The video covers measuring and calculations for the front and back sections, ribbing, color changes, shoulder connection, armholes, sleeves, and the finishing border.
This route makes sense when a standard size chart is less useful to you than building from your own measurements. It also suits someone who wants a lighter-looking striped fabric rather than the more substantial effect that can come from heavier yarn, provided the chosen substitute still meets the tutorial’s fabric requirements.
Made-to-Measure Still Needs a Clear Ease Decision
Your body measurement and your desired garment measurement are not automatically the same. Before following the tutorial’s calculation method, decide how close or relaxed you want the cardigan to feel. Compare with a cardigan you already like, and measure that garment in a similar position rather than choosing ease based only on a size label.
Sport-Weight Yarn Favors a Lighter Layer
The tutorial specifies sport-weight yarn. If you switch yarn categories, do not expect the same calculations or finished fabric to transfer unchanged. A thicker yarn can alter both gauge and physical weight, while an unusually firm substitute can reduce the drape. Swatch before making any made-to-measure calculation permanent.
Write Down Both Front-Panel Measurements Before Repeating
Made-to-measure construction gives you flexibility, but it also makes record keeping valuable. Note the actual measurements and color sequence of the first front so the second can be compared directly. Do not rely on remembered stitch totals alone, especially if you adjusted the first panel after measuring it on your body.
Original Tutorial and Creator Credit
Creator: Granny Gaia
Crochet Mohair Style Pink Striped Button Cardigan
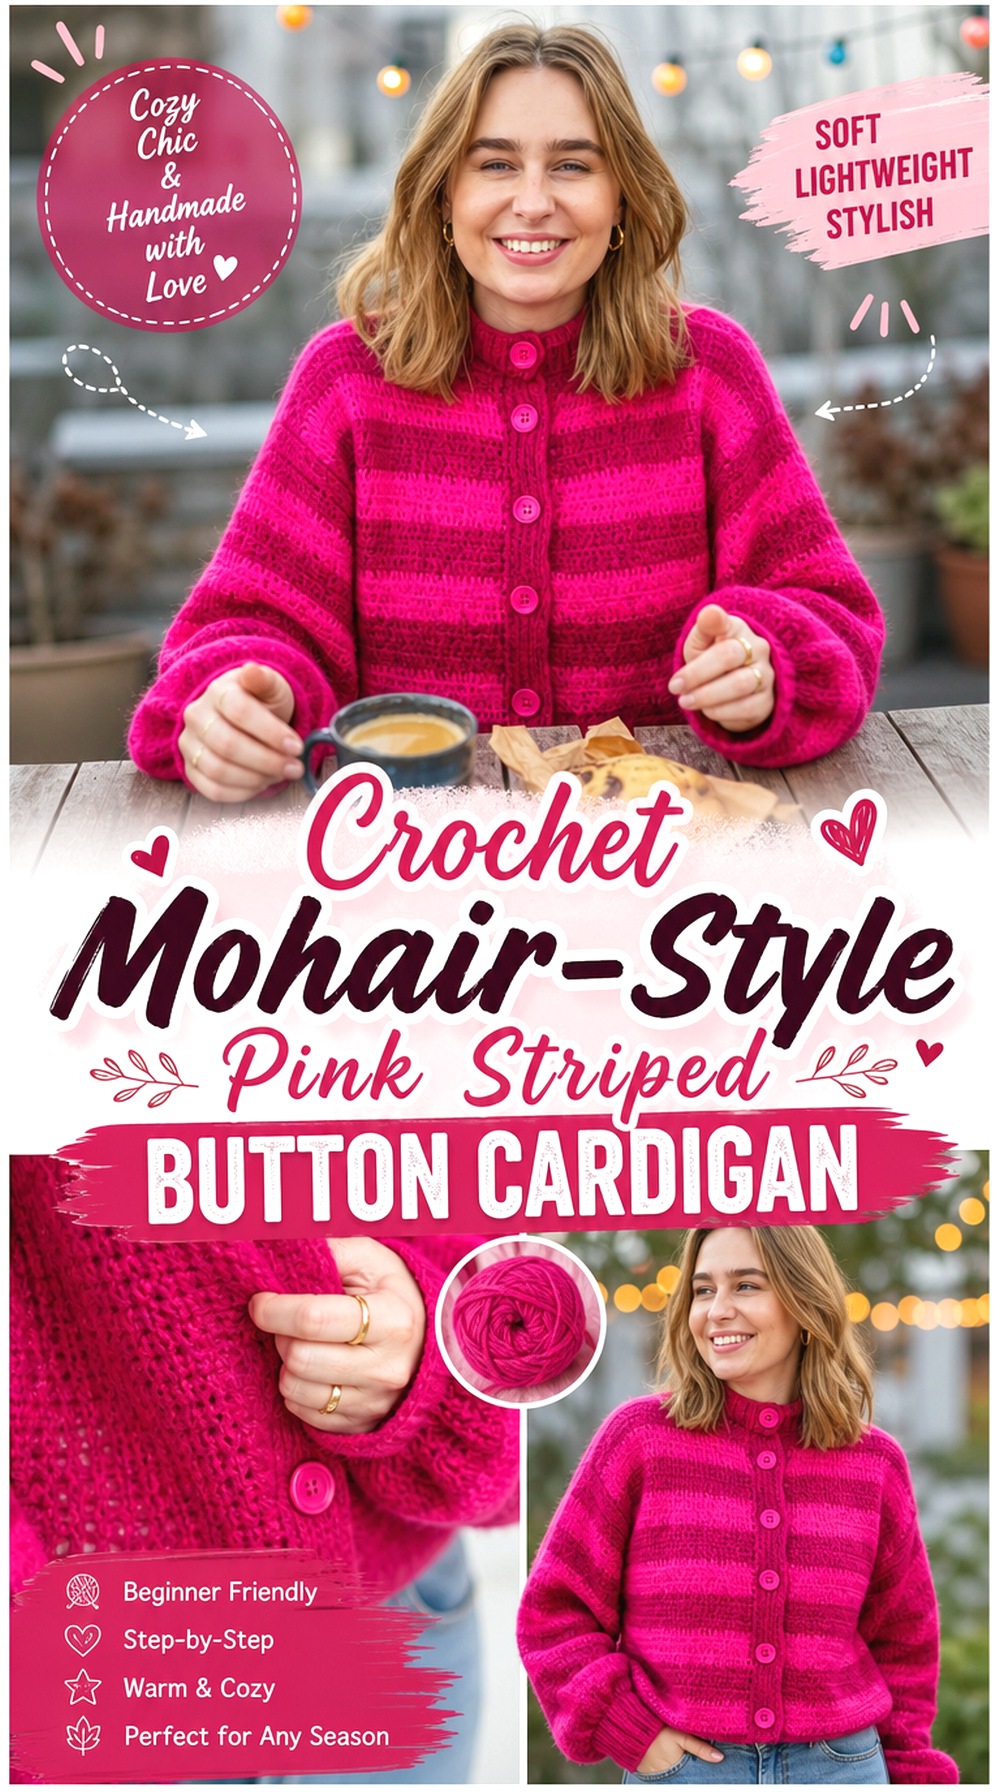
Katie Joslin’s striped cardigan uses pink and magenta shades with a soft, fuzzy yarn character and button-front finishing. Supporting project information describes the cardigan as made to measure and identifies a mohair-blend yarn, which gives the finished stripes a noticeably different surface from crisp cotton or smooth worsted styles.
This idea is less about sharp graphic bands and more about letting a halo soften the boundary between two related colors. It suits a palette where texture and tonal variation matter as much as stripe contrast.
Halo Yarn Blurs Hard Stripe Boundaries
Fuzzy fibers scatter the visual edge of a stitch, so closely related pinks can blend more gently than they would in a smooth yarn. If you want the stripes to remain obvious, test enough contrast in a swatch before committing. If you prefer a softer tonal effect, adjacent shades with similar values can make the texture the dominant feature.
Buttons Need Enough Stability in a Soft Fabric
A soft cardigan front still needs to support repeated buttoning without becoming visibly distorted. Follow the creator’s button and border construction, and check whether your substituted yarn produces a stable edge. If the fabric feels much looser than the tutorial’s example, changing only the button size will not solve the underlying tension difference.
Measure the Fabric After It Relaxes, Not Only on the Hook
Made-to-measure work depends on the fabric you actually create. A soft halo yarn can behave differently after handling or finishing, so use a representative swatch to understand its settled dimensions. Record measurements from the relaxed fabric and keep your measuring method consistent from panel to panel.
Original Tutorial and Creator Credit
Creator: Katie Joslin
Crochet Long Wide Stripe Oversized Cardigan
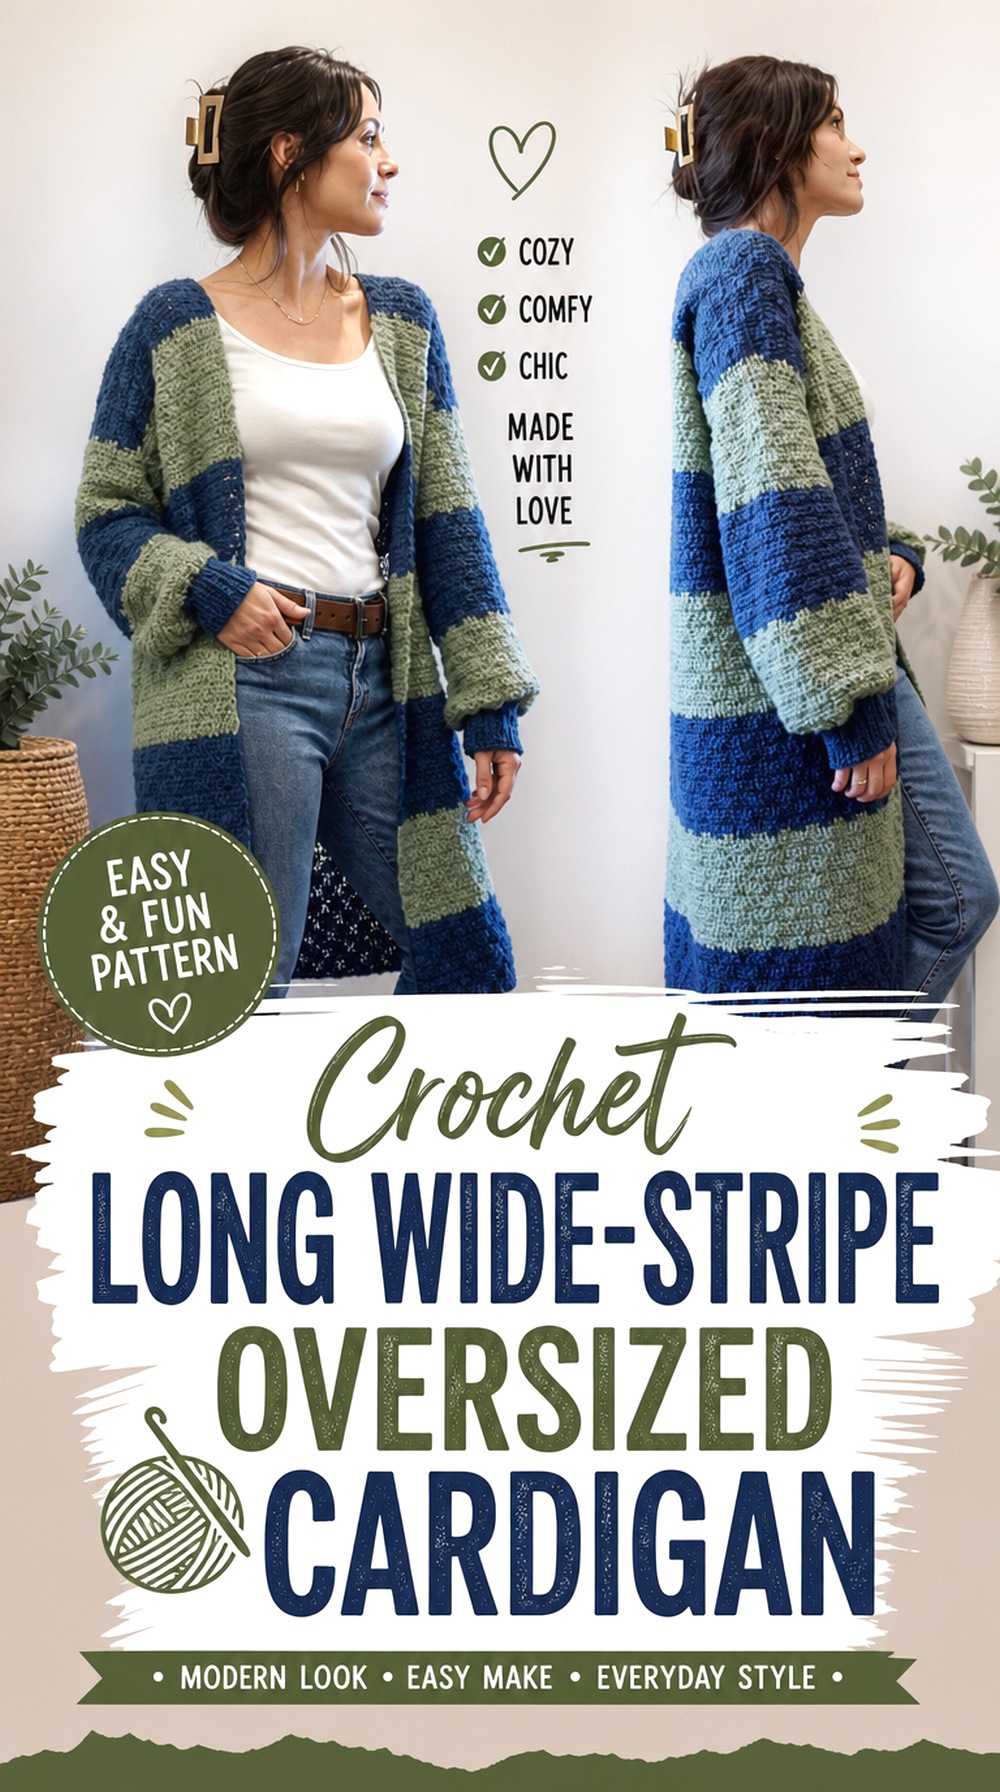
Megmade with Love’s striped cardigan uses a long, oversized silhouette that gives broad bands plenty of room to develop. Supporting project information describes a bottom-up construction, an almost seamless body apart from the shoulders, and sleeves worked in the round.
The proportions make this idea especially suited to wider stripes. Rather than repeating colors rapidly, each shade can occupy enough vertical space to become a major section of the garment. That can be useful when you want a bold palette but fewer color changes than a narrow-band design requires.
Wide Stripes Suit the Longer Body
A long torso offers room for broad bands to repeat without making the cardigan look divided into only two blocks. Before crocheting, estimate your intended garment length from the tutorial’s method and consider how many color sections you realistically want to fit within it. This is planning, not a substitute for the source pattern or gauge.
Bottom-Up Length Is the Main Customization Point
With a bottom-up garment, hem position is established early in the construction. If you want to alter length, compare your preferred finished measurement with the tutorial before assuming you can simply stop later. Armhole placement, stripe balance, and total proportions all need to remain coherent.
Watch Sleeve Stitch Counts Across Long Color Bands
Even when sleeves are worked in the round, shaping can affect how a broad stripe looks as the circumference changes. Follow the tutorial’s sleeve construction and judge the color sequence on the actual sleeve rather than copying the body’s band depth automatically. A narrower piece can make the same stripe width feel much larger.
Original Tutorial and Creator Credit
Creator: Megmade with Love
Crochet Unisex Buttoned Striped Cardigan
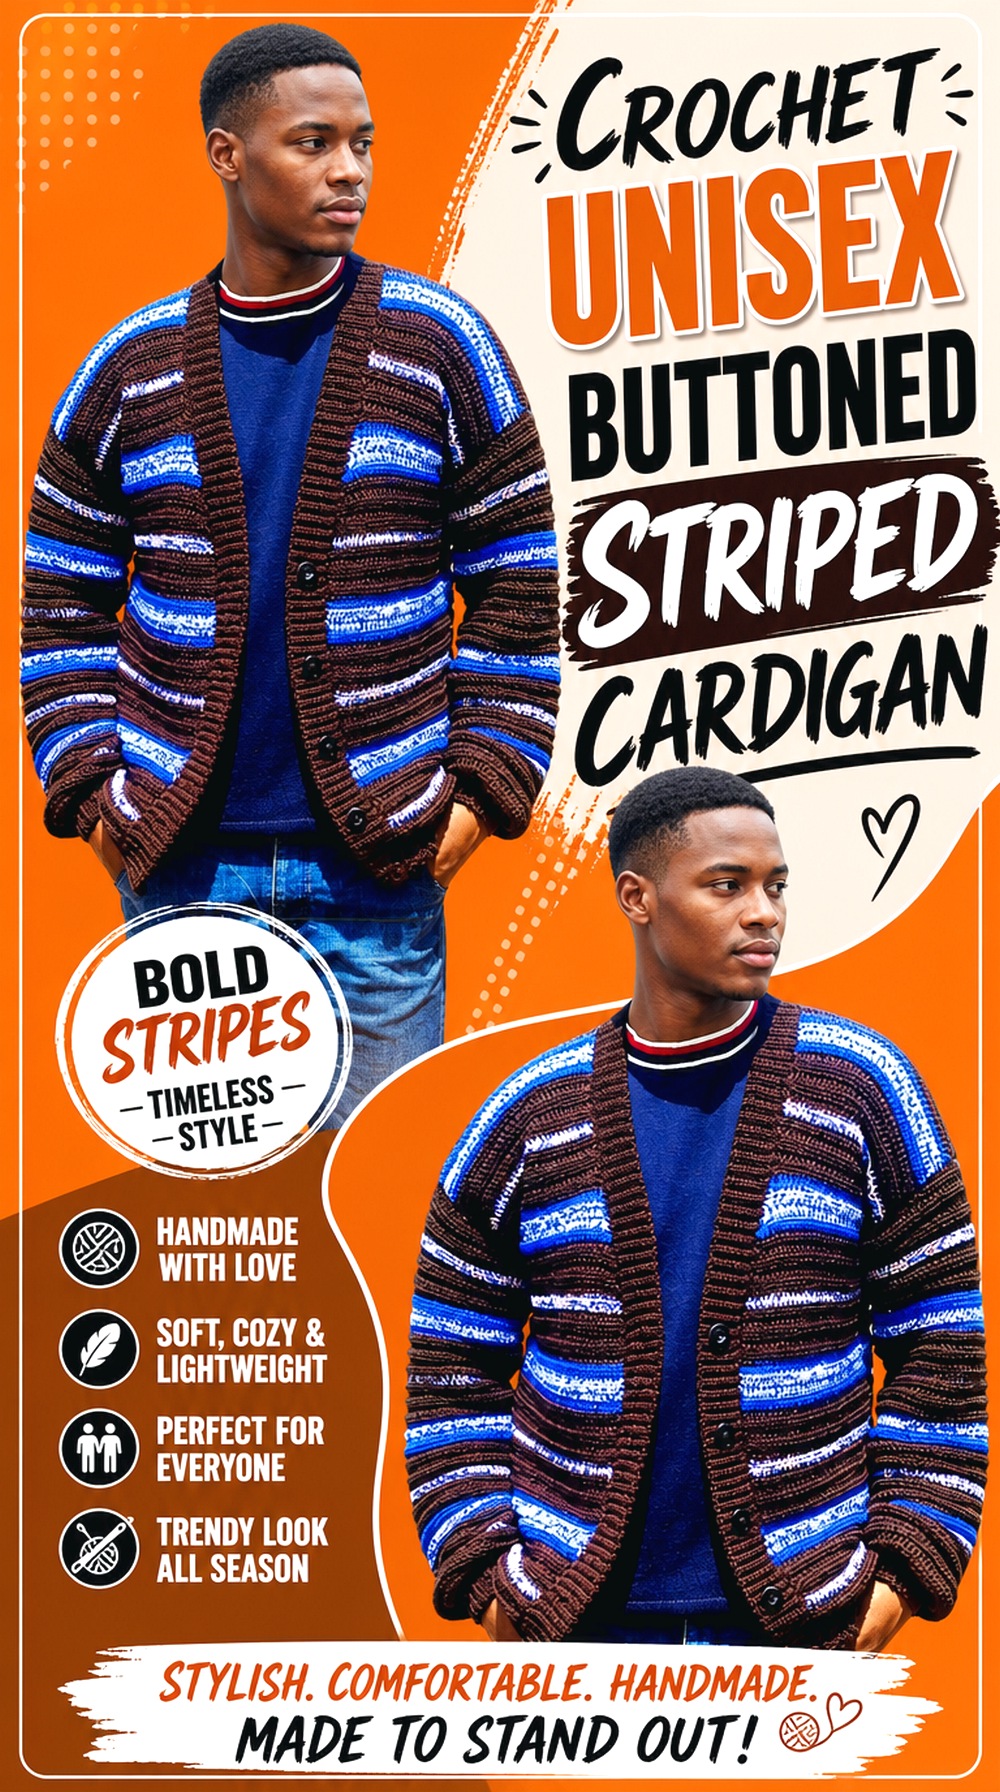
Ascarcrochets labels this tutorial as a unisex striped cardigan and includes a buttoned front, giving the project a straightforward wardrobe-oriented feel rather than a strongly cropped, lace, or oversized identity. The listed materials include medium-weight yarn, measuring tools, and buttons.
For your own version, keep the palette and proportions separate decisions. Neutral or saturated colors can both work; what matters more for fit is how the shoulders, body width, sleeve length, and buttoned front relate to the intended wearer.
A Straightforward Shape Supports Flexible Styling
For a cardigan intended to work across different styling preferences, avoid assuming that “unisex” corresponds to one universal set of dimensions. Measure the intended wearer or compare with a cardigan whose fit is already comfortable. Shoulder width and intended ease are more useful planning information than the gender category attached to a retail size.
Button Choice Changes the Front More Than the Stripe Plan
Buttons can become a quiet detail or a strong contrast against the striped fabric. Decide whether they should disappear into the dominant shade or stand out. More important, use a size and placement compatible with the creator’s buttonholes rather than selecting purely for appearance after the openings have already been made.
Compare Shoulder Width Before Adding Sleeve Length
A sleeve can have the correct length and still feel wrong if the shoulder starts too far inward or outward. Check the body fit before treating sleeve measurements as an isolated problem. With strong horizontal stripes, an awkward shoulder line may also become visually more obvious because the bands emphasize where the body transitions into the sleeve.
Original Tutorial and Creator Credit
Creator: Ascarcrochets
Crochet Lace Cardigan with Striped Border
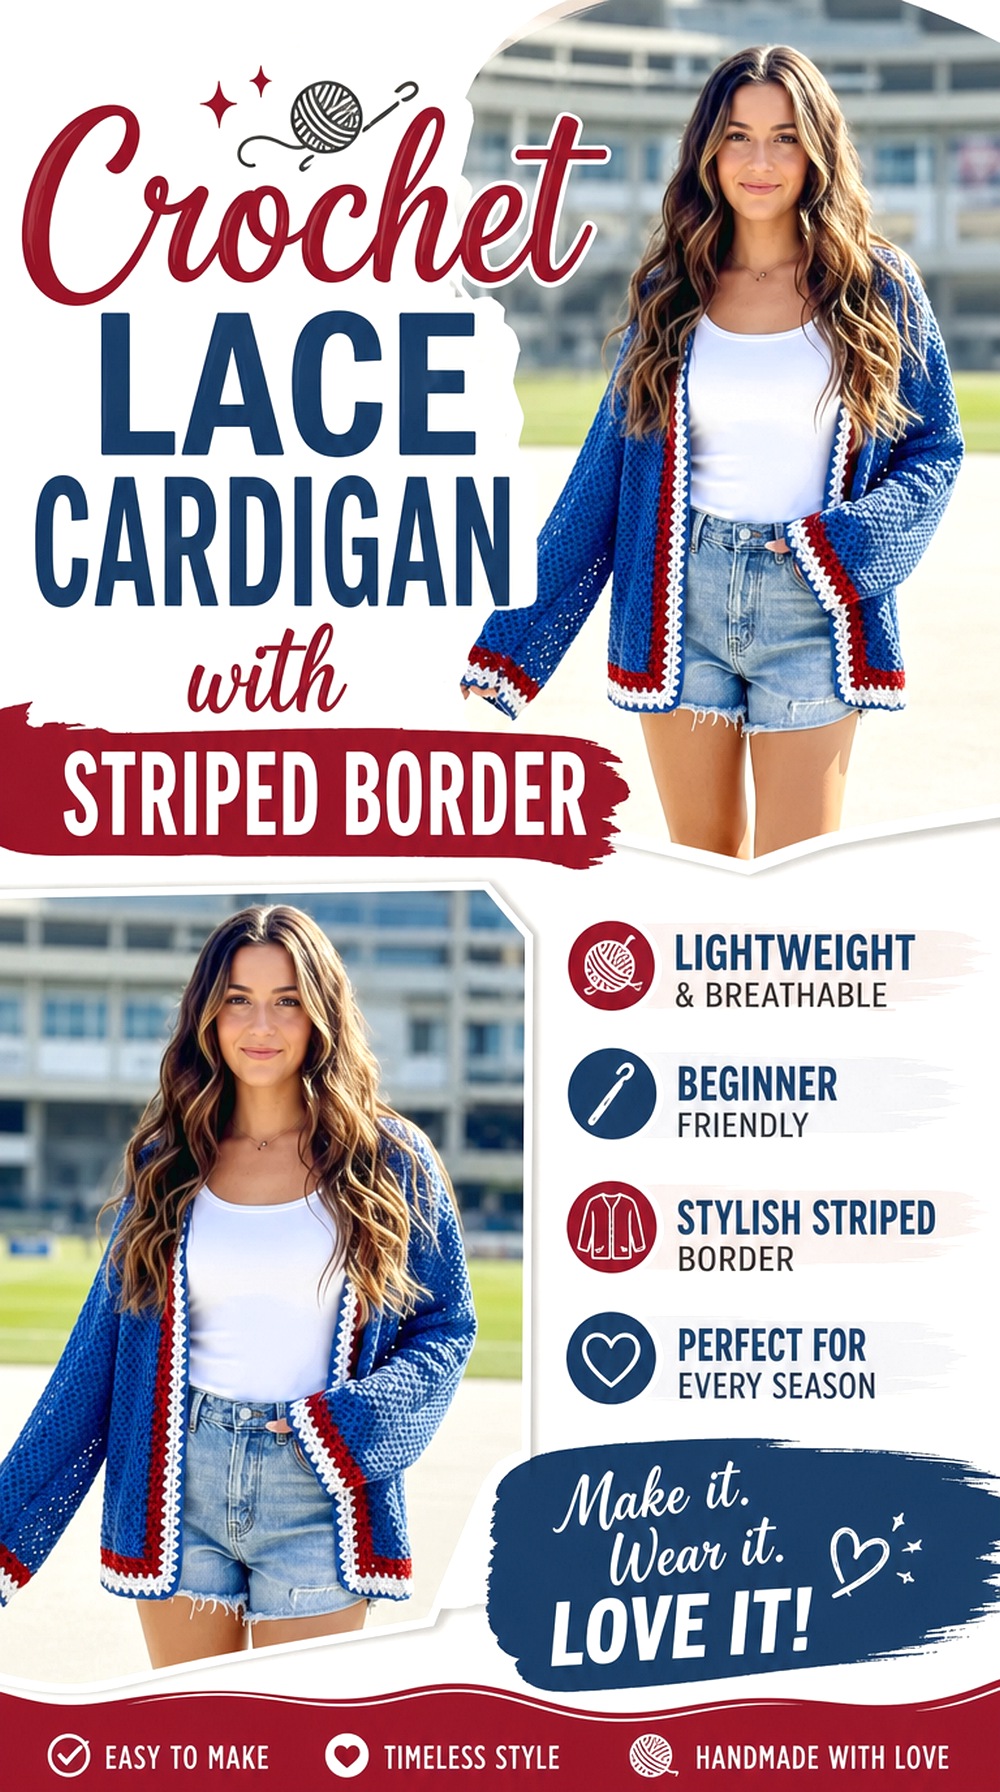
The Knotty Lace takes a different approach to stripes: the cardigan itself uses an open lace fabric, while red, white, and blue striping appears around prominent edge areas. Supporting information describes side-to-side panels and a V-stitch-based open fabric, so this option feels lighter and less stripe-dominant than the all-over banded cardigans above.
It is a useful reference when you like striped color accents but do not want every part of the garment divided into bands. The open body allows the border to become the strongest graphic feature.
Striped Edging Can Carry the Whole Color Story
You can create a recognizable striped cardigan without placing color changes across the entire body. Concentrating the palette around the front, neckline, or another edge keeps the central fabric quieter. This also gives you a clear place to use a high-contrast accent that might feel overwhelming if repeated across every row.
Open Lace Needs More Attention to Stretch
Open fabric contains more negative space and may respond differently to hanging than a dense stitch. Make a representative swatch and handle it the way you expect to finish the cardigan before deciding on dimensions. If you substitute a much heavier yarn, the lace may not preserve the same balance of openness and drape.
Side-to-Side Panels Make Length and Width Interdependent
When a panel is worked sideways, changing the starting dimension can affect a different part of the garment than it would in a bottom-up design. Study the tutorial’s orientation carefully before making a length adjustment. Mark which direction becomes the hem-to-shoulder span and which direction creates body width so you do not customize the wrong axis.
Original Tutorial and Creator Credit
Creator: The Knotty Lace
Crochet Soft Everyday Striped Cardigan
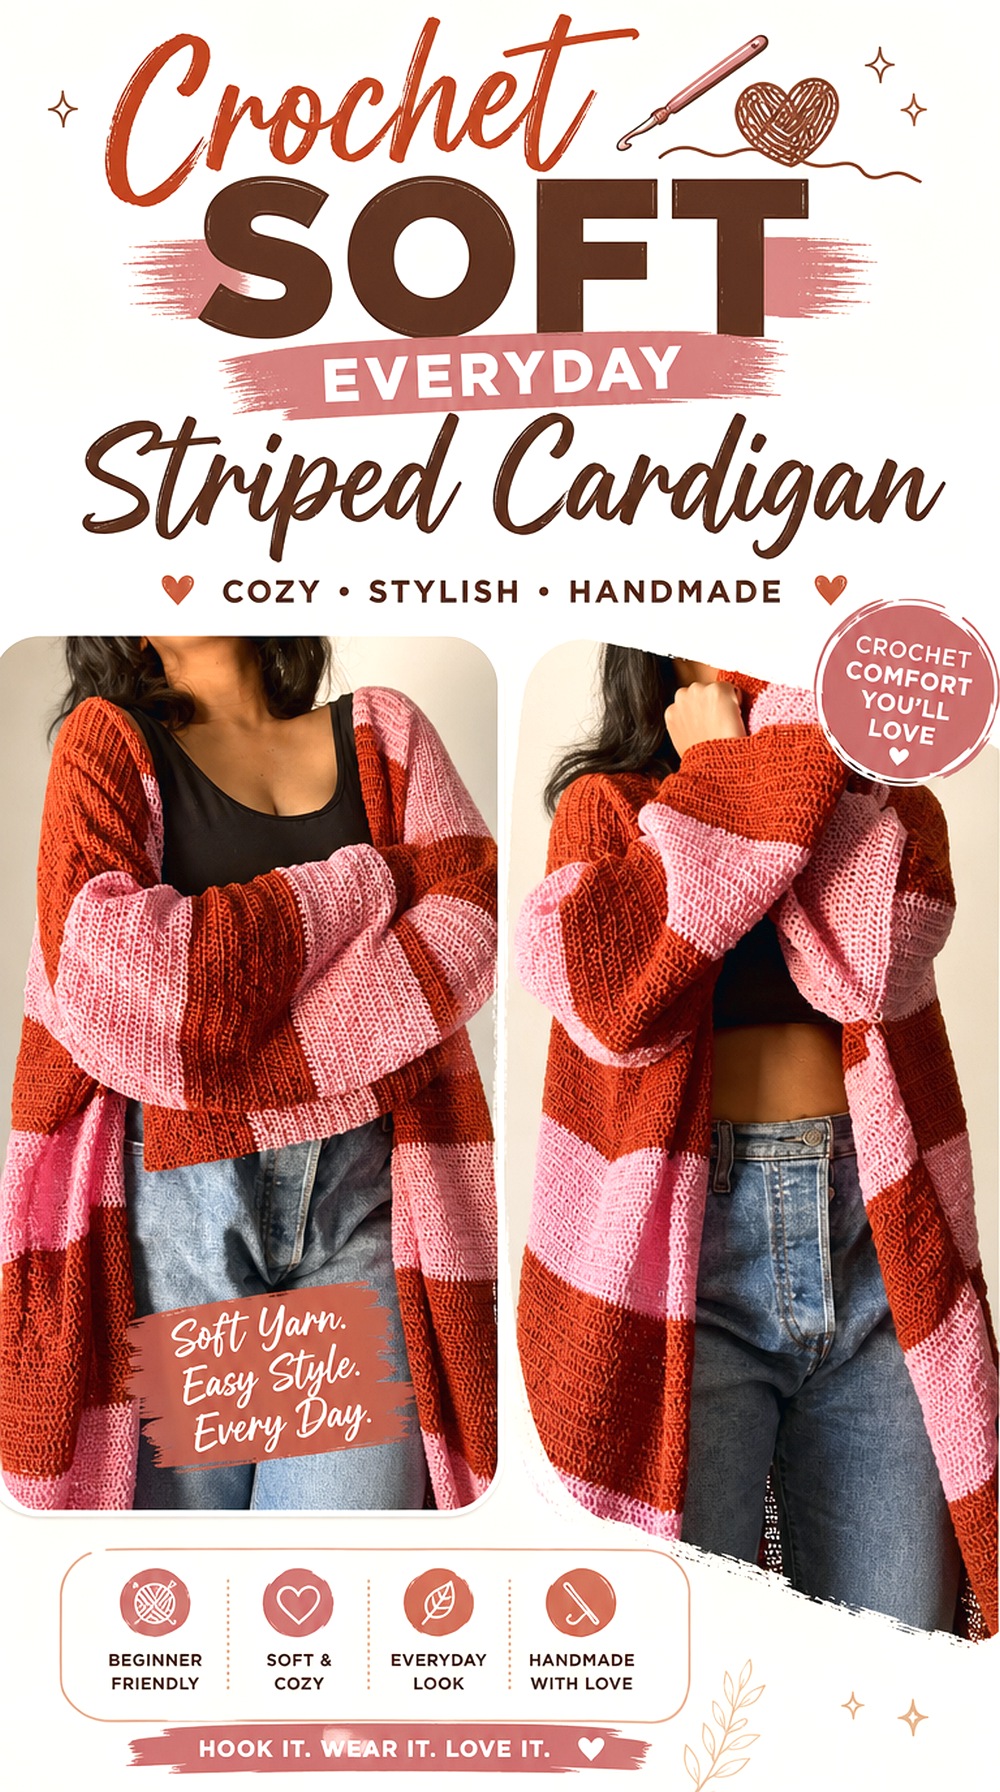
Ima’s tutorial presents a soft, comfortable striped cardigan with a full step-by-step video format. The available public description provides fewer construction and material specifics than several of the other tutorials in this roundup, so this is a project to choose by carefully viewing the finished silhouette and confirming the details you need before buying yarn.
That limitation can actually make the comparison clearer: do not infer fiber, exact dimensions, gauge, or sizing just from the finished appearance. Use the video itself to verify whether its construction method and proportions suit your plan.
Use the Finished Silhouette as Your Main Comparison
Before adopting the color scheme, look at where the hem falls, how much room the body appears to have, the shape of the sleeves, and how the front opening sits. Those visible features tell you more about whether this cardigan belongs in your wardrobe than the stripe colors alone. Then confirm the tutorial’s own measurement guidance rather than estimating from the screen.
Confirm Materials and Measurements Before Substituting Yarn
Because the public description is light on specifics, verify the creator’s stated yarn, hook, gauge, and sizing information within the tutorial or accompanying source before purchasing a substitute. A visually similar yarn can still create a different fabric. If a measurement you need is not stated clearly, measure from your own body or a comparable garment instead of inventing a number.
Crochet Baby Granny Stripe Button Cardigan
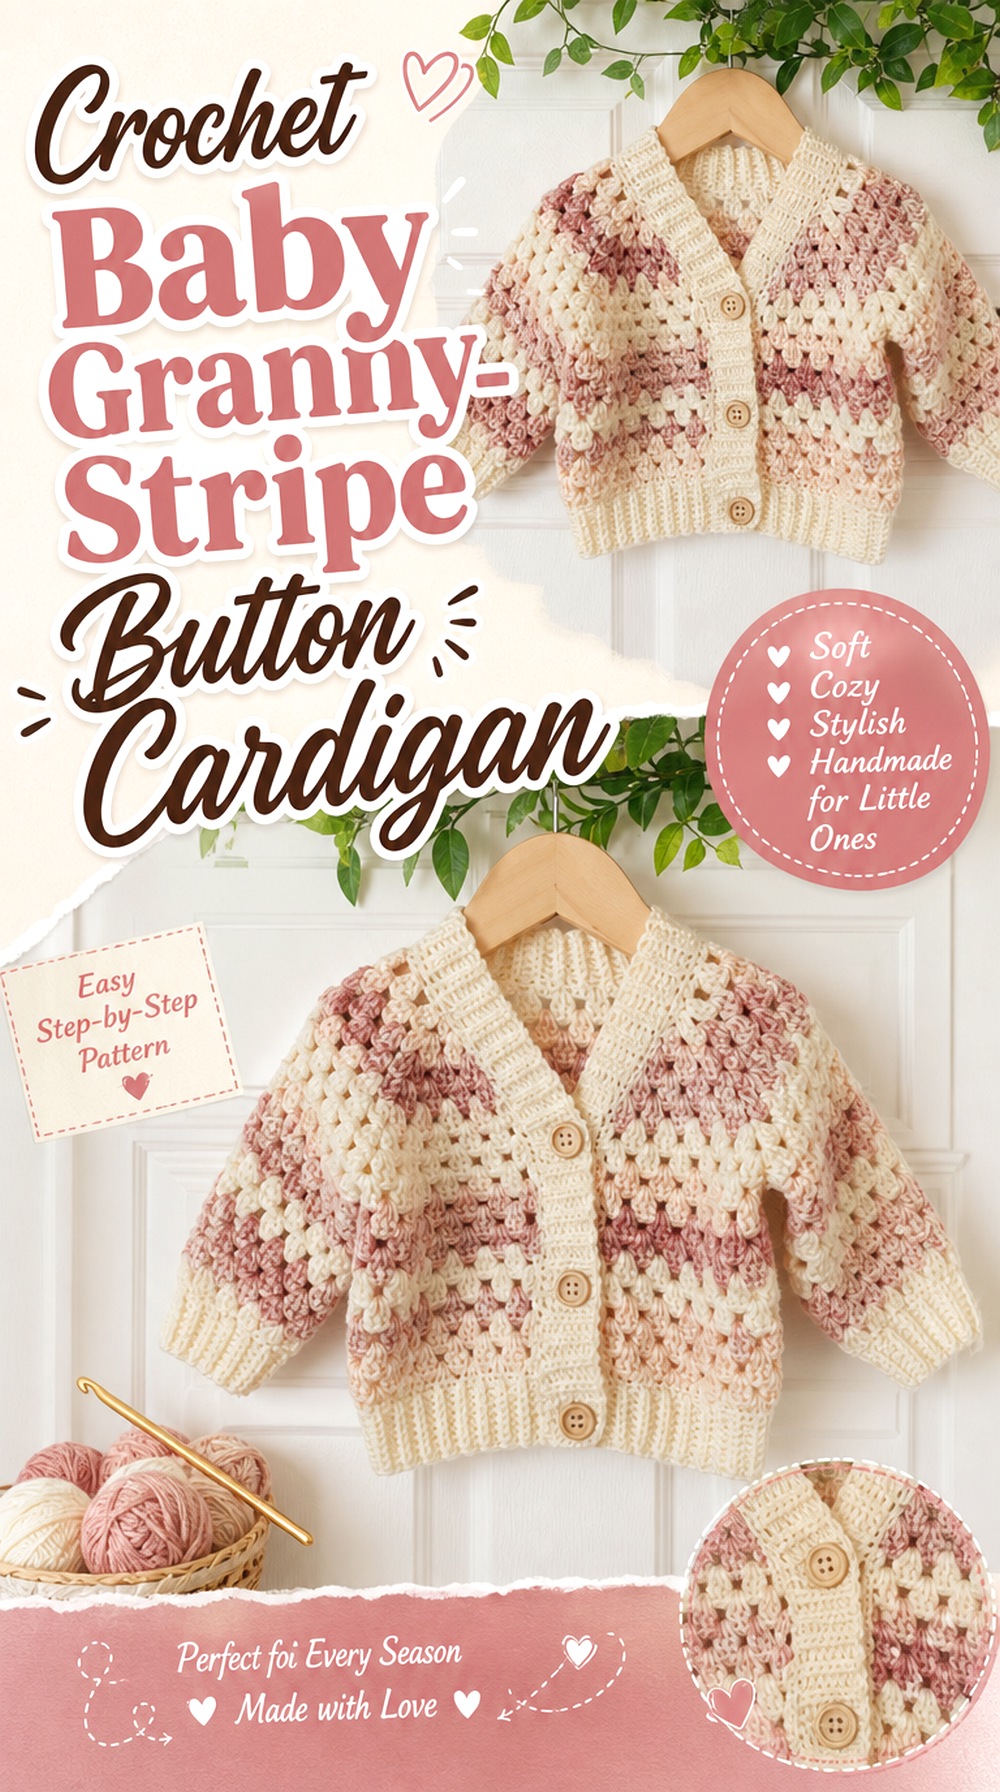
BabyCrochetDesigns brings the striped cardigan idea down to baby scale with a granny-stripe design and optional buttons. The tutorial is demonstrated for a specific baby size and uses written instructions on screen without spoken audio; the creator also points to other sizing information separately.
This project should be approached differently from an adult cardigan. Small changes in gauge can matter significantly at baby scale, so use the intended size information rather than shrinking an adult granny cardigan by eye. The open granny texture and small front buttons also deserve practical consideration for the intended wearer.
Baby Sizing Should Be Verified, Not Scaled by Guesswork
The tutorial demonstrates a specific baby size, so use the creator’s sizing information for the size you need rather than multiplying or reducing dimensions informally. Babies also vary considerably in proportions. If you are making the cardigan for a particular child, compare the relevant garment measurements with something that currently fits them when possible.
Open Granny Spaces Change the Warmth and Look
Granny stripes create visible openings in the fabric, which makes this cardigan different from a densely stitched baby layer. Consider the intended layering and season rather than assuming every crochet cardigan provides the same amount of coverage. Yarn choice should also be based on the creator’s requirements and the yarn manufacturer’s care information.
Buttons Need Secure Attachment for Baby Wear
Any small detachable component on baby clothing deserves careful attention. If you use buttons, attach them securely and inspect them regularly for loosening. If loose parts are a concern for the intended use, consider the tutorial’s button-free option instead. Do not treat a handmade fastening as automatically suitable for unsupervised use simply because it is crocheted.
Original Tutorial and Creator Credit
Creator: BabyCrochetDesigns
Which Striped Cardigan Style Should You Choose?
Start with silhouette rather than palette. For a familiar buttoned shape, the two-color Cat Kemble cardigan or Ascarcrochets unisex version keeps the construction recognizable. The AC Crochets drape cardigan and The Knotty Lace design are better references when you want movement, openness, or a less conventional stripe direction.
Choose the oversized granny or moss-stitch cardigans when relaxed proportions matter most. The rainbow scrap cardigan and Megmade with Love option make better starting points for a longer statement layer, while the MJ’s Off The Hook Designs cardigan adds functional pockets and stronger texture. If personal measurements are your priority, Granny Gaia and Katie Joslin provide made-to-measure routes. For color itself, the four-color, neon-ribbed, and broad color-block ideas give you three very different ways to make the palette dominant.
Conclusion
The most useful striped cardigan choice is the one whose construction matches the way you want to wear it. Pick a button-front design for a more defined closure, a draped or lace version for a lighter-looking layer, a long cardigan for larger bands, or a granny-stripe style when texture should be as visible as color. Made-to-measure tutorials are worth considering when fixed sizing is less useful, while pockets, contrast ribbing, and edge-only stripes can change the function or emphasis without changing the entire garment.
Once you have chosen the silhouette, plan the stripe width, yarn behavior, and finishing colors around it. Use the original tutorials near each idea for exact construction, measurements, and creator-specific details.
Frequently Asked Questions
How do I choose stripe width for a crochet cardigan?
Think about garment length and how visually active you want the surface to be. Narrow stripes create frequent color changes and a stronger rhythm, while broad bands give each color more space and can look closer to color blocking. On a short cardigan, very wide stripes may allow only a few transitions. A long cardigan gives broader bands more room to repeat. Swatch the actual color sequence before deciding from yarn balls alone.
Do cardigan stripes need to line up at every seam?
No. Some designs intentionally offset stripes or change their direction because of the construction. However, if two front panels or sleeves are meant to look symmetrical, deliberate alignment often produces a cleaner result than an almost-matched transition. Lay pieces beside each other before joining and decide whether the relationship looks intentional. Follow the tutorial whenever alignment depends on shaping or a creator-specific assembly method.
Can I substitute yarn in a striped cardigan tutorial?
You can consider a substitute, but matching the yarn-weight label alone does not guarantee the same cardigan. Fiber, twist, elasticity, and stitch pattern can all affect gauge, drape, and garment weight. Make a swatch using the tutorial’s stitch pattern and at least two of your planned colors, then compare it with the source requirements. If the tutorial gives gauge or fabric measurements, use those rather than assuming the original hook size will work unchanged.
How can I keep a long striped crochet cardigan from feeling too heavy?
Start by assessing the fabric before making the full length. A dense stitch and heavier yarn can accumulate more physical weight across a long body, while a lighter or more open fabric may hang differently. Make a representative swatch and observe its drape after finishing. Also consider whether you need dense pockets, heavy borders, or other added fabric. Do not remove structural elements from a tutorial without checking how they contribute to the design.
Are granny stripes interchangeable with solid crochet stripes?
Not automatically. Granny stripes contain open spaces and clusters, so their gauge, stretch, coverage, and drape can differ from a solid stitch even when both use the same yarn. Replacing one with the other without recalculating can change panel dimensions and fit. It is safer to use a tutorial designed for the stitch structure you want or independently recalculate the garment from your own blocked gauge.
What should I check when making a striped cardigan for a baby?
Use sizing information intended for the baby’s actual size rather than reducing an adult garment by eye. Check gauge carefully, follow the yarn manufacturer’s care guidance, and consider how open the stitch pattern is for the intended season and layering. Buttons or other small components should be attached securely and inspected regularly; if loose parts are a concern, a fastening-free version may be more appropriate.